
How to Check the Freon Level in Your Car?
Introduction
Your car’s air conditioning system keeps you cool and comfortable during hot summer drives. The refrigerant, commonly called freon, is the lifeblood of that AC system. When your car’s air conditioning stops blowing cold air, one of the first things you should check is the freon level. The good news? You don’t need to be a mechanic to understand this process. In this guide, I’ll walk you through everything you need to know about checking your vehicle’s refrigerant level, all explained in simple terms that anyone can understand.
What Is Freon and Why Does It Matter?
Let’s start with the basics. Freon is a brand name for a type of refrigerant used in air conditioning systems. The refrigerant is a special chemical that absorbs heat from inside your car and releases it outside. It flows through your AC system in a continuous cycle, making your car cool and pleasant inside.
Your car’s refrigerant doesn’t just disappear or get used up like gasoline. It stays in your system and keeps cycling around. However, small leaks can happen over time. These leaks cause the refrigerant level to drop. When the freon level gets too low, your air conditioning won’t work properly. You’ll notice your AC blowing warm air instead of cold air, or it might not blow air at all.
The refrigerant in your car is one of the most important parts of your air conditioning system. Without enough refrigerant, the entire AC system fails. It’s like trying to cook without water – things just don’t work right. That’s why checking your refrigerant level is so important.
Signs Your Car Might Be Low on Freon
Before you start checking the freon level, you should know what to look for. These signs tell you your air conditioning system might have a problem:
Your air conditioner blows warm air instead of cold air. This is the most obvious sign. When you turn on the AC, you expect cold air, not lukewarm air.
The AC system runs but doesn’t cool effectively. You feel some air coming out, but it’s not as cold as it should be. Your car takes forever to cool down.
You hear strange noises coming from your AC system. These might include hissing, clicking, or squealing sounds. Strange noises often mean something is wrong.
Your AC works sometimes but not all the time. One day it’s cold, the next day it’s warm. This inconsistency points to refrigerant problems.
You notice oily spots or residue around AC components. Refrigerant leaks sometimes leave an oily residue behind. This shows your system is leaking.
Your air conditioning compressor doesn’t engage. When you turn on the AC, the compressor should kick on automatically. If it doesn’t, low refrigerant is often the culprit.
If you notice any of these signs, it’s time to check your freon level. Most of the time, these problems mean your refrigerant is running low.
Different Types of Refrigerant in Cars
Not all cars use the same type of refrigerant. You need to know which type your car uses before you check the level or add freon. Your car probably uses one of these types:
R-134a is the most common refrigerant in cars made after 1995. It replaced the older R-12 refrigerant because R-12 was bad for the environment. If your car is relatively new, it almost certainly uses R-134a. This is the standard refrigerant you’ll find in most vehicles on the road today. Many people just call this “freon” even though that’s technically a brand name.
R-12 was the old refrigerant used in cars before the mid-1990s. Many older vehicles still use this type. You can’t buy new R-12 anymore because it harms the environment, so if you have an old car with R-12, it’s becoming harder to maintain.
R-1234yf is a newer refrigerant starting to appear in modern cars. Some manufacturers switched to this type because it’s more environmentally friendly than R-134a. If you have a newer luxury car or a recent model from some manufacturers, it might use this type.
The most important thing is to know which type your car uses. You can find this information in your owner’s manual. You can also check a label under the hood near the AC components. This label tells you exactly which refrigerant your car needs.
Tools You’ll Need to Check Your Freon Level
To check your car’s refrigerant level, you’ll need some basic equipment. Fortunately, this isn’t expensive, and you can buy most of these items at any auto parts store.
An AC pressure gauge is the most important tool. This gauge measures the pressure of the refrigerant in your system. There are two types: single gauges and manifold gauges. For beginners, a simple single gauge works fine. Manifold gauges cost more and let you measure both high and low pressure simultaneously, which is more precise. You can find basic single gauges for less than fifty dollars.
A manifold gauge set includes both a high-pressure gauge and a low-pressure gauge. These sets cost more, usually between one hundred and three hundred dollars. They also come with hoses that connect to your AC system. If you plan to check your AC often, investing in a manifold set is worth it.
Adapter fittings might be necessary depending on your car’s model. Different cars have different connection points. Sometimes you need adapters to connect your gauge to these points. Your auto parts store can help you find the right adapters for your specific vehicle.
A thermometer helps you understand if your AC system is working correctly. You place it near your AC vents to measure the temperature of the air coming out. Cold air should be around thirty-five to forty-five degrees Fahrenheit.
Safety glasses protect your eyes when working with refrigerant. Even though you’re just checking the system, safety is important.
Gloves keep your hands safe and clean. Refrigerant can be cold and potentially irritating to skin.
Your car’s owner’s manual tells you the exact pressure specs your refrigerant should be at. You’ll need this information to know if your level is correct.
Step-by-Step Guide to Checking Your Freon Level
Now let’s get to the practical stuff. Here’s how to check your car’s refrigerant level step by step.
Step 1: Prepare Your Vehicle
Turn off the engine and let it cool down. Don’t check the freon level while the engine is hot or running. You need to work on a cool car for safety reasons. Wait at least thirty minutes after the engine was last running if you’ve been driving.
Park your car in a well-ventilated area. Never work in a closed garage. You need fresh air while working with refrigerant.
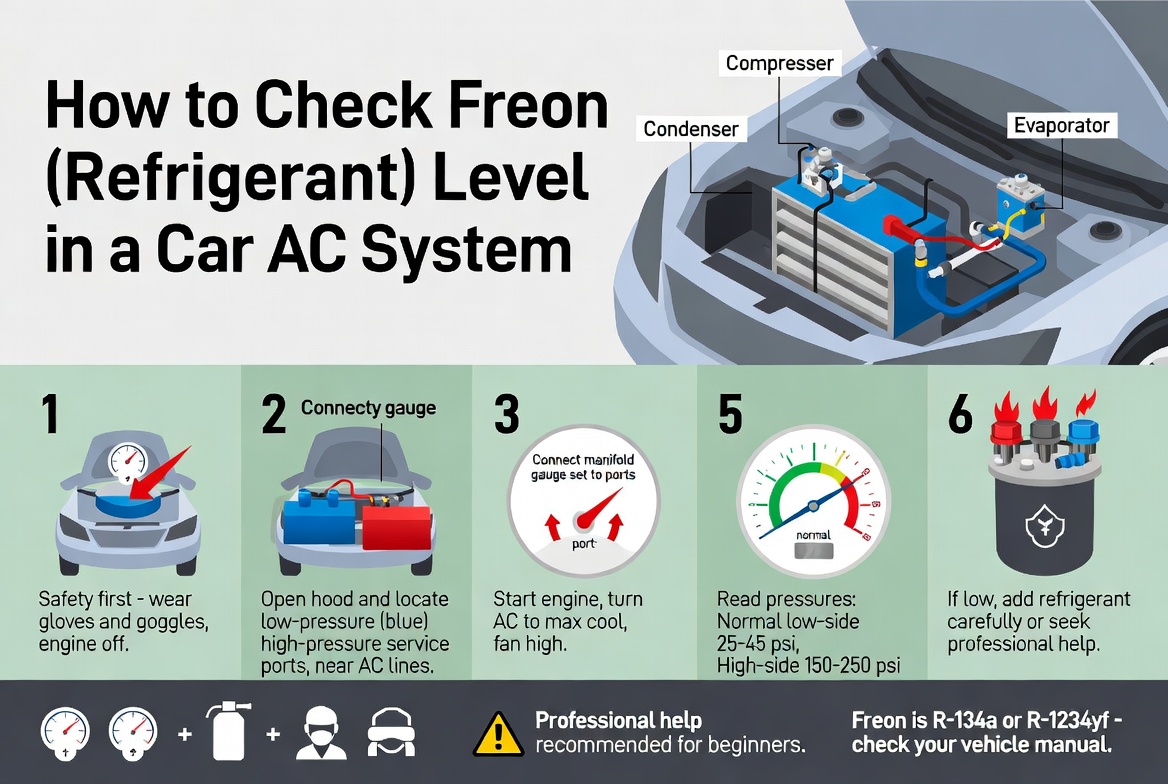
Pop the hood and look for the AC components. The main parts you’ll see are the compressor, the condenser, and the low-pressure port. The low-pressure port is what you’ll connect your gauge to. It usually has a cap on it. This is located on the larger diameter hose coming from the compressor. Find this port and remove the cap.
Step 2: Understand the Pressure Specs
Look in your owner’s manual to find the recommended pressure for your refrigerant. The specs are usually listed in pounds per square inch, or PSI. You’re looking for two numbers: the low-side pressure and the high-side pressure.
The low-side pressure is what you’ll measure when the engine is off. This is usually between thirty and fifty PSI for most cars using R-134a. Your specific car might be different, so check your manual.
The high-side pressure is measured when the engine is running. This is usually between two hundred and three hundred PSI. Again, your car might be different. Always check your manual for your exact vehicle’s specs.
Write down these numbers so you can refer to them while you’re working.
Step 3: Connect Your Gauge
Take your pressure gauge and connect it to the low-pressure port. This is the port you just uncovered. The connection should be firm but not super tight. Finger-tight usually works fine.
The gauge needle should move and settle at a specific pressure reading. This reading tells you if your refrigerant level is correct.
If the gauge doesn’t move or doesn’t register properly, you might have a dead battery in the gauge, or the connection might not be tight enough. Try reconnecting and check again.
Step 4: Read the Gauge
Now comes the important part. Look at where the needle is pointing. The gauge has different zones marked. Most gauges have a green zone that indicates normal pressure and a red zone that indicates dangerous pressure.
If the needle sits in the green zone and matches your manual’s specs, your freon level is good. Your AC system probably has other problems if the freon isn’t the issue.
If the needle sits in the red zone or reads lower than your manual recommends, your refrigerant is low. This means you probably have a leak, or the system needs refrigerant added.
Some gauges have both a high-side and low-side scale. Make sure you’re reading the correct scale for what you’re measuring.
Step 5: Check at the Right Engine Status
For the most accurate reading, you should check the pressure with the engine running and the AC turned on. This gives you a real picture of how your system is performing under normal conditions.
Start the engine and turn on the air conditioning. Let the system run for a few minutes. The compressor should kick in and engage. Once everything is running, reconnect your gauge.
With the engine running and AC on, take another pressure reading. Compare this to your manual’s high-side pressure specs. This reading should be higher than when the engine was off.
If the pressure is too low even with the engine running, your refrigerant is definitely low.
Step 6: Use a Thermometer to Double-Check
Place a thermometer in your AC vent to measure the temperature of the air coming out. Put it between the two AC vents in your car if you can. Don’t put it directly on a vent, as it might not get an accurate reading.
Let the air blow over the thermometer for a minute. The temperature should drop to around thirty-five to forty-five degrees Fahrenheit. If the air is warmer than this, your AC system isn’t working properly. Low refrigerant is often the cause.
Step 7: Disconnect Your Gauge
Once you’ve taken your readings, carefully disconnect the gauge from the low-pressure port. Turn it counterclockwise slowly until it comes free. Don’t force it, as you might damage the port.
Replace the cap on the low-pressure port to keep it clean and protected.
Store your gauge in a safe, dry place where it won’t get damaged.
What the Pressure Readings Mean
Understanding what your gauge readings tell you is crucial. Here’s a breakdown of common scenarios:
If your pressure reads in the normal range according to your manual, congratulations. Your refrigerant level is fine. If your AC still isn’t working, the problem is something else. Your compressor, expansion valve, or another component might be broken.
If your pressure reads lower than recommended, your system is low on refrigerant. You probably have a leak somewhere. You can choose to add refrigerant, but if there’s a leak, it will leak out again eventually. Finding and fixing the leak is the real solution.
If your pressure reads higher than recommended, you might have too much refrigerant, or the system might be clogged. You should have a professional mechanic look at this. Don’t try to solve this problem yourself.
If your gauge shows no pressure at all, your system might be completely empty, or there might be a blockage. This situation needs professional help.
Can You Add Freon Yourself?
Many people ask if they can add refrigerant themselves. The answer is mostly yes, but there are important things to know.
You can buy cans of refrigerant at most auto parts stores. These cans come with a basic hose and gauge built in. They’re designed for DIY use and cost between thirty and fifty dollars. These are called DIY refrigerant kits.
Using one is relatively simple. You attach it to the low-pressure port just like you did with your gauge. Then you follow the instructions on the can. Usually, you hold down a trigger to release refrigerant into your system while watching the pressure gauge on the can.
However, there are reasons to be cautious. First, if you add too much refrigerant, you can damage your compressor. Second, if your system has a leak, adding refrigerant is only a temporary fix. The refrigerant will leak out again within days or weeks.
The best approach is to check your system regularly. If you find it’s low, take your car to a professional mechanic. A professional can find the leak and fix it properly. They can also add the correct amount of refrigerant with the right equipment.
If you want to try adding refrigerant yourself, follow the can’s instructions carefully. Don’t guess about amounts. Measure and be precise.
When to See a Professional
Sometimes you should definitely see a professional instead of doing it yourself. Here are situations where professional help is necessary:
Your gauge shows extremely low pressure or no pressure at all. This means your system might be completely empty or severely damaged. A professional needs to find out why and fix it properly.
You suspect a refrigerant leak. Finding leaks requires special equipment that most people don’t have. Professionals use special dyes and detection tools to find even tiny leaks.
Your AC compressor isn’t engaging when you turn on the AC. The compressor is an expensive part, and problems with it need professional diagnosis and repair.
Your system keeps running low on refrigerant even after you add it. This clearly indicates a leak. A professional will find and repair the leak so you don’t have to keep adding refrigerant.
You notice oily residue around AC components. This suggests a leak, and you need a professional to locate and fix it.
Your AC system makes strange noises. Unusual sounds might indicate mechanical problems that need professional attention.
You’re not confident about checking the pressure yourself. There’s no shame in taking your car to a professional. They have the right tools and experience.
Common Mistakes to Avoid
When checking your freon level, avoid these common mistakes:
Don’t forget to check your owner’s manual for the correct pressure specs. Every car is different. Using generic numbers can lead to wrong conclusions.
Don’t check the pressure with a hot engine. Wait for your car to cool down. Hot engines give inaccurate readings.
Don’t force connections. The gauge connection should be hand-tight, not super tight. You can damage the port by over-tightening.
Don’t guess about which refrigerant type your car uses. Using the wrong type can damage your system. Always verify the type before adding anything.
Don’t add too much refrigerant. More isn’t better. Too much refrigerant damages your compressor. Add small amounts and measure as you go.
Don’t ignore leaks. If your system keeps running low on refrigerant, there’s a leak. Finding and fixing the leak is the real solution, not just adding more refrigerant.
Don’t work on your AC system if you’re not comfortable. If something feels unsafe or you’re not sure what you’re doing, stop and call a professional.
Don’t skip the thermometer check. Measuring the temperature of the air coming out of your vents confirms whether your system is actually working right.
Maintaining Your Air Conditioning System
Keeping your AC system healthy prevents problems down the road. Here are maintenance tips:
Run your AC regularly, even in winter. Most people think AC is only for summer, but running it occasionally keeps the system lubricated and working smoothly. Run it for a few minutes every month at least.
Keep your condenser clean. The condenser is the part that releases heat from the refrigerant to the outside air. Dirt and debris can block it. Rinse it gently with a hose. Don’t use high pressure, as you can damage the fins.
Check your AC pressure gauge readings every six months. Regular checks help you catch problems early before they become expensive.
Have your system professionally serviced every few years. A professional can do a thorough inspection and catch problems you might miss.
Check for leaks regularly. Look for oily residue around AC parts. This indicates a leak that needs attention.
Use your AC system properly. Don’t crank it all the way up in extremely hot weather. Gentle, moderate use is better for the system’s longevity.
Keep your car parked in shade when possible. Less heat inside your car means less stress on your AC system.
Conclusion
Checking your car’s freon level doesn’t have to be intimidating. With the right tools and knowledge, you can do it yourself. A basic pressure gauge costs less than sixty dollars and lasts for years. You can check your system in less than thirty minutes once you know what you’re doing.
Remember, the goal is to determine if your refrigerant level is correct. If it’s low, you know you probably have a leak. A professional mechanic can find and fix the leak. If it’s normal and your AC still isn’t working, then something else is wrong with your system.
Keep your air conditioning system healthy by running it regularly and keeping an eye on it. Check the pressure every few months. This simple maintenance catches problems early and saves you money in the long run.
Your car’s air conditioning system is important for your comfort and safety. Now that you know how to check the freon level, you’re equipped to diagnose AC problems like a pro. Whether you decide to add refrigerant yourself or take your car to a professional, you have the knowledge to make an informed decision about your vehicle’s cooling system.

Peterson is an automotive enthusiast and auto parts reviewer with a passion for vehicle maintenance, upgrades, and performance. He enjoys researching and testing car parts, tools, and accessories to help drivers make informed buying decisions. Through AutoPartsTalk.com, Peterson shares honest reviews, practical maintenance tips, and expert guides to keep vehicles running safely and efficiently.