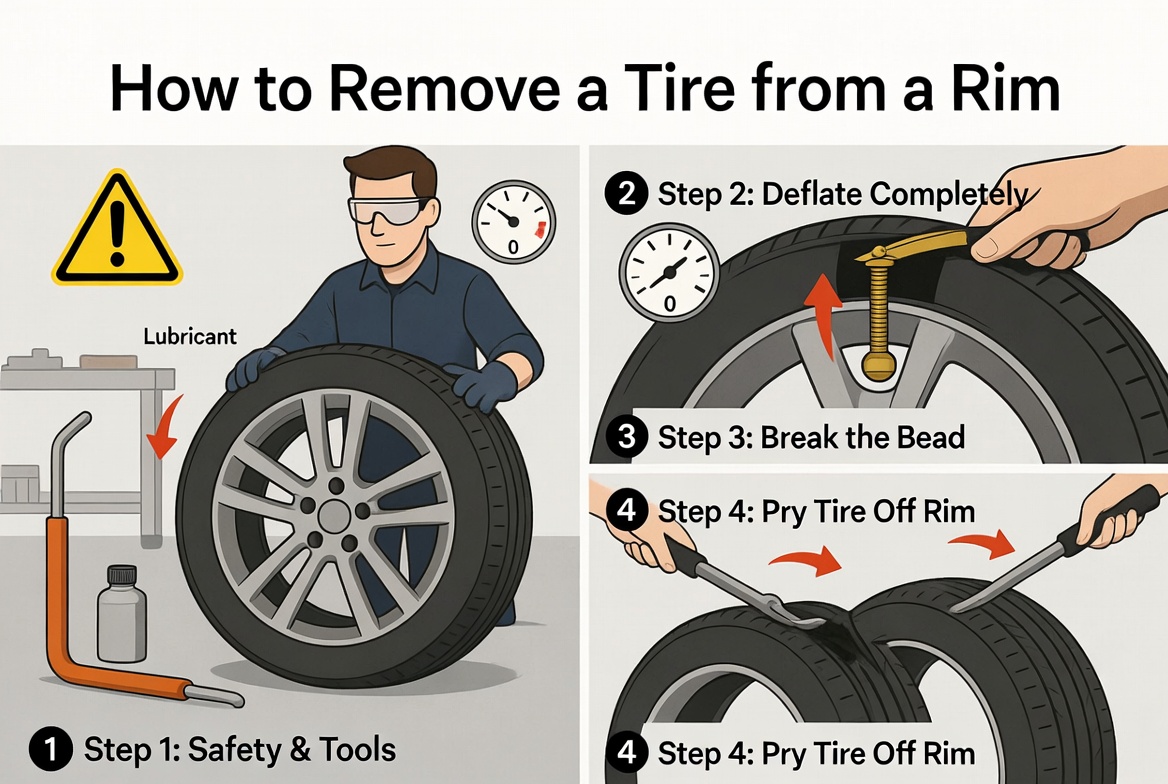
How to Remove a Tire from a Rim?
Getting a flat tire is annoying. Getting stuck with a flat and no way to fix it? That’s even worse. But here’s the good news: you don’t need to call a shop every time you have tire trouble. Learning how to remove a tire from a rim is actually pretty simple, and once you know the basics, you’ll feel like a pro.
This guide walks you through everything you need to know about tire removal. We’ll cover the tools you’ll need, the exact steps to follow, and some tips to make the job easier. Let’s get started.
Why Learn to Remove a Tire Yourself?
Before we jump into the how, let’s talk about the why. There are several solid reasons to learn this skill.
First, you save money. A tire shop will charge you to remove a tire from your wheel. That fee adds up, especially if you change tires regularly or deal with flats often. When you do it yourself, you only pay for the tire itself.
Second, you gain independence. You’re not stuck waiting for an appointment or relying on someone else to help you. You can remove a tire whenever you need to, whether that’s in your driveway on a Saturday morning or in your garage on a rainy afternoon.
Third, understanding your tires makes you a better car owner. When you work with your tires directly, you learn how they work and what keeps them healthy. This knowledge helps you spot problems early and take better care of your vehicle.
Finally, tire removal is a practical skill that comes in handy in unexpected situations. A slow leak, a damaged tire, or the need to switch to seasonal tires—all of these become manageable when you know how to remove a tire from a rim.
Tools You’ll Need Before You Start
Let’s talk equipment. You don’t need a lot of fancy gear to remove a tire from a rim, but you do need the right tools.
The tire lever is your best friend here. Also called a tire iron or pry bar, this tool has a flat end that slides between the tire and the rim. Most tire levers come in a set of two or three, which is perfect because you’ll use more than one.
A bead breaker tool is helpful, though not always essential. This tool breaks the seal between the tire and the rim, which makes the whole process easier. You can use a hammer and a rubber mallet to do this job if you don’t have a bead breaker, but a dedicated tool is nicer.
You’ll want a valve stem tool to remove the valve stem from the rim. This small tool unscrews the valve stem so you can completely deflate the tire and prepare it for removal.
Grab some soapy water in a spray bottle. This might sound odd, but it’s a game-changer. The soap acts as a lubricant and helps you slide the tire lever under the tire bead without damaging the rubber or the rim.
Get yourself a pair of work gloves. Rims have sharp edges, and tires are heavy. Gloves protect your hands from cuts and give you better grip.
Finally, have a safe workspace ready. You’ll need a flat surface to work on, good lighting, and a place to set down tools and parts as you work.
Step One: Deflate Your Tire Completely
Start by letting all the air out of the tire. This is crucial because an inflated tire clings to the rim, and you won’t be able to separate them.
Locate the valve stem on your wheel. This is the small metal or rubber tube that sticks out from the rim. Remove the valve cap by unscrewing it by hand. Then use your valve stem tool to open the valve, or simply press the stem to release the air. You’ll hear the hissing sound as the air escapes.
Let the tire sit for a minute to make sure all the air is out. Press on the tire with your hand to feel that it’s completely flat. A fully deflated tire will feel soft and loose against the rim.
Step Two: Break the Bead
The bead is the edge of the tire that grips the rim. Breaking this seal is essential for tire removal, and it’s the step that confuses a lot of beginners.
If you have a bead breaker tool, follow the manufacturer’s instructions. Usually, you’ll position the tool against the edge of the tire and push down or turn a handle to separate the bead from the rim.
Don’t have a bead breaker? No problem. You can use a rubber mallet and a wooden block. Place the wooden block against the tire edge, then tap it gently with the mallet. Work your way around the entire tire, hitting each section until you feel the tire starting to separate from the rim.
Some people use a hammer and the edge of the rim itself, but be careful with this method. A rim can dent or bend if you hit it too hard. The wooden block protects the rim from damage.
Once you’ve worked all the way around the tire, flip the wheel over and repeat the process on the other side. You want to break the bead on both sides of the wheel.
How do you know when the bead is broken? The tire will feel looser, and you might hear a cracking or popping sound. The seal between the tire and the rim is no longer airtight.
Step Three: Apply Soap to the Tire Edge
This step saves you so much frustration. Spray your soapy water solution around the entire edge where the tire meets the rim. Get both sides of the tire bead good and wet.
The soap reduces friction and lets your tire lever slide under the tire much more easily. Without it, you’ll struggle and risk damaging the tire or the rim. With it, the whole process becomes smooth and quick.
Step Four: Insert Your Tire Lever
Now comes the hands-on part. Take your first tire lever and find a spot on the rim where you can slip it under the tire bead. The rounded edge of the lever slides between the tire rubber and the rim.
Apply gentle pressure and work the lever into position. You’re not trying to force it; you’re just creating enough space to get the tool under the tire. The soapy water helps here—the tire bead will slide more easily.
Once the lever is in position, start to pry the bead upward and over the rim edge. Slow, steady pressure works better than fast, hard yanking. You want to lift the tire bead up and over the rim lip so that part of the tire is now outside the wheel.
Step Five: Use Multiple Levers to Work Around the Rim
This is where having two or three tire levers comes in handy. After you’ve pried up one section of the tire, insert your second lever a few inches away and pry up another section.
Work your way around the rim, using multiple levers to gradually lift the tire bead all the way around. The tire will start to bulge outward as more of it clears the rim. Keep applying soap as you go if the area starts to feel dry.
You’re not trying to pull the entire tire off in one spot. Instead, you’re gradually releasing the bead all the way around the rim, bit by bit. This method is gentler on the tire and the wheel.
Once you’ve worked all the way around and a good portion of the tire is sitting outside the rim, remove all your levers. You should now be able to pull the first bead of the tire completely off the rim by hand.
Step Six: Remove the First Bead Completely
With most of the tire already pried up and away, grab the tire and pull it toward you with both hands. The first bead should slide right off the rim now. You might hear a sucking sound or feel resistance as the tire completely separates. That’s normal.
Set the tire down so the rim is resting on top of the tire. Now you can see the full rim and the other bead of the tire still attached to the inside.
Step Seven: Break and Remove the Second Bead
The second bead is on the other side of the rim, the side you’re looking at right now. You’ll repeat the same process.
Apply soapy water to the edge where the tire meets the rim on this side. Then use your tire lever to start prying this bead up and off as well. Work around the entire rim just like you did with the first side.
The second bead often comes off a bit easier because you’ve already loosened things up. Keep working your levers around the wheel until this bead is also completely off the rim.
Once the second bead is free, you should be able to pull the tire completely away from the rim with your hands. Congratulations—you’ve successfully removed the tire from the rim.
Tips to Make Tire Removal Easier
Let’s cover some tricks that experienced tire removers use.
Start from the top of the wheel rather than the bottom. Gravity helps you here—the tire wants to fall downward, so work with that natural force instead of against it.
Don’t be shy with the soapy water. The more lubricant you use, the easier the job becomes. Some people also use tire soap products or silicone sprays designed for this purpose.
Take breaks if your hands get tired. Tire removal isn’t a race. Steady effort over time beats frantic rushing. Your hands will thank you.
Work methodically around the rim. Don’t try to remove one spot completely before moving to the next. Instead, work a little bit all the way around, then come back for another pass.
If you’re struggling with a bead, stop and use your bead breaker again on that section. Sometimes you need to go over a stubborn area more than once.
Keep your tire levers clean and in good condition. A worn tool will slip and slide around, wasting your effort. Sharp, clean tools make the job much quicker.
Common Mistakes to Avoid
Even with good tools and knowledge, people still make mistakes. Let’s talk about what to avoid.
Never use a screwdriver as a tire lever. It’s too thin and will bend or break. More importantly, it can scratch and damage your rim, and it doesn’t give you the leverage you need.
Don’t try to remove a tire from a rim that still has air in it. You’ll fight the tire the whole way, and you’ll risk damaging both the tire and the rim. Always deflate completely first.
Avoid hitting the rim with your hammer. I can’t stress this enough. A dented rim is much more expensive to fix than taking a few extra minutes to use proper technique. Always use a rubber mallet and a wooden block instead.
Don’t neglect the soapy water. I know it seems like an extra step, but it truly makes a huge difference. Skipping this part means you’ll spend twice as long and twice as much effort.
Never yank hard on the tire to force it off. Patience and steady pressure work much better than brute force. You could damage the tire or hurt yourself.
Safety Reminders
Tire removal isn’t dangerous if you do it right, but safety always matters.
Always wear work gloves to protect your hands. Rims have sharp edges, and tires are heavy.
Make sure your work area is well-lit so you can see what you’re doing. Accidents happen in poor lighting.
Keep children and pets away from your work area. Tire removal tools can be hazardous in inexperienced hands.
If you’re working in a garage with a door, keep it open for ventilation. You don’t need to breathe in dust and rubber particles.
Never work under a vehicle that’s only supported by a jack. Use jack stands or a proper lift. If a wheel is still on the vehicle, remove it first before attempting to remove a tire from the rim.
When to Call a Professional
Sometimes, DIY isn’t the best choice. If your tire is stuck so firmly that you can’t budge it after real effort, it might be time to call in backup. Tire shops have industrial equipment that can handle stubborn situations without any damage.
If your rim is bent, cracked, or damaged, don’t try to remove the tire yourself. A professional can assess the damage and remove the tire safely.
If you damage the tire or rim during your removal attempt, stop and get professional help. Continuing might cause more damage and cost more money in the end.
Removing a Tire Takes Practice
Your first time removing a tire from a rim will probably take longer than your fifth time. That’s normal and expected. Each time you do it, you’ll learn something and get a little bit faster and smoother.
After a few tries, you’ll develop a feel for how much pressure to apply and where to work the lever for best results. You’ll know how much soap to use and how to work around the rim efficiently.
The skills you develop will stick with you. You’ll be able to remove a tire whenever you need to, whether that’s for maintenance, repair, or seasonal changes.
Conclusion: You’ve Got This
Removing a tire from a rim is a skill that any car owner can master. It doesn’t require special talent or years of experience. It just takes the right tools, a little patience, and a willingness to learn.
Start with the basics: deflate, break the bead, apply soap, and work your levers around the rim. Follow the steps carefully, take your time, and resist the urge to force things. Before you know it, you’ll have the tire off and you’ll wonder why you ever thought this was difficult.
The next time you need to remove a tire, you won’t feel that moment of panic. Instead, you’ll grab your tools and get to work. That confidence comes from knowledge and experience, and now you have both. Get out there and tackle that tire removal—you’re ready for it.