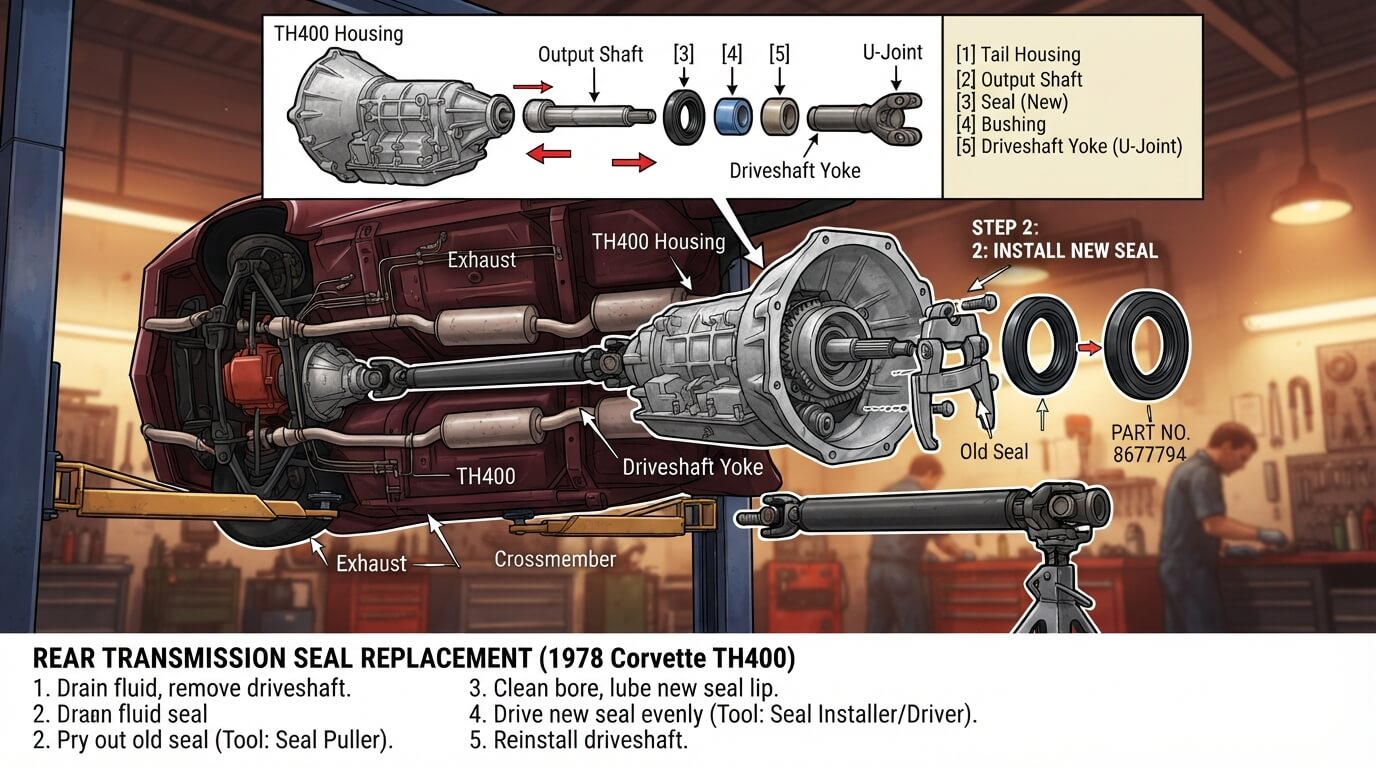
How to Replace a Transmission Seal on a Corvette?
If your Corvette is leaving little puddles on your garage floor, there’s a good chance your transmission seal has gone bad. This is a super common issue on classic C3 Corvettes, and the good news is that it’s a job you can tackle at home with basic tools and a free afternoon. You don’t need to be a pro mechanic to get this done right.
In this guide, we’ll walk through everything step by step, in plain language, so even if this is your first time crawling under a car, you’ll feel confident by the end.
Why Transmission Seals Fail in the First Place
Before we jump into the fix, it helps to know why this happens. The transmission seal (often called the rear main seal or the tailshaft seal, depending on where it sits) is made of rubber. Over time, heat, age, and constant exposure to hot transmission fluid make that rubber dry out, crack, and lose its shape. Once that happens, fluid finds a way out.
A few common causes include:
- Old age and dried-out rubber
- A worn or scored output shaft
- Too much pressure inside the transmission from a clogged vent
- A damaged seal from a rough installation in the past
- Simple wear and tear after years of driving
Knowing the cause matters because if you just swap the seal without checking what caused the failure, you might end up doing this job twice.
Signs Your Corvette Needs a New Transmission Seal
Here’s how to tell if your seal is the actual problem and not something else, like a leaking pan gasket or a bad axle seal.
- Red or brown fluid spots under the back of the transmission, near where it meets the driveshaft
- A burning smell from low fluid levels
- Slipping gears or delayed shifting because fluid is running low
- Fluid dripping specifically from the tailshaft area, not the pan
- A grinding or whining noise as fluid levels drop
If you spot fluid closer to the front of the transmission, near the bell housing, that’s more likely a front seal or torque converter seal issue, which is a slightly different repair. This guide focuses on the rear seal, which is the most common spot for leaks.
Tools and Supplies You’ll Need
Gathering everything ahead of time saves you from crawling out from under the car every five minutes. Here’s a simple list:
- New transmission seal (make sure it matches your transmission model)
- Seal puller or a large flathead screwdriver
- Seal installer tool or a socket that matches the seal’s outer diameter
- Rubber mallet
- Jack and jack stands
- Wheel chocks
- Drain pan for old fluid
- New transmission fluid (check your owner’s manual for the right type)
- Torque wrench
- Basic socket and wrench set
- Shop rags or paper towels
- Penetrating oil like PB Blaster or WD-40
- Gloves and safety glasses
Having the right seal size matters a lot here. Transmissions used in these cars can vary, so double check your part number before you buy anything. A quick call to a parts store with your VIN handy will save you a return trip.
Safety First: A Quick Word Before You Start
Working under a car always comes with some risk, so let’s cover the basics. Never rely on a jack alone to hold the car up. Always use jack stands rated for the weight of your Corvette, and place wheel chocks on the tires that stay on the ground. Park on a flat, level surface, and let the engine and transmission cool down completely before you touch anything. Hot transmission fluid can cause burns, so patience here really pays off.
Step 1: Get the Car Ready
Start by parking your Corvette on level ground and setting the parking brake. Chock the front wheels so the car can’t roll. Then lift the rear of the car using your jack, and set it down on jack stands placed under the frame rails, not the axle. Give the car a gentle shake to make sure it’s stable before you slide underneath.
Step 2: Drain the Transmission Fluid
Slide your drain pan under the transmission pan. Remove the bolts around the edge of the pan slowly, working from one side to the other so the fluid drains evenly instead of gushing out all at once. Once the pan is off, let all the old fluid drain out completely. This is also a great time to inspect the fluid. If it looks dark, smells burnt, or has metal flecks in it, that’s a sign your transmission has been running hotter than it should, which could be part of why the seal failed.
Step 3: Remove the Driveshaft
The driveshaft connects your transmission to the rear axle, and it needs to come out before you can reach the seal. Mark the position of the driveshaft and the yoke with a paint pen or marker so you can put it back in the exact same spot. This keeps everything balanced once it’s reinstalled.
Unbolt the U-joint straps at the rear axle end, then slide the driveshaft forward and pull it out of the transmission tailshaft. Keep a rag handy because a bit of fluid will drip out once the shaft is removed. Set the driveshaft somewhere safe where it won’t get bumped or dirty.
Step 4: Take Out the Old Seal
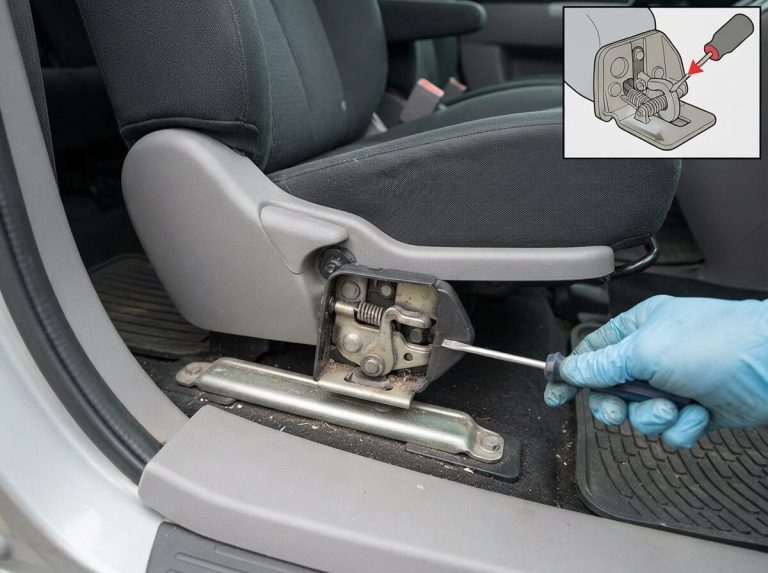
Now you’re looking right at the tailshaft housing where the seal sits. Use your seal puller or a flathead screwdriver to gently pry the old seal out. Go slow here. You don’t want to scratch or gouge the metal housing, since any damage there can cause your new seal to leak too.
If the seal is stubborn, tap around its edge lightly with a hammer to loosen it before prying again. Once it pops free, take a close look at the output shaft where the seal was riding. Run your finger along it to feel for any grooves or rough spots. A worn shaft is often the real reason seals fail again and again, so if you feel damage, you may want to look into a speedo sleeve or shaft repair kit before moving forward.
Step 5: Clean the Housing
Wipe down the tailshaft housing with a clean rag to remove any old fluid, dirt, or bits of the old seal. A clean, smooth surface helps the new seal sit properly and seal tightly. Take a moment to inspect the housing bore for any burrs or damage, and smooth those out with fine sandpaper if needed.
Step 6: Install the New Seal
This step matters more than people think. A rushed seal installation is one of the top reasons for repeat leaks.
Apply a thin layer of transmission fluid or seal lubricant around the outer edge of the new seal. This helps it slide in evenly and reduces the chance of it tearing. Line the seal up straight with the housing bore, making sure it’s facing the correct direction (the open side of the seal usually faces into the transmission).
Using your seal installer tool or a socket that matches the seal’s outer diameter, tap the seal in gently and evenly using your rubber mallet. Go around the edge in a circular pattern instead of hammering one spot repeatedly. This keeps the seal from going in crooked. Stop once the seal sits flush with the housing.
Step 7: Reinstall the Driveshaft
Slide the driveshaft back into the tailshaft, lining up the marks you made earlier. Bolt the U-joint straps back onto the rear axle yoke, tightening them to the torque spec listed in your service manual. Give the driveshaft a spin by hand to make sure it moves freely without any binding or scraping sounds.
Step 8: Put the Transmission Pan Back On
Clean off the old gasket material from both the pan and the transmission housing surface. A putty knife works well for this, just be careful not to scratch the metal. Place a new gasket on the pan, then bolt it back into place. Tighten the bolts in a crisscross pattern, a little at a time, so the gasket seats evenly and doesn’t warp.
Step 9: Refill the Transmission Fluid
Locate the fill tube or dipstick and pour in fresh transmission fluid slowly. Check your owner’s manual for the exact amount and type needed, since using the wrong fluid can cause shifting problems down the road. Start the engine and let it idle for a minute, then shift through the gears a few times with your foot on the brake to help the fluid circulate.
Step 10: Check for Leaks
This is the moment of truth. With the car still up on jack stands, look closely at the tailshaft area for any fresh drips. Let the engine run for several minutes, then check again. If everything looks dry, lower the car back down and take it for a short test drive. Afterward, park it and check underneath one more time to be sure the new seal is holding strong.
Common Mistakes to Avoid
A few small errors can turn this simple job into a headache. Keep these in mind:
- Forcing the seal in crooked, which causes leaks right away
- Skipping the inspection of the output shaft for wear
- Using the wrong size or type of seal
- Overtightening the pan bolts, which can warp the pan and cause a new leak
- Not marking the driveshaft position before removal
- Reusing an old, torn gasket instead of a fresh one
Taking your time with each step is the real secret here. Rushing is what leads to comebacks.
How Long Does This Job Take?
For someone doing this for the first time, plan on spending around two to three hours from start to finish. That includes time to drain fluid, remove the driveshaft, swap the seal, and refill everything. Once you’ve done it once, it goes a lot faster the next time around.
How Much Does It Cost to Fix This Yourself?
One of the best reasons to do this job at home is the savings. A new seal typically costs a small amount, and a gasket set adds a little more. Add in the cost of fresh transmission fluid, and you’re looking at a modest total compared to what a shop would charge for labor on top of parts. Doing it yourself also means you know exactly how the job was done.
When to Call a Professional Instead
If you find serious damage to the output shaft, cracks in the tailshaft housing, or signs of bigger transmission trouble like metal shavings in the fluid, it might be time to bring in a transmission specialist. Those issues go beyond a simple seal replacement and usually mean something deeper is going on inside the transmission itself.
Keeping Your Transmission Healthy After the Repair
Once your new seal is in place, a little maintenance goes a long way toward making it last. Check your fluid level every few months, and look under the car occasionally for any early signs of leaking. Change your transmission fluid on a regular schedule, since old, dirty fluid runs hotter and puts extra stress on seals and gaskets. Keeping the transmission vent clear also helps prevent pressure buildup, which is one of the sneaky causes of seal failure in the first place.
Final Thoughts
Replacing a transmission seal on your Corvette isn’t as scary as it might sound. With the right tools, a bit of patience, and this step-by-step guide, you can knock out this repair in an afternoon and save yourself a good chunk of cash. Plus, there’s a real sense of pride that comes from fixing your own car and knowing it’s done right.
Take your time, double check each step, and don’t be afraid to ask questions at your local parts store if you get stuck. Your Corvette will thank you with smooth, leak-free driving for a long time to come.