How to Fix a Torn Leather Seat in a Car?
Your car’s leather seats feel great. They look professional. They make your car feel a little more luxurious. Then one day, you notice it—a tear in the leather. Your heart sinks. You think about those expensive repair bills. You imagine yourself stuck in the mechanic’s shop for hours.
Here’s the good news: you can fix that torn leather seat yourself. You don’t need special skills or fancy equipment. This guide walks you through everything you need to do. By the end, you’ll have a seat that looks almost like new.
Why Your Leather Seats Get Torn
Leather car seats tear for lots of reasons. The most common culprit is daily wear and tear. You sit down, you get up. You do this hundreds of times. Eventually, the leather starts to show its age.
Sharp objects cause tears too. Your keys can do damage. A pen in your pocket can poke right through. Even a rough edge on your wallet can cause problems. Sometimes your kids do it by accident. They jump on the seats or bring toys that have sharp edges.
Heat plays a big role. Your car gets hot in the sun. Leather shrinks and cracks when it gets too hot. Then it tears easily. Cold weather does damage as well. The leather gets stiff and less flexible, which makes it break.
Sun damage is real. The ultraviolet rays break down the leather over time. The seat loses its natural oils. It becomes dry and brittle. Then the first small tear spreads into a big rip.
Spills and stains also lead to tears. When liquid sits on leather too long, it eats away at the material. The leather becomes weak. A small rip turns into a huge problem.
How Bad Is Your Tear? Knowing When to DIY
Not all tears are created equal. Some you can fix at home. Others need a professional.
Small tears look like little cuts in the leather. They might be half an inch or smaller. These are perfect for DIY repair. You have all the tools and materials to handle them.
Medium tears run between half an inch and two inches. You can still fix these at home, but they take more work. The repair might not be invisible, but it will work.
Large tears are bigger than two inches. These are tougher. They might need professional help. Your DIY repair might not hold up as well. That said, you can still try the steps in this guide.
Deep tears go all the way through the leather and into the foam underneath. These ones are serious. You really should call a professional. The foam needs repair too.
If your tear has jagged edges or is really messy, that’s another sign to call in help. Clean tears are easier to fix. Torn leather seats that split in a weird shape are harder to seal back up.
What You’ll Need to Get Started
The beauty of fixing leather seats yourself is that you don’t need much. Most of these items are cheap. Some you might already have at home.
Cleaning supplies come first. Get some mild soap and warm water. You can use dish soap if that’s all you have. Grab some soft cloths or old t-shirts. You need something that won’t scratch the leather.
A leather repair kit is essential. These kits cost between fifteen and fifty dollars. They come with leather filler, color-matched dye, and a brush. They also include sandpaper and instructions. The filler acts like glue and putty combined. It fills in the tear and hardens.
Scissors or a cutting tool helps you prepare the tear. You need something sharp. Kitchen scissors work fine. A craft knife is better if you have one.
Rubbing alcohol cleans the tear really well. It removes dirt and oils. This helps the filler stick better.
A small brush or applicator spreads the filler smoothly. Most repair kits include one. You can also use an old toothbrush.
Sandpaper smooths everything out. The kit usually includes different grits. You want 220-grit and 400-grit sandpaper.
A leather sealant or clear coat protects your work. This step is optional but recommended. It locks in the color and protects from future tears.
Newspaper or drop cloths protect your car’s interior. You don’t want filler dripping on your floor mats.
Step-by-Step: Fixing Your Torn Leather Seat
Step One: Clean the Area
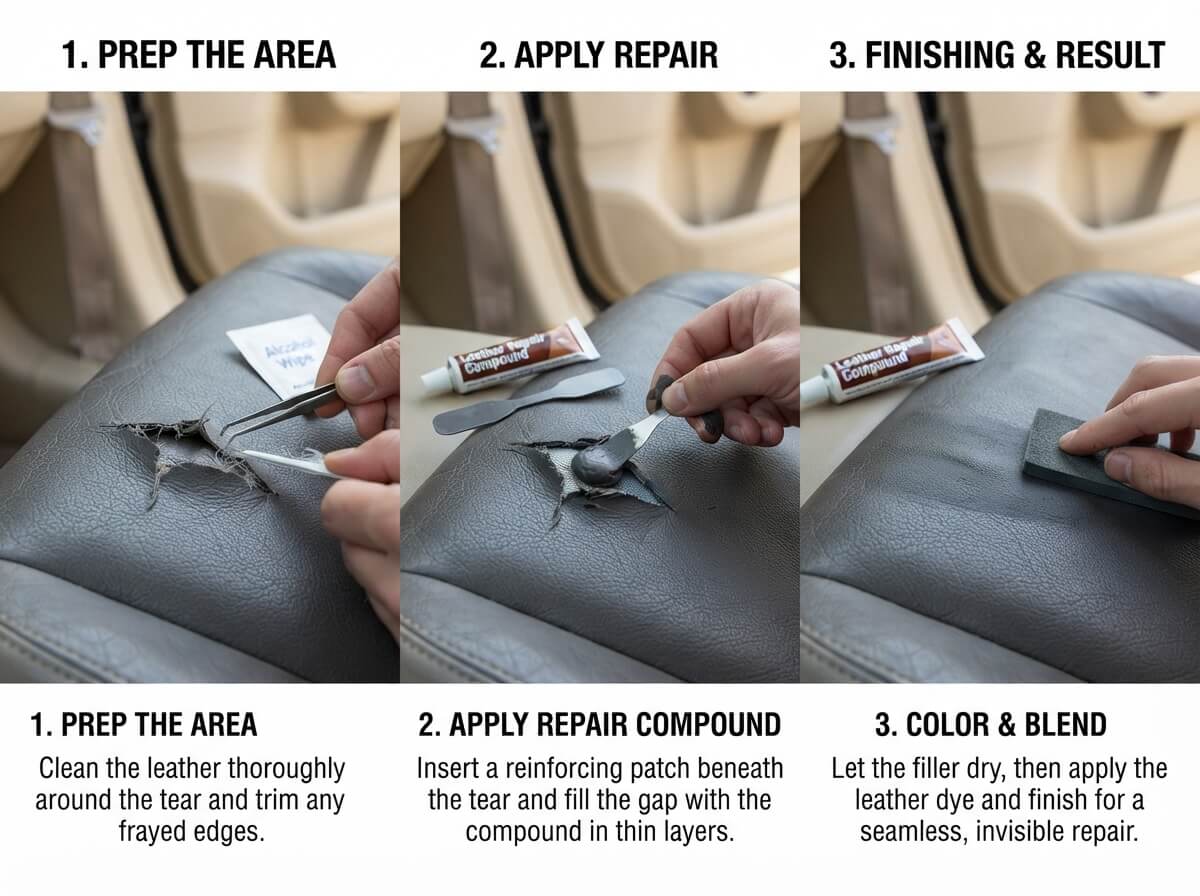
Start by cleaning the torn area. Use your mild soap and warm water. Scrub around the tear. Get rid of any dirt, dust, or oils. Dry the area completely with a clean cloth.
Now use rubbing alcohol on the tear itself. Rub it into the torn edges. Let it dry completely. This step is super important. It helps the repair filler bond to the leather.
Step Two: Trim Any Loose Pieces
Look at the tear. You might see loose leather hanging around the edges. Grab your scissors or craft knife. Cut away any fraying or loose pieces. Make the edges as clean as possible. Don’t cut into healthy leather. Just remove the damaged bits.
The goal is to have a tear with clean edges. Rough or torn edges make your repair look worse. Neat edges mean a better final result.
Step Three: Prepare the Filler
Read the instructions on your leather repair kit. Different kits work differently. Most require you to mix the filler. You might mix it with a hardener. You might mix two parts together. Follow the specific directions.
Mix only as much as you need. The filler starts to set after you mix it. You don’t want it to harden before you use it. Mix thoroughly. No lumps should be in the mixture.
Step Four: Apply the Filler
Get your brush or applicator. Dip it into the filler. Start applying it into the tear. Work from one end to the other. Fill the entire tear completely. Push the filler deep into the gap.
Use your brush to smooth it out. Make the filler level with the surrounding leather. Wipe away any excess with a cloth. Get it as smooth as possible while it’s wet.
The filler will expand slightly as it dries. Keep that in mind. Don’t overfill the tear.
Step Five: Let It Dry
This step requires patience. Most fillers take several hours to dry. Some take all day. Read your kit instructions. Don’t touch the repair while it dries. Even touching it can mess up the finish.
You can speed up drying with a fan or blow dryer on the lowest setting. Just don’t use heat. Keep the air moving gently. Patience is your friend here.
Step Six: Sand the Area
Once everything is completely dry, grab your sandpaper. Start with the rougher grit (220-grit). Sand the repair gently. You’re trying to make it level with the surrounding leather. Sand in the same direction as the natural grain of the leather.
Switch to the finer grit (400-grit) sandpaper. Sand again gently. This smooths out any scratches from the rougher paper.
Wipe away the dust with a damp cloth. Let it dry completely.
Step Seven: Color Match and Dye
Your leather repair kit comes with color-matched dye. This is important. The filler might look gray or tan. You need to dye it to match your seat.
Test the dye on a hidden area first. Make sure it matches. The color should blend in with your leather.
Apply the dye with a small brush or applicator. Work carefully. You want to color just the repair area. Take your time. Multiple thin coats work better than one thick coat.
Let each coat dry before applying the next one. Usually two to three coats does the trick.
Step Eight: Seal the Repair
Apply a leather sealant or clear coat over the repair. This protects your work. It makes the repair area water-resistant. It also helps the color last longer.
Apply it with a brush or applicator. Keep it thin. You don’t want a thick, obvious coat. A thin layer does the job.
Let it dry completely. This usually takes a few hours.
Extra Tips for the Best Results
Temperature matters. Work in a warm, dry space. Cold makes fillers set slower. Humidity can cause problems. If you’re in a humid climate, run a dehumidifier while the filler dries.
Ventilation helps. Open your car windows. Let fresh air move through. This speeds up drying and prevents fumes from building up.
Be patient with drying time. This is the number one mistake people make. They rush the drying. Then the filler doesn’t set properly. Wait the full time recommended. Your patience pays off with a better repair.
Work in small sections. Don’t try to fix the whole seat in one day. Fix one tear at a time. This helps you do quality work.
Take your time applying color. The color match is what makes or breaks the repair. People notice a sloppy dye job more than they notice an imperfect filler job.
Use light pressure when sanding. You can sand away too much. Use gentle pressure. You’re trying to smooth, not reshape.
When Should You Call a Professional?
Some damage is beyond DIY repair. Call a professional leather repair person if your tear is really large. They have industrial equipment you don’t have. They can replace sections of leather if needed.
Long tears that go all the way through the seat deserve professional attention. The foam underneath might be damaged. A pro can fix both the leather and the padding.
If your seat has multiple tears in the same spot, that’s another reason to get professional help. Multiple tears mean the leather is seriously compromised. A pro might suggest reupholstering that section.
Burns and severe stains might need professional treatment. Some damage goes too deep for a patch job.
Water damage from flooding needs professional help. The foam soaks up water. Mold can grow. A pro needs to handle this properly.
Prevention: Keeping Your Leather Seats Safe
Once you’ve fixed your seat, protect it from future damage. Prevention is way easier than repair.
Use seat covers during long trips. They protect your leather from wear. They also keep the sun off your seats.
Clean spills immediately. Don’t let liquid sit on leather. The moisture breaks down the material.
Park in the shade when you can. Sun damage is real and permanent. A good sunshade prevents a lot of problems.
Condition your leather regularly. Special leather conditioner keeps it soft and flexible. Soft leather resists tearing better than dry, brittle leather.
Be careful with sharp objects in the car. Keep sharp pens and keys in bags. Keep them out of pockets when you’re sitting down.
Watch your passengers. Teach kids to be gentle with the seats. No jumping or roughhousing on the furniture.
Use quality floor mats and seat covers if needed. They absorb spills before they reach the leather.
The Money Question: DIY Versus Professional Repair
A DIY repair costs you maybe thirty to seventy dollars. That’s for a complete kit and supplies. Your time is the only other cost.
A professional leather seat repair runs anywhere from one hundred to five hundred dollars. It depends on the size of the tear and where you live. Huge rips might cost even more.
Reupholstering an entire seat runs fifteen hundred to three thousand dollars. That’s a major job.
So a DIY repair saves you a lot of money. If you mess it up, you’ve only lost thirty bucks. You can try again with a new kit.
Your Repair Is Done—Now What?
After your repair cures completely, treat your seat gently for a few days. Let the materials fully harden. Don’t sit on the repaired area if you can avoid it for twenty-four hours.
Once it’s cured, your seat should work fine. The repair holds up to normal use. It should last years if you take care of it.
Keep the seat clean. Protect it from excess sun. Condition it regularly. Your repair will look good and last a long time.
Wrapping Up
A torn leather car seat doesn’t have to mean an expensive trip to the shop. You can fix it yourself. The steps are simple. The materials are cheap. You just need patience.
Start with a clean tear. Apply filler carefully. Let it dry completely. Sand it smooth. Match the color. Seal it up. Done.
Your car will look good again. Your wallet will thank you. You’ll have the satisfaction of fixing something yourself. That’s a win all around.
So grab a repair kit this weekend. Find that torn seat. Get to work. You’ve got this. By tomorrow, your leather seat will be good as new again.