how to fix faded car paint?
Your car used to shine like a mirror when you first brought it home. Now it looks dull, tired, and kind of sad. You’re not alone—faded car paint happens to almost every vehicle owner eventually. The good news? You can bring that shine back without spending a fortune at a professional detailer.
This guide walks you through everything you need to know about fixing faded paint. Whether you want to restore that glossy finish yourself or simply understand what’s happening to your vehicle’s exterior, you’re in the right place.
Why Does Car Paint Fade?
Before you grab a polishing compound and get to work, it helps to know why your paint faded in the first place.
Sun damage is the biggest culprit. Your car sits outside, and the sun’s UV rays beat down on it every single day. Over time, these rays break down the clear coat that protects your paint. That clear coat is like sunscreen for your car—without it, the paint underneath gets damaged and loses its color.
Environmental contaminants also play a role. Bird droppings, tree sap, road salt, and industrial fallout stick to your car and eat away at the protective layers. Rain might rinse some of it off, but the damage is already done.
Oxidation happens when your paint reacts with oxygen in the air. This creates a dull, chalky layer on top of your color coat. If you’ve ever noticed your car looks like it has a white haze over it, oxidation is likely the reason.
Poor maintenance speeds up the fading process. If you never wash your car or apply protective products, the clear coat breaks down faster. Your paint gets exposed to the elements with nothing to shield it.
Can You Really Fix Faded Paint Yourself?
Yes, you can. The extent of the fading determines what method works best, though.
If your paint fading is light to moderate—meaning the color is duller but still has some shine—you can restore it with proper polishing and detailing. This is totally achievable as a DIY project.
If the fading is severe and deep, you might have damage that goes beyond the clear coat into the actual color coat. At that point, you may need professional help or a fresh paint job.
Most people find their car falls somewhere in the middle. That’s where these techniques come in handy.
What You’ll Need to Get Started
Let’s talk about the supplies you should gather before you start any paint restoration work.
Microfiber wash mitts and towels are essential. Regular towels and cloths can scratch your paint. Microfiber is soft and lifts dirt without leaving marks.
Car wash soap keeps your paint clean without stripping protective layers. Regular dish soap is too harsh—skip it.
Clay bar kit removes contaminants that washing alone can’t get. These tiny particles sit on your paint and dull the finish. A clay bar grabs them and lifts them away.
Polishing compound is the heavy lifter for faded paint. This product contains mild abrasives that smooth out oxidation and restore shine. You can get different grades—light, medium, and heavy—depending on how much fading you’re dealing with.
Dual-action polisher (optional but helpful) makes the job faster and easier than hand polishing. A random orbital polisher works great for beginners because it’s safer than a rotary polisher.
Finishing wax or sealant protects your work once you’re done. This goes on last to lock in the shine and shield your paint from future damage.
Microfiber applicator pads work best with wax and sealant. Foam pads are fine, but microfiber tends to distribute products more evenly.
You don’t need every fancy tool out there. Start simple and add to your collection as you learn.
Step-by-Step Process to Restore Your Paint
Step 1: Wash Your Car Thoroughly
Start with a clean canvas. Park your car in the shade and rinse it with cool water to remove loose dirt. Use a pressure washer on a low setting if you have one, or a regular garden hose works fine.
Fill a bucket with water and add car wash soap. Grab your microfiber wash mitt and scrub your car from top to bottom. Rinse the mitt frequently in a separate bucket of clean water to avoid dragging dirt across your paint.
Pay extra attention to crevices where dirt builds up. Dry your car completely with clean microfiber towels. Any water spots left behind can interfere with the next steps.
Step 2: Use a Clay Bar
This step removes particles that plain washing misses. These contaminants sit on your clear coat and make your paint look rough and dull.
Knead your clay bar to warm it up and make it soft. Spray your car section by section with a clay lubricant (some clay kits include this, or you can use detailing spray). Gently rub the clay bar across the wet surface in straight lines—don’t use circular motions.
You’ll feel the clay gliding more smoothly as it picks up contaminants. After you work a section, check the clay for embedded dirt. Fold it and use a clean area. If it gets too dirty, start with a fresh piece.
Rinse each section with water as you go. Your car should feel incredibly smooth once you’re done—run your hand over the paint and you’ll notice the difference.
Step 3: Choose Your Polishing Method
Now you’re ready to tackle the fading itself.
Hand polishing takes more effort but gives you complete control. Apply a small amount of polish to a microfiber applicator pad. Work on one section at a time, using circular motions to spread the polish. Light pressure works better than aggressive scrubbing.
Let the polish dry to a haze, then buff it off with a clean microfiber towel. Check your work under direct light. You might need multiple applications to get the results you want.
Machine polishing speeds things up. A dual-action polisher handles the repetitive motions for you. Set it to a low to medium speed for beginners. Apply polish to the pad, move the machine slowly across your paint, and let it do the work. Keep the polisher moving—don’t let it sit in one spot.
Both methods work. Hand polishing teaches you valuable control, while machine polishing saves time and your arm muscles.
Step 4: Apply Polish and Buff
Use a polish that matches your paint’s condition. Light polish suits minimal fading. Medium polish tackles moderate oxidation. Heavy cutting compound is for serious fading and heavy oxidation.
Apply a small amount—you don’t need much. Work on a 2-by-2-foot section at a time. Spread the polish in circular motions until it forms a thin, even coat. Let it sit for a minute or two, then buff it away with a clean towel.
Inspect your work in bright light. You should see an improvement in shine and depth of color. If the fading is still noticeable, apply polish again to that section.
Don’t rush this step. Multiple light applications work better than one heavy application.
Step 5: Repeat on Entire Vehicle
Work your way around your entire car section by section. The hood, roof, and sides typically show the most fading because they get the most sun exposure.
This is where patience pays off. Take breaks so you stay focused. Polishing takes physical effort, especially if you’re doing it by hand.
As you work on each section, step back and check your progress. Natural light shows results better than artificial light. You’ll start noticing the transformation as the paint gets shinier and the color gets richer.
Step 6: Apply Finishing Wax or Sealant
Once you’ve polished the entire vehicle, it’s time to protect your work. A good wax or sealant locks in the shine and guards against future fading.
Wax offers a natural look and pleasant smell but doesn’t last as long—typically a few months. Sealants are synthetic and last longer, often six months or more.
Apply wax or sealant the same way you applied polish—in small sections with an applicator pad. Use light, circular motions. Let it dry to a light haze, then buff it off.
This protective layer is crucial. It shields your paint from UV rays, contaminants, and weather. Without it, your paint will start fading again.
Different Methods for Different Situations
Light Fading
If your car paint is just slightly dull but otherwise in decent shape, a quality wax might be all you need. Some waxes contain light polishing compounds that can remove minor oxidation while providing protection.
Try a premium carnauba wax or a synthetic sealant. Apply it per the manufacturer’s instructions. Often, just refreshing the protective layer brings back surprising shine.
Moderate Fading
This is where most cars land. The paint looks noticeably tired, but it’s not severely damaged. Your best bet is light to medium polishing followed by wax application.
Expect to spend a few hours on this project. The results are usually excellent—your car will look significantly fresher.
Severe Fading and Oxidation
Heavy oxidation shows as a thick, chalky white layer on your paint. This situation requires medium to heavy cutting compound and possibly multiple polishing sessions.
You might also need to sand the clear coat if the oxidation is really bad. Wet sanding involves using ultra-fine sandpaper with water to carefully remove the damaged clear coat layer. This is more advanced and risks damaging your paint if done wrong, so consider professional help if you’re not confident.
Maintenance Tips to Prevent Future Fading
Once you restore your paint, keeping it in good shape is easier than you might think.
Wash regularly—about every two weeks. Regular washing removes contaminants before they damage your clear coat. Use car-specific soap, never dish soap.
Park in shade when possible. Your garage is ideal. If you don’t have one, a carport helps. Trees provide natural shade but watch out for sap and bird droppings.
Apply protective products every few months. Reapply wax or sealant as directed—don’t just do it once and forget it. These products wear away over time, especially with regular washing.
Use a car cover if you park outside regularly. A breathable cover protects from sun and contaminants without trapping moisture.
Rinse bird droppings and tree sap immediately. These etch into your clear coat and cause permanent damage if left sitting. The longer they stay, the worse the damage gets.
Don’t use generic household products on your paint. Many cleaners are too harsh or acidic. Stick with products made specifically for cars.
Tools That Make the Job Easier
A dual-action polisher transforms the experience if you plan to polish regularly. Expect to pay $100-300 for a decent entry-level model. It reduces physical strain and delivers more consistent results than hand polishing.
A quality lighting setup helps you see what you’re doing. Good natural light is best, but work lights or LED headlamps keep you from missing spots.
Microfiber products pay for themselves. They last for years with proper care and prevent scratches that polishing compounds can’t fix.
A detailing cart or caddy keeps all your supplies organized and within reach. This isn’t essential but makes the job more enjoyable.
Common Mistakes to Avoid
Don’t use too much polish. A small amount does the job. Excess polish just creates more haze and wastes product.
Don’t apply heavy pressure when polishing. Let the product and either your hand or the machine do the work. Pressing hard causes uneven results and potential damage.
Don’t skip the clay bar step. It makes a huge difference in your final result and takes just 30 minutes.
Don’t forget to wax after polishing. Polishing removes your protective layer, so you must reapply wax or sealant. Skipping this means your paint fades again quickly.
Don’t rush the job. Take your time and work methodically. Hurrying leads to mistakes and subpar results.
Don’t polish in direct sunlight. The heat causes polish to dry too fast and can leave streaks. Work in shade or indoors if possible.
When to Call a Professional
DIY polishing works great for most fading situations, but sometimes professional help makes sense.
Call a professional detailer if your paint has deep scratches, severe oxidation, or significant clear coat damage. Professional paint correction equipment and expertise can handle severe damage that DIY methods can’t fix.
Also consider professional help if you’re uncomfortable working on your own car or simply don’t have the time. Quality detailing isn’t cheap, but it’s faster and often produces better results on problem paint.
Final Thoughts
Faded car paint doesn’t mean the end of your vehicle’s good looks. With some basic supplies, a little elbow grease, and patience, you can restore that showroom shine.
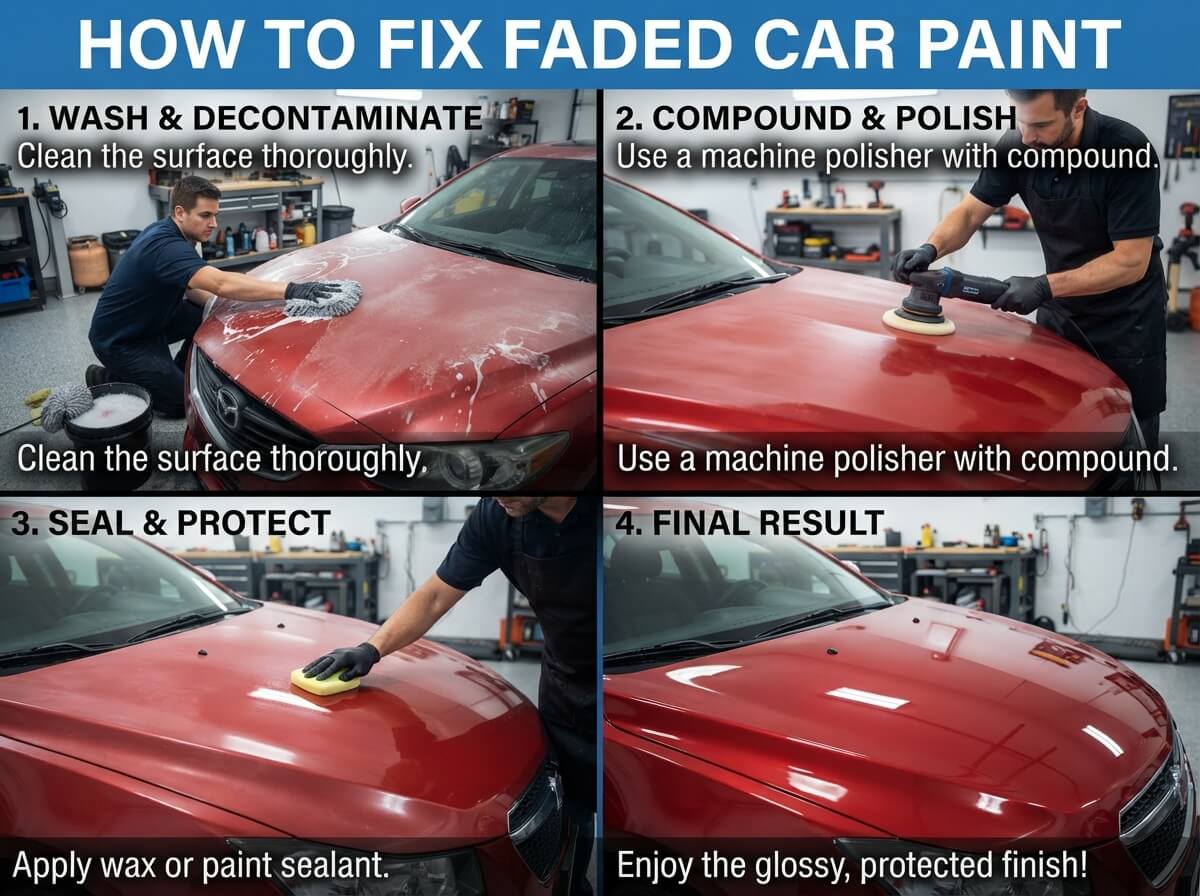
The process is straightforward: wash, clay, polish, and protect. Most people complete an entire car in a weekend. The satisfaction of seeing your dull paint transform into a glossy, vibrant finish makes the effort completely worth it.
Start with a small section of your car to build confidence. Once you see how well polishing works, you’ll be motivated to tackle the rest of the vehicle.
Regular maintenance afterward keeps your paint looking fresh. Wash often, park smartly, and reapply protective products regularly. These simple habits add years to your paint’s life and keep that restored finish looking beautiful.
Your car will thank you—and you’ll love driving around in a vehicle that shines again.