How to Paint a Wheel Rim?
Painting your wheel rims can totally transform the look of your car. Your rims are one of the first things people notice about your vehicle, so giving them some love with a fresh coat of paint makes a huge difference. The best part? You can do this yourself at home without needing to spend a ton of money at a professional shop.
This guide will walk you through every single step of the rim painting process. By the end, you’ll know exactly how to tackle this project like a pro.
Why Paint Your Wheel Rims?
Your rims take a beating. They get exposed to road salt, dirt, grime, and harsh weather. Over time, they start to look dull and tired. A fresh paint job brings them back to life.
Beyond looks, painting your rims protects them. A good coat of paint prevents rust and corrosion from eating away at the metal. This protection helps your rims last longer and keeps your car looking sharp.
You also get to pick any color you want. Whether you like classic silver, sleek black, bold red, or something totally unique, painting lets you customize your ride exactly how you imagine it.
What You’ll Need to Get Started
Before you jump in, gather all your supplies. Having everything ready means you won’t waste time running back to the store mid-project.
Tools and Materials
The rim painting supplies list includes:
- Wire brush or steel wool
- Sandpaper (various grits: 80, 120, 220)
- Brake cleaner
- Masking tape
- Newspaper or plastic sheeting
- Paint primer for metal
- Spray paint for rims (or brush-on paint)
- Clear coat sealer
- Drop cloth or cardboard
- Work gloves
- Safety glasses
- Respirator mask
- Bucket of water
- Rags or old towels
Choosing Paint for Rims
The paint you pick matters a lot. Cheap paint won’t last long on rims that get heated up and exposed to the elements constantly.
Look for paint made specifically for wheels and rims. These special formulas handle the heat and chemicals your rims encounter every single day. They also stick better to the metal surface.
Spray paint works great for DIY projects. It covers fast and gives nice, even coats. If you want more control, brush-on paint works too, though it takes longer and might show brush marks.
Make sure you get a primer as well. Primer helps the paint stick to the rim and makes the color more vibrant. Don’t skip this step.
Getting Your Workspace Ready
Where you paint matters. You need a clean, well-ventilated space with no wind if you’re using spray paint.
Your garage works well if you can open the doors. A covered porch or carport is good too. Avoid painting outside on a windy day because the wind will push paint around and ruin your finish.
Lay down drop cloths or cardboard to protect the ground. Paint splatters happen, and you don’t want to stain your concrete or grass.
Cover anything nearby that you don’t want painted. Use newspaper and masking tape to shield other parts of your car and surrounding areas.
Make sure you have good lighting. You want to see what you’re doing and spot any missed spots or drips before the paint dries.
Removing Your Rims from the Car
Decide whether you want to paint rims on or off your car. Most people take them off because it’s easier to get all sides clean and painted.
If you’ve never removed rims before, here’s the basic process. First, loosen the lug nuts while the car sits on the ground. Then lift your car with a jack and place it on jack stands for safety. Never work under a car supported only by a jack.
Remove the lug nuts and take off the wheel. Set it on a flat surface where you can work on it easily.
If you decide to paint rims while they’re on your car, that’s okay too. Just be extra careful with your masking tape and plastic sheeting to protect the tire and brake components.
Cleaning Your Rims Thoroughly
Clean rims are absolutely critical. Any dirt or grime will ruin your paint job, so don’t rush this step.
Start by rinsing your rims with water to remove loose dirt and debris. Use an old brush to scrub away stuck-on gunk. Get into all the corners and grooves.
Next, use a wire brush or steel wool to scrub off any rust or corrosion spots. This is where most people get lazy, but this step prevents paint from peeling later. If you skip it, rust will bubble up under your fresh paint.
For stubborn grime, use brake cleaner. Spray it on and let it sit for a minute, then scrub. Brake cleaner cuts through oily residue that water alone won’t remove.
Dry everything with a clean rag. Any moisture left behind will interfere with paint adhesion.
Sanding Your Rims
Sanding creates a surface that paint can grip onto. Without sanding, paint just sits on top and peels off easily.
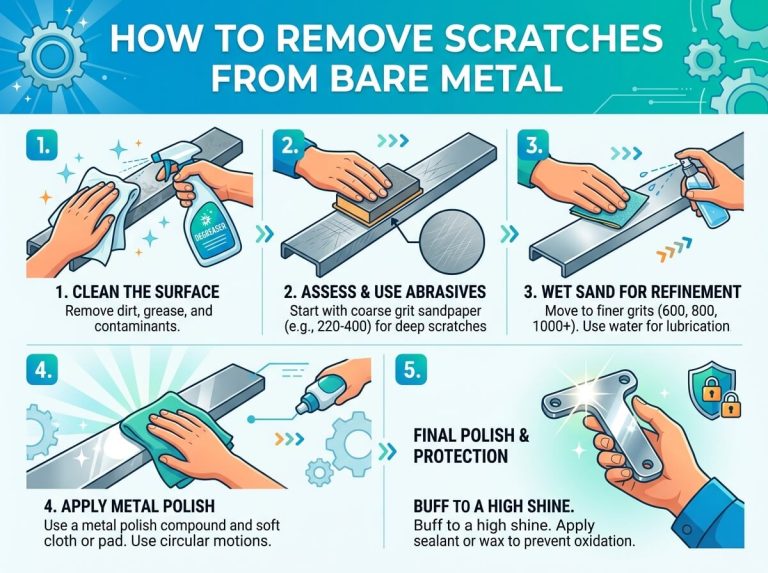
Start with 80-grit sandpaper if your rims have rust or deep pitting. Use medium pressure and sand in circular motions, covering every surface. This removes old paint and oxidation.
Move up to 120-grit sandpaper next. Keep sanding the entire rim with overlapping strokes. You’re aiming for a dull, matte finish. A glossy finish means the paint won’t stick well.
Finish with 220-grit sandpaper for a smooth, even surface. This fine grit creates the perfect base for primer and paint.
Wipe away all dust with a damp rag. Let the rims dry completely before moving to the next step.
Masking Off Areas You Don’t Want Painted
Masking prevents paint from getting on parts you want to keep clean. Take your time here because sloppy masking means more cleanup later.
Use masking tape around the tire. Press it down firmly so paint can’t sneak underneath. Cover the valve stem carefully.
If your rims have certain areas you want to leave unpainted, mask those too. Some people like to paint the face of the rim one color and keep the barrel (outer edge) natural or another color. Masking makes this easy.
Use newspaper or plastic sheeting as barriers. Tape them securely so they don’t flap around.
Double-check all your masking before you start painting. It’s way easier to adjust now than to scrape paint off later.
Applying Primer to Your Rims
Primer is your foundation. It helps paint stick and improves color coverage and durability.
Apply primer in thin, even coats. Use a spray can from 6 to 8 inches away from the rim surface. Move your hand steadily across the rim in one direction.
Apply two to three light coats rather than one thick coat. Thick coats sag and drip. Light coats dry evenly and look smooth.
Wait 15 to 30 minutes between coats, or follow the primer can’s instructions. Don’t move to the next step until the primer is completely dry and hard.
Run your finger lightly over the primer (don’t press hard). It should feel smooth and slightly rough. If there are drips or thick spots, let them dry and sand them down with fine sandpaper.
Painting Your Wheel Rims
Now comes the fun part. This is where your rims get their new color.
Shake your paint can for at least two minutes. This mixes the pigment evenly so you get consistent color.
Apply paint the same way you applied primer. Hold the can 6 to 8 inches from the rim and spray in smooth, steady passes. Keep moving so the paint dries evenly.
Two to three thin coats work best. Let 15 to 30 minutes pass between coats. Resist the urge to apply thick coats. They look glossy and uneven, plus they take forever to dry.
Pay special attention to the edges and grooves where rims often have texture. Spray these spots from slightly different angles to make sure you get full coverage.
Let the paint cure fully before handling the rims. This usually takes several hours, but some paints need overnight drying.
Adding a Clear Coat for Protection
A clear coat seals your paint job and adds serious protection against weather and damage.
Clear coat goes on like paint. Shake the can thoroughly, then apply three thin coats with 15 to 30 minutes between each.
Clear coat brings out the shine and depth of your paint color. It also protects against UV rays, salt spray, and chemical damage from road salts and cleaning products.
Don’t skip the clear coat thinking your rims look fine without it. The clear coat is what makes your paint job last for years instead of months.
Removing Your Masking Tape
Remove tape while the clear coat is still slightly tacky, not bone dry. This prevents the paint from peeling up with the tape.
Peel the masking tape back slowly at a 45-degree angle. If paint starts to tear, stop and let it dry longer before continuing.
Pull off newspaper and plastic sheeting carefully. Go slow to avoid dragging paint chips around.
Stand back and admire your work. Your rims should look clean, even, and shiny.
Curing and Drying Time
Your rims aren’t done yet. They need time to cure fully, which is different from just drying to the touch.
Let your rims sit for at least 24 to 48 hours before exposing them to water or driving hard. During this time, the paint hardens completely.
Avoid washing your car or driving in the rain during this curing period. Water can spot the finish or cause the paint to cure unevenly.
After 48 hours, your rims are good to go. The paint will continue to harden over the next few weeks, so baby them a bit longer if you can.
Reinstalling Your Rims on Your Car
Once everything is dry and cured, put your rims back on your car.
Clean the area where the rim sits on the hub to remove any dirt or corrosion. This helps the rim sit flush and prevents vibration.
Place the rim on the hub and hand-tighten the lug nuts first. This keeps the rim from falling off as you tighten further.
Lower your car slightly with the jack so it bears some weight, then tighten the lug nuts in a star pattern. This keeps the rim from warping. Go tight but not so hard you need a massive wrench.
Lower the car completely and give the lug nuts one final check. They should be snug but not stripped.
Maintaining Your Newly Painted Rims
Your fresh rim paint needs care to look great long-term.
Wash your rims every two weeks with soap and water. Use a soft brush to clean between the spokes and grooves. Avoid aggressive scrubbing that scratches the paint.
Skip the heavy-duty wheel cleaners for the first month. These harsh chemicals can damage fresh paint. After the paint fully cures, gentle cleaners are fine.
Dry your rims after washing. This prevents water spots and keeps the paint looking shiny.
Apply a rim sealant every few months for extra protection. These sealants add a protective barrier against salt, UV rays, and oxidation.
Avoid parking under trees where sap and bird droppings can damage the paint. Cover your car if you’re parked outside for long stretches.
Common Mistakes to Avoid
Plenty of people mess up their rim paint jobs by making simple errors. Learn from their mistakes instead of repeating them.
Skipping the sanding step. This is the biggest mistake. Paint won’t stick properly to unsanded rims, and it peels off within months.
Using thick paint coats. Thick coats drip, sag, and dry unevenly. Thin coats always look better.
Painting in windy conditions. Wind pushes paint around and creates uneven coverage and unwanted texture.
Not wearing safety gear. Spray paint fumes are harmful. Always wear a respirator mask and work in ventilated spaces.
Rushing the drying time. Wet paint looks fine, but it’s not set. Wait the full time before driving or washing your car.
Forgetting the clear coat. Your paint won’t last without protection. Clear coat is non-negotiable.
Painting wet or damp rims. Moisture prevents paint from sticking. Always work with completely dry rims.
Troubleshooting Paint Problems
Even careful painters run into issues sometimes. Here’s how to fix common problems.
Drips and sags: These happen when you apply too much paint at once or hold the spray can too close. Light coats prevent this. If drips happen, let them dry completely, sand them smooth with fine sandpaper, and repaint that area.
Orange peel texture: This bumpy finish comes from thick coats or spraying from too far away. Light, even coats from the right distance prevent it. If you get orange peel, sand it smooth and reapply paint with better technique.
Paint won’t stick: Dirty or glossy rims are the culprit. Go back and clean and sand again. Paint only sticks to clean, dull surfaces.
Uneven color: This usually means inconsistent application. Keep the can the same distance away and move at a steady pace. Apply extra coats if needed to even out the color.
Peeling paint: Insufficient surface prep is the cause. Don’t try to paint over peeling paint. Strip it down, sand thoroughly, clean, and start over.
Runs and streaks: These come from applying paint too wet or too thickly. Use several thin coats instead of one heavy coat.
Different Paint Finishes Explained
Paint comes in different finishes, and each has pros and cons.
Gloss finish shines bright and looks deep and rich. It shows every imperfection and fingerprint though. Gloss is great if your rims are in perfect condition.
Satin finish has a slight shine without being super glossy. It hides minor imperfections better than gloss but still looks clean and modern.
Matte finish has no shine and looks stealthy and aggressive. Matte is trendy but shows dirt easily and requires more frequent cleaning. It’s also harder to touch up because any repair shows clearly.
Most rim painters choose gloss or satin for easy maintenance and durability.
Budget Breakdown
How much does painting rims actually cost?
If you do it yourself, expect to spend $50 to $150 for all supplies. This covers primer, paint, clear coat, sandpaper, and masking materials. You’ll use these supplies multiple times.
Paint cans usually cover 2 to 4 rims per can, depending on rim size. Bigger rims need more paint.
If you pay a shop to paint your rims, expect $200 to $600 per wheel. A full set of four rims could cost $800 to $2,400. That’s why DIY painting saves so much money.
When to Call a Professional
Sometimes professional painters make sense. If your rims are severely damaged, rusted, or cracked, a pro might be necessary. They have equipment to strip old paint and repair damage properly.
If you want a flawless finish with perfect color matching or complex designs, professionals deliver. They also have spray booths that control dust and temperature for perfect results.
If you lack time or confidence, that’s okay. Professionals do this work all day and finish faster with better results than your first attempt.
Final Thoughts on Painting Wheel Rims
Painting your wheel rims is totally doable as a DIY project. You don’t need fancy equipment or professional skills. You just need patience, attention to detail, and the right supplies.
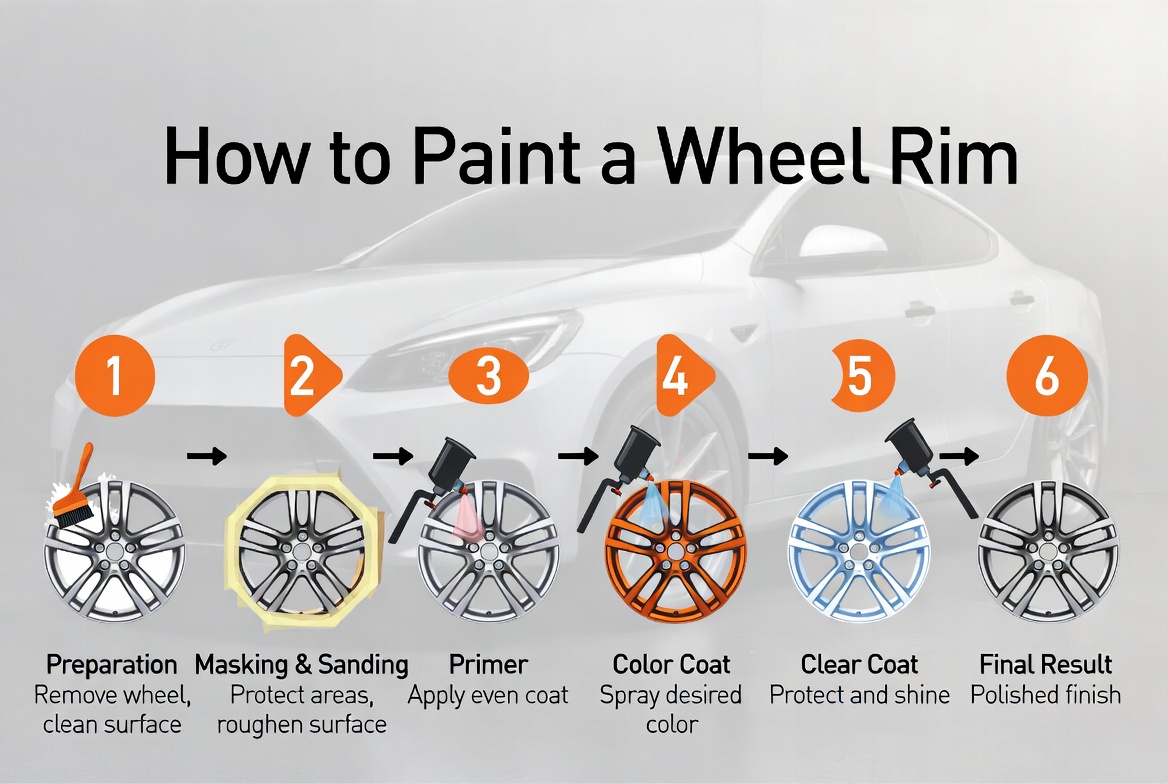
The key steps are simple: clean, sand, prime, paint, seal, and wait for it to cure. Follow these steps in order and take your time between coats.
Your car will look instantly better with freshly painted rims. You’ll save a fortune compared to professional work. Plus, you get the satisfaction of doing it yourself.
Get started today. Your rims are waiting for their makeover.
Quick Reference Checklist
- [ ] Gather all supplies and tools
- [ ] Prepare your workspace with drop cloths and ventilation
- [ ] Remove rims from car or prepare for on-car painting
- [ ] Clean rims thoroughly with water and cleaner
- [ ] Scrub away rust and grime with wire brush
- [ ] Sand with 80, 120, and 220-grit sandpaper
- [ ] Wipe away all dust with damp rag
- [ ] Mask off tire and unwanted areas
- [ ] Apply 2-3 thin primer coats
- [ ] Apply 2-3 thin paint coats
- [ ] Apply 3 thin clear coat layers
- [ ] Remove masking tape slowly
- [ ] Let cure for 24-48 hours before driving
- [ ] Reinstall rims on your car
- [ ] Maintain with regular washing and protection
Frequently Asked Questions
How long does it take to paint rims?
Active painting takes 2 to 4 hours total. Add drying time between coats, and the whole process takes 6 to 8 hours spread over a couple of days. The curing period takes 24 to 48 hours before driving.
Can I paint rims while they’re on my car?
Yes, but it’s harder. You’ll need careful masking to protect the tire and brake components. Removing rims gives you easier access to all surfaces and cleaner results.
What’s the best paint for wheel rims?
Spray paint designed for rims and wheels works great. For larger projects or second coats, brush-on epoxy paint designed for metal offers good durability. Always use primer underneath.
How many coats of paint do I need?
Two to three coats is standard. One coat looks thin and uneven. Four or more coats starts to look thick and may drip. Stick with 2-3 thin layers for best results.
Do I need a clear coat?
Yes. Clear coat protects your paint from UV rays, salt, chemicals, and weathering. Without it, your paint will fade and peel within months. Clear coat makes the difference between a temporary paint job and a lasting one.
Can I wash my car after painting?
Wait 24 to 48 hours before washing. After that, gentle washing is fine. Avoid harsh wheel cleaners for the first month while paint cures.
Will painted rims chip easily?
Quality paint with primer and clear coat is pretty tough. Normal driving and washing won’t chip it. Impacts with curbs or potholes can damage paint though, just like they damage clear coats on car bodies.
What if my paint drips?
Let it dry fully, then sand the drip smooth with fine sandpaper. Apply another thin coat to blend it in. This is why thin coats are better than thick ones.
Can I paint rims in cold weather?
Paint works best between 50°F and 85°F. Cold weather slows drying and can cause paint to cure improperly. If it’s cold, wait for warmer weather or paint in a heated garage.
Do different colors require different techniques?
Dark colors like black show every flaw, so they need extra care with thin coats and smooth technique. Light colors hide imperfections better. The technique is the same, but darker colors demand more patience and precision.
Conclusion
Painting your wheel rims brings new life to your car’s appearance. The process seems complicated at first, but it’s really just repeated simple steps done carefully.
Start with proper prep work. Sand your rims well. Use primer. Apply thin paint coats. Add clear coat protection. Let everything cure. These steps guarantee great results.
Your rims will look showroom-fresh and stay protected for years. Your friends will notice. Your car will turn heads. And you’ll know you did it yourself, which makes it even better.
Stop staring at tired, dull rims. Grab your supplies and get painting. Your vehicle transformation starts right now.

Peterson is an automotive enthusiast and auto parts reviewer with a passion for vehicle maintenance, upgrades, and performance. He enjoys researching and testing car parts, tools, and accessories to help drivers make informed buying decisions. Through AutoPartsTalk.com, Peterson shares honest reviews, practical maintenance tips, and expert guides to keep vehicles running safely and efficiently.