How to Paint Rims Black?
Tired of looking at those boring factory rims on your car? Want to give your vehicle a sleek, modern look without breaking the bank? Painting your rims black is one of the easiest ways to transform your car’s appearance. Black wheels look sharp, professional, and give any vehicle an instant upgrade.
The best part? You don’t need to be a professional mechanic or artist to do this job. With the right tools and some patience, anyone can paint their rims black at home. This guide walks you through everything you need to know about the entire process.
Why Black Rims Are Worth the Effort
Black wheels have become a must-have for car enthusiasts. They work with almost any car color. Whether you drive a white sedan, a red sports car, or a dark pickup truck, black rims just look good. They add a touch of class and make your car look more expensive than it actually is.
Black wheel finishing also hides dirt and brake dust better than lighter colors. This means your rims stay looking clean longer between washes. Plus, the contrasting color against the tire rubber makes your wheels pop and draws attention to them in the best way possible.
Tools and Supplies You’ll Need
Before you start, gather all your materials. Having everything ready will make the job much faster and easier. You won’t want to run to the store halfway through the project.
Safety Equipment Start with the basics. Get a good respirator or mask rated for paint fumes. Paint fumes are toxic, and you don’t want to breathe them in all day. Grab some nitrile gloves to keep paint off your skin. Safety glasses protect your eyes from paint splatter and dust. Finally, wear old clothes you don’t mind getting dirty. Paint is hard to remove from fabric.
Cleaning Supplies You need to clean your rims really well before painting. Get a stiff-bristled brush for scrubbing away dirt and grime. Grab some soap and water, or better yet, pick up some degreaser from an auto parts store. A bucket and sponge work fine too. Clean rims ensure the paint sticks properly and lasts longer.
Sanding and Prep Materials Pick up sandpaper in different grits. Start with 80-grit or 100-grit for heavy cleaning. Move to 200-grit and 400-grit for smoothing. Fine grit paper gives you a nice surface for paint to stick to. A sanding block or orbital sander makes this step way easier on your hands.
Masking and Protection You need painter’s tape to mask off areas you don’t want painted. Get quality tape that sticks well. Grab some newspaper or plastic sheeting to protect surrounding areas. Old cardboard boxes work great for this. A drop cloth or plastic tarp keeps overspray off your garage floor and other items.
Primer and Paint This is crucial. Get a self-etching primer made for metal wheels. Primer helps paint stick and prevents rust from forming underneath. For the actual paint, buy high-quality spray paint designed for automotive use. Never use regular spray paint from the hardware store. Automotive paint is tougher and lasts much longer.
Finishing Products After painting, you’ll want to protect your work. Clear coat spray adds shine and protects the black paint from UV rays and weather. Ceramic coating is even better if you want maximum protection. Some people prefer a matte finish instead of glossy, which requires special matte clear coat.
Removing Wheels: Getting Started Right
The first real step is getting the wheels off your car. Make sure you’re on flat, level ground and your car is turned off. Engage the parking brake. Find a safe spot to work where you won’t be in anyone’s way.
Loosen the lug nuts before you raise the car. This is super important. If you try to loosen them after raising the vehicle, the wheel will spin freely and you’ll have a hard time. Just break them loose a bit, don’t remove them yet.
Use a jack to lift your car. Make sure the jack is rated for your vehicle’s weight. Position it on the frame where it’s meant to go. Raise the car slowly and steadily. Once the wheel is off the ground, you can fully remove the lug nuts and take off the wheel.
Repeat this for all four wheels if you’re painting all of them. Having all four wheels ready to work on keeps your momentum going. Place the wheels in a safe spot where they won’t roll away.
Cleaning Your Rims Thoroughly
Never skip this step. Clean rims make all the difference between a paint job that lasts for years and one that chips off in months. Dirty, greasy rims won’t hold paint well.
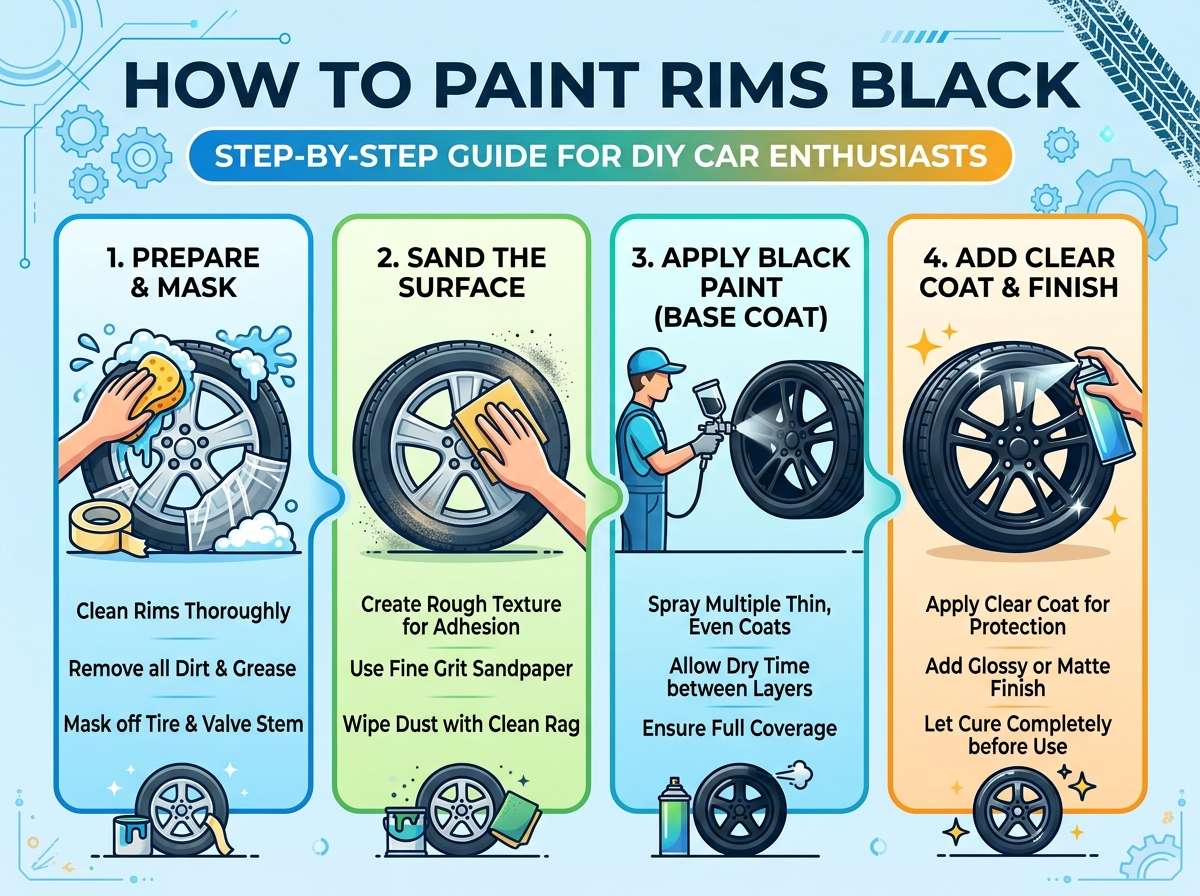
Fill a bucket with warm soapy water. Grab your stiff brush and start scrubbing each rim. Pay special attention to the barrel and face of the wheel. Get into all the crevices and around the lug holes. Rinse with clean water and dry completely with a clean cloth.
Now use degreaser on any stubborn grease or brake dust. Spray it on and let it sit for a minute. Scrub with your brush again. Rinse thoroughly. Brake dust contains metallic particles that interfere with paint adhesion, so be thorough here. Dry the wheels again completely.
If your rims have lots of baked-on dirt or corrosion, soak them in degreaser for a few minutes first. This loosens everything up and makes scrubbing easier. Once they’re clean and dry, you’re ready for the next step.
Sanding Your Wheels for Better Paint Adhesion
Sanding is where many DIY painters mess up. They either skip it or don’t sand enough. Don’t make this mistake. Proper sanding is vital for paint adhesion. Without it, your paint will peel and flake off.
Start with 80-grit or 100-grit sandpaper. This coarser grit removes old paint, clear coat, and surface oxidation. Sand the entire surface of the rim, including the face, barrel, and backside. Use medium pressure and sand in circular motions. You’re trying to dull the shine and create a rough surface for the primer and paint to grip.
Work your way up to finer grits. Use 200-grit next, then finish with 400-grit. These finer grits smooth out the scratches from the coarser paper and get everything ready for primer. The goal is a dull, uniform surface with no shiny spots.
Pay extra attention to any rust spots or corrosion. If you find rust, sand it down to bare metal. Use a wire brush if needed. Rust underneath paint will spread and cause the paint to fail. Get all of it off before moving forward.
After sanding, wipe each rim with a clean, damp cloth to remove all dust. Let them dry completely. You can use a tack cloth if you have one, which grabs fine dust particles. A clean surface is essential for proper paint coverage.
Masking Off Areas You Don’t Want Painted
Take your time with this step. Good masking means clean edges and less cleanup later. It’s worth spending extra minutes getting it right.
Use painter’s tape to mask around the inner lip where the tire meets the rim. You don’t want paint inside the tire area. Cover the valve stem completely. Mask around the center cap area if you’re not painting that. Apply tape to the outer edge where the tire rubber touches the wheel.
Press the tape down firmly so paint doesn’t seep underneath. Make sure all edges are sealed. If you see gaps, fill them with more tape. It might seem like overkill, but it saves time later.
For extra protection, cover the tire itself with plastic or newspaper. Use more painter’s tape to hold these covers in place. You’re creating a barrier so paint only goes on the rim where you want it.
Applying Primer to Your Rims
Primer is the foundation of your paint job. Don’t skimp here. Use self-etching primer designed for metal wheels. This primer chemically bonds to the metal and helps prevent rust.
Shake the primer can for at least two minutes. Follow the directions on the can for shaking. Move to a well-ventilated area, preferably outside. If working in a garage, open all doors and windows. Wear your respirator.
Hold the can about eight to ten inches from the rim. Use smooth, even strokes. Start spraying before you reach the rim and stop after you pass it. This prevents thick spots at the beginning and end of each stroke.
Apply a light first coat. You should be able to see the underlying surface through it. This is fine. Let it dry according to the can’s instructions, usually ten to twenty minutes. Apply a second coat the same way.
Two coats of primer is the standard. Some people do three coats for extra protection, which is fine. Make sure each coat is dry before applying the next one. Don’t rush this part. Good primer application prevents rust and ensures the paint sticks properly.
Painting Your Rims Black
This is the exciting part. High-quality automotive spray paint designed for wheels is what you need. Never use cheap paint. It looks dull, wears off quickly, and doesn’t protect the rim underneath.
Shake the paint can for at least two to three minutes. The instructions will tell you the specific time, so follow them carefully. Moving components inside the can need to be fully mixed. If you don’t shake enough, the paint won’t spray evenly.
Work in a well-ventilated area. Outside is ideal. Wear your respirator, gloves, and safety glasses. Make sure the temperature is between fifty and eighty-five degrees if possible. Cold paint doesn’t spray well. Hot conditions make it dry too fast.
Hold the spray can at the recommended distance, typically eight to ten inches. Use smooth, horizontal strokes. Keep the can moving. Never hold it in one spot or you’ll get drips and runs. One drip ruins the whole panel and you’ll have to sand it down again.
Apply thin coats rather than one thick coat. This is the golden rule of spray painting. Thin coats dry evenly and look better. They’re less likely to run or sag. One thin coat might not fully cover the primer. That’s okay. Let it dry and apply another coat.
Most black paint jobs need two or three coats for solid color coverage. Apply each coat with the same smooth motions. Wait the full drying time between coats. Rushing this step ruins the finish.
Clear Coat: Protecting Your Black Paint
After the black paint is fully dry, apply clear coat. This protective layer shields your paint from UV rays, dirt, and water. It also gives the rim that professional, shiny finish.
Treat clear coat the same way as the paint. Shake it well. Use thin, even coats. Apply it with the same smooth spray technique. Usually, one or two coats of clear coat is enough.
Clear coat adds depth to the black color and makes it look richer and more professional. Some people prefer a matte finish instead of glossy. If that’s you, use matte clear coat instead of regular glossy. The application is the same.
Let the clear coat dry completely. This can take several hours or even a day depending on the product. Be patient. Don’t touch the rim or brush anything against it until it’s fully hardened.
Drying and Curing: Don’t Rush This Part
This step separates weekend warriors from people with lasting results. Just because paint feels dry doesn’t mean it’s fully cured. There’s a big difference.
Paint might feel dry to the touch after a few hours. Don’t fool yourself into thinking it’s ready. The paint is still soft and vulnerable. Any contact, dirt, or moisture can damage it.
Let your rims cure for at least twenty-four hours before touching them or moving the car. Forty-eight hours is even better if you have the time. During this time, keep them in a clean, dust-free environment. Don’t wash the car. Don’t drive it through puddles. Keep everything off the wheels.
After the full curing time, your paint is hardened and ready to handle normal use. That’s when you can reinstall the wheels and get back on the road.
Reinstalling Your Wheels on the Car
Once the paint is fully cured, you’re ready to put the wheels back on. Reverse the removal process. Make sure your car is still on the jack and elevated.
Lift the car slightly to align the wheel with the lug holes. Slide the wheel onto the studs. Start by hand threading the lug nuts. This keeps the wheel straight and prevents cross-threading. Once they’re all started, tighten them by hand as much as you can.
Lower the car until the wheel touches the ground but the car is still slightly on the jack. Now tighten the lug nuts with a wrench or impact wrench. Use a star pattern when tightening. Go to opposite sides of the wheel. This ensures even pressure and proper seating.
Tighten firmly but don’t over-tighten. You can crack the rim if you use too much force. A snug fit is all you need. Lower the car completely and double-check that all lug nuts are tight.
Repeat this process for the remaining wheels. Once all four wheels are installed, you’re done with the mechanical part.
Maintaining Your Freshly Painted Rims
Your hard work is installed and looking sharp. Now keep it looking good. Regular maintenance extends the life of your paint job.
Wash your rims every two weeks with regular car wash soap and water. Use a soft cloth or sponge. Avoid abrasive scrubbers that can scratch the clear coat. Dry them with a microfiber cloth to prevent water spots.
Brake dust builds up on wheels constantly. This stuff is corrosive and can damage paint if left sitting. A quick rinse with water during your regular car wash keeps it under control.
Every couple of months, apply a wheel sealant or ceramic coating designed for wheels. These products add extra protection against dirt, brake dust, and UV rays. They make the rims easier to clean too. Applying them is as simple as spraying and wiping.
Avoid harsh wheel cleaners or acid-based products if possible. These can damage the paint and clear coat over time. Stick with mild soap and water. If you use specialized wheel cleaners, test them on a small area first.
Common Mistakes to Avoid
Learning what not to do saves you time and frustration. Here are the mistakes most beginners make.
Skipping the sanding step is the biggest mistake. Unsanded rims won’t hold paint properly. The paint flakes and peels off within weeks. Always sand, even if the rim already has paint on it.
Not cleaning properly is a close second. Dirt, grease, and brake dust prevent paint adhesion. Take the time to really clean your rims. This investment pays off with a longer-lasting finish.
Using cheap paint is another huge mistake. Dollar store spray paint looks terrible and wears off quickly. Spend the money on proper automotive paint. It looks better and lasts years longer.
Applying thick coats instead of thin ones causes drips and runs. Thick paint also takes longer to cure properly. Stick with thin coats and build up coverage gradually.
Not waiting between coats is tempting but ruins the finish. The can instructions tell you the minimum dry time. Follow it. Paint applied over wet paint wrinkles and doesn’t adhere properly.
Painting in cold weather or high humidity causes problems. Cold paint doesn’t spray smoothly. High humidity makes it dry unevenly and can cause a cloudy finish. Wait for better weather if possible.
Alternative Methods for Painting Rims
Spray painting is the most popular method, but it’s not the only option. Here are some alternatives.
Brush painting is possible but not recommended. Brushes leave visible brush strokes and the finish looks uneven. Spray painting gives a much smoother, more professional result. If you absolutely must brush paint, use very thin coats and quality automotive paint.
Roll-on coating is a newer option. Some people mix paint with a special additive and roll it on like latex house paint. This method is slower and doesn’t give as smooth a finish as spray painting. It’s mainly used for DIY jobs on a tight budget.
Professional powder coating is the ultimate option. You take the wheels to a shop where they apply powder coat in an industrial oven. The result is incredibly durable and has a perfect finish. The downside is cost. Powder coating all four wheels can be expensive compared to DIY spray painting.
Some people dip their rims instead of painting them. Dipping uses a special liquid polymer that creates a rubber-like coating. It’s fast and looks good, but it’s not as protective as paint. Dip also tends to peel with age.
Troubleshooting Common Problems
Even with careful work, things sometimes go wrong. Here’s how to fix common issues.
If you get drips or runs in the paint, you applied too thick a coat. Let the paint fully cure, then sand down the drip with fine-grit sandpaper. Clean and respray that area. Next time, use thinner coats and keep the spray can at the proper distance.
A cloudy or hazy finish means you painted in high humidity or applied coats too close together. Once fully cured, you can wet sand the rim with super fine sandpaper and then apply a fresh coat of clear coat.
If the paint won’t stick and starts peeling, you probably didn’t sand properly or didn’t clean well enough. Sand the rim back down and start over with primer. Take more time on the prep work this round.
Orange peel texture happens when paint dries too quickly or when the spray technique is off. It’s minor and won’t affect performance, but if it bothers you, let it cure and lightly wet sand it, then apply clear coat again.
Uneven color coverage usually means you didn’t apply enough coats. Once everything is fully cured, apply another coat of black paint and clear coat over the entire rim.
The Bottom Line
Painting rims black is totally doable as a DIY project. The key is taking your time, using quality materials, and following each step carefully. Proper preparation is honestly more important than the painting itself.
Start to finish, plan on a full day for cleaning and prep, another day for priming and painting, and several days for curing. It’s not a weekend project you can rush. But the results are absolutely worth the time investment.
Your car will look completely different with fresh black rims. They work on any vehicle and instantly make your car look more expensive and well-maintained. Once you’ve done it once, you’ll wonder why you didn’t do it sooner.
So grab your supplies, clear out some garage space, and get started. Your new black rims are waiting. Just remember to take it slow, stay patient, and enjoy the transformation of your vehicle. The pride you’ll feel driving around on freshly painted rims makes the whole process worthwhile. Happy painting.

Peterson is an automotive enthusiast and auto parts reviewer with a passion for vehicle maintenance, upgrades, and performance. He enjoys researching and testing car parts, tools, and accessories to help drivers make informed buying decisions. Through AutoPartsTalk.com, Peterson shares honest reviews, practical maintenance tips, and expert guides to keep vehicles running safely and efficiently.