How to Remove Scratches from Bare Metal?
Bare metal surfaces look great when they’re shiny and smooth. But scratches happen. Maybe you accidentally dragged something across your metal table. Maybe your tools left marks on your metal shelf. Or maybe your car’s bare metal panel got scuffed up in the driveway.
The good news? You can fix those scratches. You don’t need to be a pro. You just need the right tools and a bit of patience. This guide will show you exactly how to remove scratches from bare metal surfaces step by step.
Why Bare Metal Gets Scratched So Easily
Bare metal sits exposed with no protective coating. Unlike painted surfaces, bare metal sits there with nothing between the metal and the rest of the world. This makes it easy for scratches to happen.
A scratch is just a break in the metal surface. When you drag something across bare metal, you remove a thin layer. This creates that visible line. The deeper the scratch, the more noticeable it becomes.
Understanding scratches helps you pick the right removal method. Shallow scratches take less work to fix. Deep gouges might need more effort. But almost all scratches can get better with the right approach.
Types of Metal Scratches and What You’re Dealing With
Not all scratches are the same. Knowing what type you have makes a big difference in how you’ll fix it.
Surface Scratches
Surface scratches sit on top of the metal. They look like thin lines, but they don’t cut deep. You can feel them slightly when you run your finger across the metal, but they’re pretty shallow. These are the easiest to remove.
Fine Scratches
Fine scratches are a step deeper than surface scratches. They’re more visible and they cut into the metal more. You can usually see light or shadow in these scratches because they create actual grooves in the surface.
Deep Gouges and Dents
Deep scratches or gouges go far into the metal. These are the tough ones. They might even have metal missing from the surface. Deep damage takes more work to fix, but you can still improve the look.
Rust Scratches
If your bare metal has been exposed to moisture, scratches might have turned rusty. These need special treatment because you have to deal with both the scratch and the rust together.
What You’ll Need Before You Start
Grab these supplies before you begin your metal scratch removal project. Having everything ready makes the job go faster.
Essential Tools and Materials
- Sandpaper in various grits: Start with 80-grit for rough work, move to 120-grit, then 220-grit, and finish with 400-grit or higher
- Sanding block or sanding pad: Helps you sand evenly and prevents hand fatigue
- Rubbing compound: Removes fine scratches and brings back shine
- Metal polish: Brings out the natural luster of the bare metal
- Polishing cloth or microfiber cloth: Won’t scratch the surface while you work
- Wire brush: Gets rid of loose rust and debris
- Steel wool: Fine steel wool helps blend scratches into the surrounding surface
- Degreaser or cleaning solution: Removes oil, dirt, and grime before you start
- Safety gear: Wear gloves to protect your hands and safety glasses for your eyes
- Dust mask: Sanding creates dust, so protect your lungs
- Protective finish (optional): Clear coat or wax to protect your work
Some people like to use power tools like an orbital sander or wire wheel attachment on a drill. These tools speed up the job, but hand tools work fine too.
How to Remove Shallow Surface Scratches
These scratches are the easiest to handle. Start here if your bare metal has light damage.
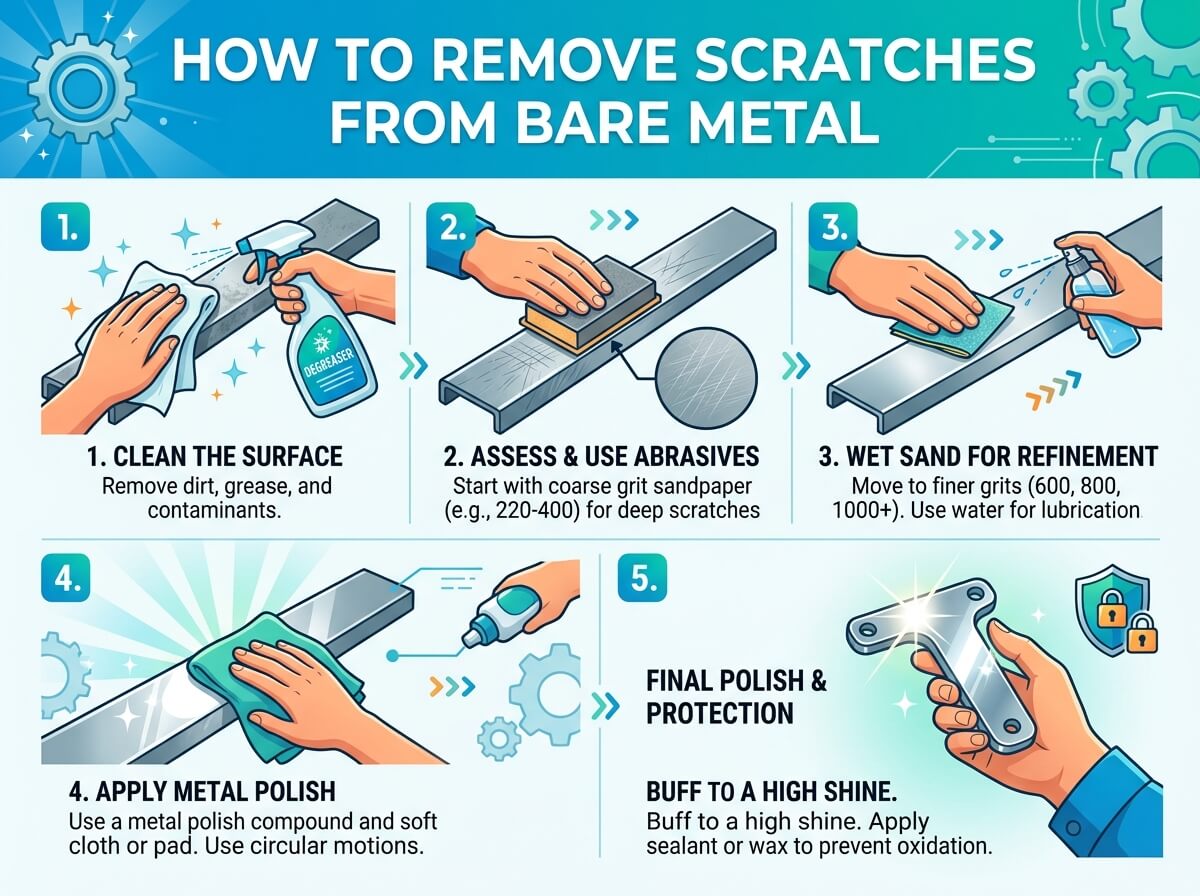
Step 1: Clean the Area
First things first. Wash the scratched area with a degreaser or soap and water. Dry it completely. You need to see what you’re working with, and dirt gets in the way.
A clean surface also means your polishing compounds will work better. Grime creates a barrier that stops the polishing agents from reaching the metal.
Step 2: Apply Rubbing Compound
Rubbing compound is a mild abrasive that removes light surface damage. Apply it directly to the scratch area. Rub it in using gentle circular motions with a soft cloth.
Don’t press hard. Let the compound do the work. The abrasive particles in the compound will slowly wear away the edge of the scratch.
Step 3: Polish the Surface
After the rubbing compound starts to blend the scratch, switch to metal polish. Use a clean cloth and apply polish using the same circular motion.
This step brings back the shine and smoothness. Keep polishing until the scratch blends in with the surrounding metal. The scratch should become less visible or disappear completely.
Step 4: Wipe Clean
Use a fresh, clean cloth to wipe away any leftover polish. Dry the metal completely. Look at your work under good lighting to see if the scratch is gone.
For shallow scratches, this method works great. Many surface scratches disappear completely.
How to Remove Fine and Medium Scratches
These scratches go deeper than surface marks. They need more work, but the process is straightforward.
Step 1: Clean Thoroughly
Wash and dry the area just like before. Make sure no dirt or dust remains on the surface. Any debris will interfere with sanding.
Step 2: Start Sanding
Now grab your sandpaper. Start with 80-grit or 120-grit sandpaper if the scratch isn’t too deep. Sand back and forth across the scratch, not along it. This motion helps blend the edges.
Sand in overlapping strokes. Cover a slightly wider area than just the scratch itself. This helps the repair blend into the surrounding metal.
Don’t sand too hard or too long in one spot. You want to level the metal around the scratch, not create a dent. Light to medium pressure works best.
Step 3: Check Your Progress
Stop and look at the scratch. The goal is to make it less visible. The edge of the scratch should start to blend into the surrounding surface.
If the scratch is still deep, continue with the same grit. Once the scratch becomes shallower, move to the next grit up (like 120-grit if you started with 80-grit).
Step 4: Progress Through Finer Grits
Move from 120-grit to 220-grit to 400-grit. Each step removes the scratches made by the previous sandpaper. This process creates a smooth, blended finish.
Spend less time on each grit as you go finer. You’re smoothing, not removing now.
Step 5: Polish and Finish
Once you reach 400-grit or higher, apply rubbing compound followed by metal polish. This brings back the shine and hides any remaining micro-scratches from sanding.
Your bare metal should now look smooth and blend much better.
How to Remove Deep Scratches and Gouges
Deep damage is tougher. You’ll need patience and time, but you can make a real difference.
Step 1: Prepare the Area
Clean the damaged area thoroughly. If rust is present, use a wire brush or steel wool to remove it. Get the metal as clean as possible.
For rusty scratches, you might need to use a rust converter product to treat the rust chemically before sanding.
Step 2: Sand with Coarse Grit
Start with 80-grit sandpaper. Use firm pressure and sand back and forth across the gouge. The goal is to level the metal on both sides of the scratch.
This takes time. Keep sanding until the lowest point of the scratch lines up with the surrounding surface. You’re not removing the scratch completely. You’re blending it in.
Step 3: Progress to Medium Grits
Move to 120-grit, then 220-grit. Spend good time on each grit to ensure smooth progression. The scratch should become less and less visible.
Deep scratches take longer to blend. You might spend five to ten minutes on each grit depending on how deep the damage is.
Step 4: Finish with Fine Sanding
Use 400-grit and possibly 600-grit sandpaper to create a smooth finish. At this stage, you’re removing the scratches left by coarser sandpaper.
Step 5: Metal Finishing
Now apply rubbing compound to restore the metal’s appearance. Follow with metal polish. This brings back shine and makes the repair blend beautifully.
For very deep gouges that go all the way through the metal, you might need to fill the hole. Metal epoxy putty or solder works for this. Fill the hole, let it dry, then sand it smooth and polish.
Using Steel Wool for Fine Blending
Steel wool is underrated for metal scratch removal. Fine steel wool (0000 grade) does amazing work on blending and finishing.
After you’ve sanded with fine-grit sandpaper, use steel wool with rubbing compound. Rub gently in circular motions. This technique creates a super smooth finish and helps the scratch blend in.
Steel wool is gentler than sandpaper. It removes tiny imperfections without creating new scratches.
The Power of Metal Polish and Compounds
These products deserve their own section because they’re powerful tools.
Rubbing compound contains mild abrasives that remove fine scratches and dull spots. The particles in the compound are suspended in a creamy base that lets you apply it evenly.
Metal polish is finer than rubbing compound. It brings back shine and smoothness. Polish should be your last step because it’s meant to protect and beautify, not remove deep damage.
Using the right product in the right order matters. Start rough and work your way to fine. Don’t jump straight to polish on a deep scratch. It won’t work because the abrasive is too mild.
Protecting Your Work: Finish and Maintain
Once you’ve removed the scratch, you probably want it to stay fixed. Bare metal likes to oxidize and rust, so protection helps.
Apply a Clear Coat
For metal items that get handled or exposed to weather, a clear coat protects your repair. Spray-on polyurethane clear coat works great. It dries to a hard finish that resists scratching and rust.
Let the clear coat dry completely before touching the metal.
Wax Your Bare Metal
Wax creates a protective barrier. It also brings out the shine and warmth of bare metal. Apply wax with a soft cloth in circular motions. Buff it off with another clean cloth.
Wax needs to be reapplied every few months depending on use and weather.
Keep It Clean and Dry
The best protection is keeping your bare metal clean and dry. Wipe it down regularly. If it gets wet, dry it promptly. Moisture leads to rust, which leads to problems.
Store bare metal items indoors if you can. If outdoor storage is necessary, cover them with a tarp.
Common Mistakes to Avoid
Learning what not to do saves you time and frustration.
Don’t Skip the Cleaning Step
Starting with a dirty surface wastes time and materials. Dirt interferes with sanding and polishing. Always clean first.
Don’t Use Too Much Pressure
Heavy pressure doesn’t remove scratches faster. It just creates new problems. Light to medium pressure works best. Let the tools do the work.
Don’t Jump Grits Too Quickly
Each grit size removes scratches from the previous one. Skipping grits leaves visible scratches. Progression matters.
Don’t Sand in One Direction Only
Sanding back and forth blends better than sanding in one direction. Directional sanding creates visible patterns.
Don’t Use Dirty Cloths
Dirt particles on a cloth can scratch the metal. Always use clean cloths. Microfiber cloths are best because they don’t shed fibers.
Don’t Apply Too Much Product
A little rubbing compound goes a long way. Thick application wastes product and makes cleanup harder. Use just enough to cover the area thinly.
Don’t Forget Safety Gear
Sanding creates dust. Wear a mask. Wear gloves to protect your hands. Wear safety glasses to keep dust out of your eyes.
Tips for Different Metal Types
Different metals react slightly differently to scratch removal.
Stainless Steel Scratches
Stainless steel resists rust, which makes repairs easier. Follow the standard process, but use stainless steel polish at the end. It brings out the natural shine of stainless.
Aluminum Scratches
Aluminum is softer than steel. Use lighter pressure and finer grits. Aluminum can easily get over-sanded or gouged if you’re not careful.
Copper and Brass Scratches
These metals are also soft. They respond well to rubbing compound and polish. The finish is easier to restore than on steel.
Carbon Steel and Cast Iron
These metals rust easily. After scratch removal, apply a protective finish immediately. Don’t leave them bare and exposed to air.
DIY vs. Professional Help
When should you try this yourself? When should you call a pro?
Do It Yourself If:
- The scratch is shallow to medium depth
- You have time and patience
- The item isn’t valuable or rare
- You don’t mind if the repair isn’t perfect
- You want to save money
Call a Professional If:
- The scratch is extremely deep or long
- The item is valuable or antique
- You need a perfect finish
- The metal is heavily rusted
- You don’t have the tools or supplies
Professionals have power tools and experience. They can handle difficult jobs that would take you hours. But for most household scratches, DIY works great.
Frequently Asked Questions
Can I remove scratches from bare metal permanently?
You can make scratches much less visible or completely invisible. However, the metal memory remains. You’ve redistributed the metal, not magically fixed it. With proper care and maintenance, the repair can last for years.
How long does the process take?
For shallow scratches, you might spend 30 minutes total. For deep scratches, plan on a couple of hours. Very deep damage might need a full day’s work.
Do I need expensive tools?
No. Basic hand tools work fine. Sandpaper, cloth, and rubbing compound are cheap. Power tools speed up the job but aren’t necessary.
What if the scratch gets rusty?
Remove the rust first with a wire brush or rust converter. Then follow the repair process. The rust prevents you from seeing the actual scratch, so getting rid of it matters.
Can I fix scratches on painted metal?
This guide focuses on bare metal. Painted metal needs different techniques. You’d need to sand through the paint, which requires more careful work.
Will the repair show under certain light?
Sometimes yes, sometimes no. It depends on how deep the original scratch was. Shallow scratches usually disappear completely. Deep damage might show a slight difference in light, but it’s far less noticeable than the original scratch.
What’s the best way to prevent future scratches?
Keep protective covers on metal items. Apply wax or clear coat. Handle items carefully. Store them properly. Prevention is always easier than repair.
Your Bare Metal Scratches Don’t Have to Stay
Scratches in bare metal look bad, but they’re fixable. You now know how to handle shallow scratches, medium damage, and deep gouges. The process takes time, but it’s not difficult.
Start with the right supplies. Take your time with each step. Progress through the grits properly. Finish with polish and protection. Your bare metal will look so much better.
Most scratches can be reduced to barely noticeable marks or removed completely. Some deep damage might leave a faint trace, but that’s miles better than the original gouge.
Don’t let scratches ruin your bare metal items. Use these techniques to restore them to near-original condition. Your tools, metal furniture, car panels, and decorative metal pieces can all look great again.
Now grab your sandpaper and get started. Your bare metal will thank you.