How to Install Wheel Spacers?
You’ve probably seen cars that look wider and more aggressive on the road. Their wheels sit further away from the body. That look comes from wheel spacers. Installing them is easier than you think, and I’m here to walk you through every step.
What Are Wheel Spacers Anyway?
Wheel spacers are simple metal rings that sit between your wheel and the hub. They push your wheels outward. Think of them like shims for your car. They create space between the inside of your wheel and your vehicle’s body.
The main purpose is to make your car look wider and more planted on the road. Your wheels stick out further. Some people call this stance modification or wheel offset adjustment. It gives your car an aggressive stance that turns heads.
You have different options for spacer thickness. They come in sizes like 5mm, 10mm, 15mm, 20mm, and even thicker. The thicker the spacer, the further your wheels push out.
Why People Install Wheel Spacers
The main reason is looks. A wider wheel track makes any car appear more muscular. Your vehicle sits lower visually. The gap between your wheel and your car’s body fills in. It looks intentional and professional.
Another reason is wheel fitment. Sometimes you want to run wider wheels without changing your suspension or buying new ones with different offsets. Spacers let you adjust your wheel position without buying expensive new wheels.
Some people use spacers for better brake clearance. This is common when upgrading to larger brake rotors. The spacer pushes the wheel out just enough to clear the bigger brakes.
There’s also the performance angle. A wider stance can improve handling in some cases. Your wheels are further apart. This increases your track width. Your center of gravity shifts slightly. However, this effect is minimal with small spacers.
Types of Wheel Spacers You Should Know About
Bolt-on spacers are the most common type. They bolt directly to your wheel studs. Your wheel bolts to the spacer. Then the spacer bolts to your hub. Most people use these because they’re affordable and easy to install.
Slip-on spacers slide over your wheel studs. You push them on and tighten your wheel lug nuts. These are less common because they can be riskier if not installed correctly.
Hub-centric spacers have a ring that matches your vehicle’s hub bore. This ring centers your wheel perfectly. It takes stress off your lug nuts. This is the better option for most people.
Lug-centric spacers rely on your lug nuts to hold everything in place. The bolt holes align your wheel. The lug nuts do the centering work. These are cheaper but not as ideal.
Two-piece spacers have threaded rings on both sides. You bolt them to your hub first. Then you bolt your wheel to the outer threads. These are sturdy and can handle extreme offsets.
One-piece spacers are solid rings that bolt directly between your hub and wheel. They’re simple and very strong. Most people choose these for street use.
Tools and Materials You’ll Need
Gather everything before you start. You don’t want to stop halfway through because you’re missing something.
You’ll need a jack and jack stands. Never work under your car with just a jack. Use stands to keep your vehicle safe while you work underneath.
A lug wrench or socket set is essential. Your wheel lug nuts need to come off. A torque wrench is important too. You need to tighten things to the correct specification.
Spacers come with new lug bolts or studs. Make sure you have the right bolt length. Longer bolts are needed when spacers push the wheel further out.
Some people use anti-seize lubricant. This prevents corrosion on your studs. It’s optional but recommended, especially in wet climates.
A work light or flashlight helps you see what you’re doing. Getting under your car is dark. Having good light makes the job easier and safer.
Cleaner spray removes dirt from your studs and hubs. Clean surfaces help everything fit snugly together.
Preparation Steps Before Installation
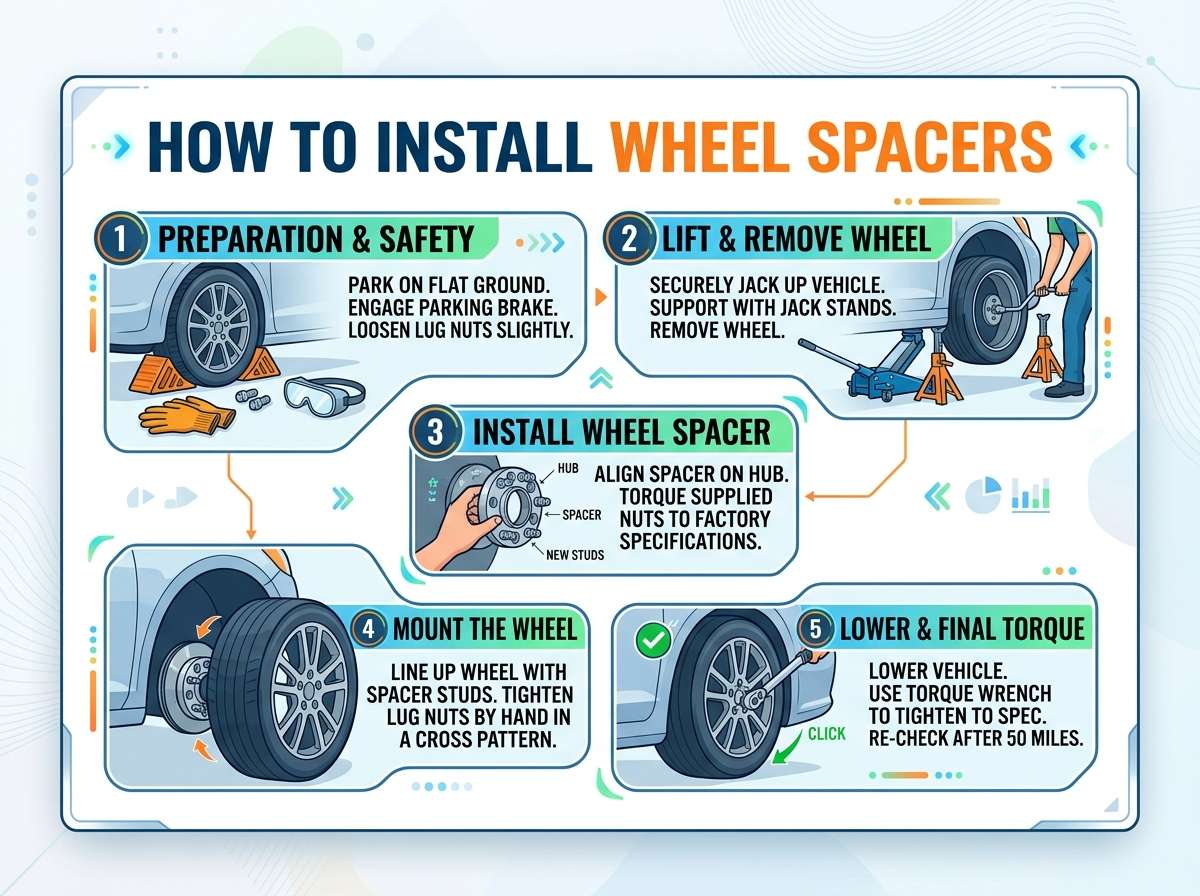
Start by parking on a flat, level surface. Your car should be stable before you lift it. Turn off the engine and engage the parking brake.
Remove any wheel covers or center caps from your wheels. These sit on top of your wheel center. You need access to your lug nuts.
Loosen your lug nuts while the car is still on the ground. Don’t remove them yet. Just crack them loose. Your wheel won’t spin when you’re not jacked up. This makes breaking the nuts loose much easier.
Now place your jack under the frame. Refer to your vehicle’s manual for the proper jacking points. Lift your car slowly until your wheel is a few inches off the ground.
Slide your jack stands under the frame right next to the jack. Lower your car onto the stands. Never work under a car supported only by a jack.
Now you can fully remove those lug nuts. Place them somewhere safe where they won’t roll away. I use a small container so I don’t lose any.
Remove your wheel by pulling it straight toward you. It might stick slightly. Rock it gently side to side. It’ll come free.
Set your wheel aside safely. You don’t want it rolling across your work area.
The Installation Process: Step by Step
Now comes the actual installation. Take your time with this part.
Step 1: Clean Your Hub
Look at the hub where your wheel was mounted. It’s the round metal area your wheel bolts to. Clean it with your cleaner spray. Remove all dirt and debris. A clean surface helps everything sit flush and tight.
Step 2: Examine Your Lug Studs
Check the studs sticking out from your hub. Make sure they’re not damaged or bent. If any studs look bad, don’t use them. You might need new ones before installing spacers. Clean the studs too.
Step 3: Position Your Spacer
Take your spacer ring and slide it onto your studs. Line up the holes. It should slide on easily. If it’s tight, you might have the wrong size spacer for your car.
Step 4: Install New Lug Bolts or Extended Studs
If your spacer is thick enough, your original wheel bolts might not work anymore. They’re not long enough to reach through the spacer and into the wheel. You need longer bolts.
Install these new bolts through the spacer. They should thread into your wheel. Don’t fully tighten them yet. Hand tighten only at this stage.
Step 5: Install Your Wheel
Slide your wheel onto the spacer and the lug bolts. The wheel should sit flat against the spacer. Line up all the bolt holes.
Step 6: Hand Tighten All Bolts
Go around in a star pattern and hand tighten all bolts. This pattern prevents uneven tightening. Start at one bolt, skip one, then go to the next. Create a star shape with your tightening pattern.
Hand tight means snug but not hard. Your fingers provide the force. Don’t use tools yet.
Step 7: Lower Your Vehicle
Once all bolts are hand tight, you can lower your car. Use your jack to raise your vehicle slightly. Remove the jack stands slowly. Lower your car to the ground gently.
Step 8: Torque Everything Down
Now use your torque wrench. Refer to your vehicle’s manual for the correct torque specification. Most cars need between 80 and 120 foot-pounds. Never guess on this number.
Again, use the star pattern. This ensures even pressure all the way around. Tighten one bolt, skip one, go to the next.
Apply steady pressure with your wrench. Go slowly until you hear the click or feel the wrench slip. That’s your signal that you’ve reached the correct tightness.
Go around twice with the star pattern. This helps distribute the load evenly.
Step 9: Repeat on All Four Wheels
Do the same process on each wheel. It takes patience but it’s worth it. Don’t skip any wheels just because you only wanted to space one side. Always do all four for balanced handling.
Step 10: Double Check After Driving
Drive around the block after you finish. Listen for any rattles or weird noises. Stop at home and check all your lug nuts again. Sometimes they’ll settle slightly after driving. Make sure they’re still tight.
Important Things to Know About Spacer Installation
Hub-centric vs lug-centric matters. Hub-centric spacers are better. The wheel centers on your hub bore, not just your lug nuts. This is safer and feels more solid.
Wheel offset changes everything. Your wheel offset determines how far in or out your wheel sits naturally. Spacers add outward offset. Know your original offset before you space your wheels.
Brake clearance is critical. Make sure your spacers don’t interfere with your brakes. Your brake calipers need room to breathe. Install and test carefully.
Extended studs sometimes needed. Standard wheel bolts might bottom out before creating proper clamping force. Extended studs are longer. They work better with thick spacers.
Don’t cheap out on spacers. Buy spacers from reputable manufacturers. Quality spacers are precision made. Cheap ones can cause vibration and safety issues.
Suspension geometry changes slightly. Your camber and caster change when you install spacers. This is usually minor with thin spacers. Thicker spacers create more noticeable changes.
Alignment might be necessary. After installing spacers, your wheel alignment might shift. Your car might pull to one side. A quick alignment check is smart. Many shops offer free alignment checks.
Common Mistakes People Make
Forgetting to use jack stands. Never trust a jack alone. Jack stands are non-negotiable. This is about safety. Don’t skip this step.
Not tightening to spec. Guessing on torque is risky. Under-tightened bolts can loosen. Over-tightened bolts can strip. Use a torque wrench every time.
Installing bolt-on spacers wrong. Some people bolt the spacer to the wheel instead of the hub. This is backwards and dangerous. Always bolt the spacer to the hub first.
Mixing bolt types. Don’t use your original bolts with new spacers if they’re not long enough. Use proper extended hardware. Mixing parts causes problems.
Ignoring alignment. After spacers, your alignment changes. Ignoring this causes uneven tire wear. Your car might handle weird. Get checked by a professional.
Not cleaning your hub. Dirt between your hub and spacer prevents proper seating. Your wheel won’t be perfectly centered. Clean everything thoroughly.
Going too thick too fast. Start with small spacers like 10mm or 15mm. See how your car looks and handles. You can always add more later.
Forgetting about all four wheels. Some people space only the front. This creates an unbalanced look and weird handling. Always do all four wheels.
Maintenance After Installation
Your spacers don’t need much maintenance. They’re basically permanent once installed. However, a few things help them last.
Check torque monthly at first. Your first month of ownership, check your lug nut torque every few weeks. Check them after your first drive. Then monthly for a while.
Clean them occasionally. Brake dust builds up on spacers. Wash them when you wash your wheels. Keep them clean to prevent corrosion.
Inspect for damage. If you hit a big pothole, check your spacers. Look for cracks or bent areas. Damaged spacers need replacement immediately.
Watch for vibration. If you develop a vibration after spacing, something’s wrong. It could be unbalanced wheels or loose bolts. Get it checked right away.
Rotate your tires regularly. Your tires wear differently with different stance. Rotation every 5,000 to 7,000 miles keeps them even.
Does Spacing Your Wheels Affect Your Warranty?
This is a gray area with manufacturers. Some dealers are cool with spacers. Others view them as suspension modification. It depends on your vehicle and dealer.
Generally, spacers won’t void your entire warranty. However, if something suspension-related breaks, dealers might deny that claim. They could argue your modification caused it.
Check with your dealer first. Ask them directly about spacers. Get their answer in writing if possible. Some dealers are fine with it. Others aren’t.
When to Call a Professional
Some people prefer professional installation. There’s nothing wrong with that. Some situations definitely need a pro.
You don’t have proper tools. A torque wrench is not optional. If you don’t have one, take your car to a shop. Improper torque is dangerous.
You’re not comfortable working under your car. This work requires lifting your vehicle. If you’re nervous, let someone else do it. Your confidence matters for safety.
Your studs are damaged. If your studs are bent or damaged, a shop should replace them first. This is beyond basic spacer installation.
You want alignment done immediately. A shop can space your wheels and align your car the same day. That’s convenient if you want it done right.
You need extended studs installed. If your spacers need extended studs instead of bolts, a shop can handle this. It requires some expertise.
Most shops charge between 50 and 150 dollars per wheel for installation. Four wheels might cost 200 to 600 dollars total. It’s not crazy expensive if you decide to go that route.
FAQ About Wheel Spacers
Q: Will spacers hurt my gas mileage?
A: Slightly wider stance creates slightly more drag. The effect is minimal though. You probably won’t notice any difference in fuel economy.
Q: Can I use spacers with my factory wheels?
A: Yes, absolutely. Spacers work with any wheels. Factory or aftermarket, spacers push them out the same way.
Q: How thick can I go?
A: This depends on your car. Some cars handle 25mm or even 30mm spacers. Others maxout at 10mm before hitting issues. Start smaller and work up.
Q: Will spacers affect my suspension negatively?
A: Minimal spacers have minimal effect. Thick spacers change geometry more. Your camber, caster, and toe all shift slightly. Stay conservative with thickness.
Q: Do I need new lug nuts?
A: Usually yes. Your bolts need to be long enough to reach through the spacer and seat properly in your wheel. Shorter bolts won’t work.
Q: Can I install spacers myself if I’ve never done it?
A: Yes, if you take your time and follow steps carefully. This is a beginner-friendly job. You just need patience and the right tools.
Q: What if my spacer doesn’t fit?
A: This is rare but happens. Make sure you bought the right spacer for your car. Hub bore diameter matters. Lug pattern matters. Double check before installation.
Q: Should I use front and rear spacers of the same thickness?
A: Not necessarily. Some people use different thicknesses front and rear. This changes your stance angle. Experiment based on how you want your car to look.
Q: Will spacers make my wheels wobble?
A: No, not if installed correctly. Use hub-centric spacers and tighten properly. Your wheels will be just as solid as without spacers.
Q: Can I remove spacers later?
A: Completely. Just reverse the installation process. You’ll need your original lug bolts back. Everything returns to normal.
Final Thoughts on Wheel Spacers
Installing wheel spacers is an exciting modification. It transforms how your car looks. That aggressive stance is worth the effort.
The installation itself is straightforward. Take your time. Follow the steps. Use proper tools. You’ll be fine.
The hardest part isn’t the installation. It’s the waiting. Waiting for your car to go on the lift. Waiting to see the final result. Waiting to drive around and admire your handiwork.
Start with modest spacer thickness. See how you like it. See how your car handles. You can always add more later. Going smaller is harder after you’ve adjusted to a wider look.
Spacers are one of the most affordable suspension modifications. They cost way less than new wheels with different offsets. They’re simple to install. They deliver real visual results.
Whether you do it yourself or take it to a shop, the result is the same. Your car will look wider, more aggressive, and more planted on the road. That’s a feeling worth chasing.
Get your tools ready. Grab your spacers. Follow the steps I’ve laid out. Then drive your newly spaced car around with pride. You’ve earned it.

Peterson is an automotive enthusiast and auto parts reviewer with a passion for vehicle maintenance, upgrades, and performance. He enjoys researching and testing car parts, tools, and accessories to help drivers make informed buying decisions. Through AutoPartsTalk.com, Peterson shares honest reviews, practical maintenance tips, and expert guides to keep vehicles running safely and efficiently.