How to Clean Brake Calipers?
If you’ve noticed your brakes making noise or your wheels looking like they’ve been dipped in black dust, your brake calipers probably need cleaning. The good news? You can do this yourself at home without expensive tools or special skills.
Brake calipers are the parts of your brake system that squeeze the brake pads against your rotors. Over time, they collect brake dust, dirt, and grime. This buildup can make your brakes less effective and cause annoying squeaking sounds.
In this guide, I’ll walk you through everything you need to know about cleaning brake calipers. You’ll learn what they are, why they get dirty, and exactly how to clean them like a pro.
What Are Brake Calipers and Why Do They Get So Dirty?
Let me explain what brake calipers actually do. When you press your brake pedal, hydraulic fluid pushes pistons inside the calipers. These pistons press the brake pads against the rotor, which slows down your wheels. It’s a simple but brilliant system.
Here’s the thing: every time you brake, tiny particles of brake pad material rub off. These particles mix with the heat from friction and create brake dust. This dust is black and super sticky. It clings to your calipers, wheels, and everything nearby.
Brake dust comes from both the brake pads and the rotors. The faster you brake and the hotter your brakes get, the more dust you create. If you drive in stop-and-go traffic all day, your calipers get dirty faster.
Over time, this dust hardens and bakes onto your calipers. It looks ugly, but more importantly, it can trap moisture and cause corrosion. Corroded calipers don’t work as well, and they can wear out your brake pads faster.
Why Cleaning Your Calipers Matters
You might think brake dust is just a cosmetic problem. You’d be wrong.
Clean calipers mean better braking performance. When your calipers are covered in gunk, heat can’t escape properly. This causes your brakes to overheat. Overheated brakes fade, which means they won’t stop your car as well.
Dirty calipers also cause uneven braking. If one caliper is clogged and the other isn’t, your vehicle can pull to one side when you brake. This is unsafe and makes your car harder to control.
Regular caliper cleaning extends the life of your brake pads and rotors. When your calipers work smoothly, they apply even pressure. This means your pads wear evenly instead of getting damaged in spots.
Plus, your wheels will look amazing. Brake dust makes your rims look filthy no matter how clean your car is. Clean calipers mean clean wheels, which makes your whole vehicle look better.
Tools and Materials You’ll Need
Here’s what to grab before you start.
You need a jack and jack stands to lift your car safely. Never work under a vehicle supported only by a jack. Jack stands are non-negotiable for safety.
You’ll need a lug wrench to remove your wheel. A socket set works too, but a lug wrench is simpler if you only have one.
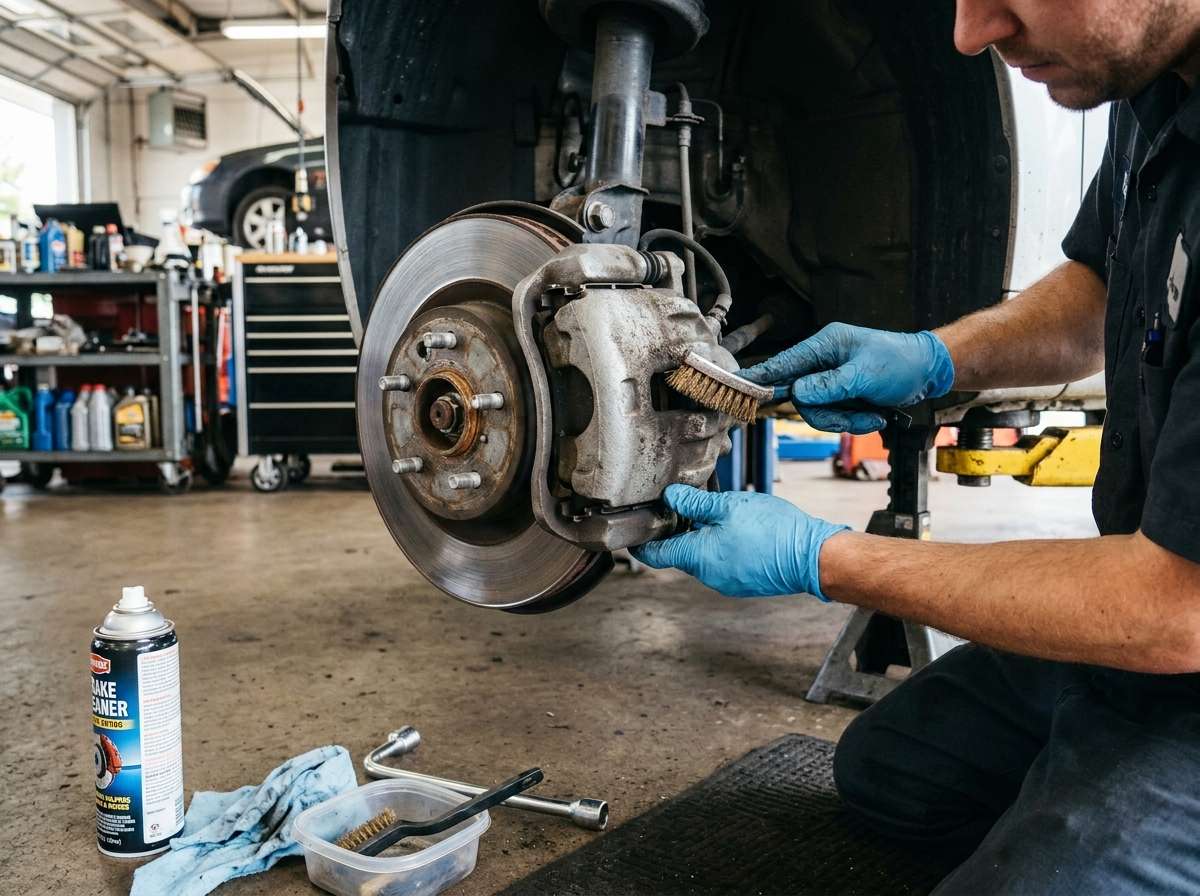
Get some wire brushes or stainless steel brushes. These scrub away dried-on brake dust and grime. Don’t use steel wool because it leaves behind tiny fibers that can cause rust.
A spray bottle filled with water helps rinse away loose debris. You can use a garden hose too, but a spray bottle gives you better control.
Brake cleaner is your best friend here. Get a quality brake cleaner spray that you can buy at any auto parts store. This stuff dissolves brake dust and grease like magic.
Grab some clean rags or paper towels. You need lots of them because brake dust is messy.
A small brush or old toothbrush works great for tight spaces. You’ll use this for detailed cleaning around the caliper pistons and edges.
Consider wearing gloves and safety glasses. Brake dust isn’t great for your skin, and splashing brake cleaner in your eyes hurts.
Some people like to use a pressure washer, but be careful. High pressure can damage brake components if you’re not careful.
Step-by-Step Instructions for Cleaning Your Brake Calipers
Now let’s get into the actual cleaning process. Follow these steps and you’ll have spotless calipers.
Step 1: Prepare Your Workspace and Vehicle
Park on a flat, hard surface. You need solid ground for your jack stands. Asphalt or concrete is perfect. Avoid soft ground or gravel.
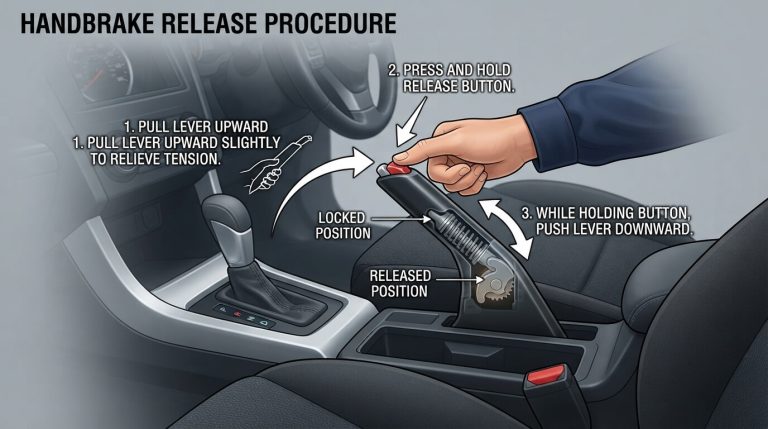
Put your parking brake on. This keeps your vehicle steady while you work.
Let your vehicle cool down if you just drove it. Hot brakes can burn your hands, and brake cleaner works better on cool surfaces anyway.
Gather all your tools and materials in one spot. You don’t want to be hunting for things once you’re elbow-deep in brake dust.
Step 2: Lift Your Vehicle Safely
Place your jack under the vehicle’s frame, not under the body panels. Your owner’s manual shows where the proper lift points are.
Jack up the vehicle only a few inches at first. Once it’s slightly elevated, position your jack stands under the frame. These stands should be close to where your jack is positioned.
Lower the vehicle onto the jack stands. Lower it slowly and make sure it sits firmly. Give it a little push to make sure it’s stable.
Never rely on just the jack. Always use jack stands as backup. This is the most important safety rule here.
Step 3: Remove the Wheel
Loosen the lug nuts while the wheel is still on the ground. Turn them counterclockwise but don’t remove them completely yet.
Now lift the side of the vehicle a bit higher if needed. You need enough room to pull the wheel off.
Finish removing the lug nuts completely and set them somewhere safe where you won’t lose them.
Grab the wheel with both hands and pull it straight toward you. It should come off easily.
Step 4: Do a Quick Inspection
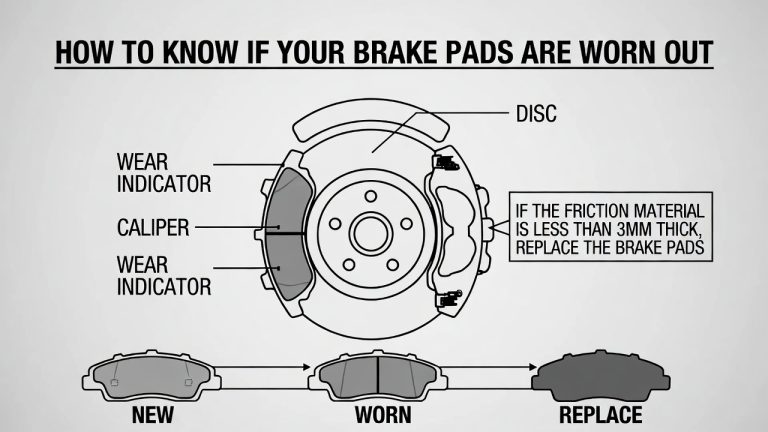
Before you start spraying and brushing, take a good look at your caliper. Look at the condition of the brake pads. If they’re very thin, you might need to replace them while you’re at it.
Check if the caliper is leaking fluid. Small amounts of oil around the seals are normal, but dripping fluid means problems. If you see actual dripping, stop here and get professional help.
Look at the rotor too. If it has deep grooves or damage, it will need replacing.
Take a photo with your phone. It’s helpful to remember what it looked like before you cleaned it.
Step 5: Spray Away the Loose Debris
Now spray everything with your spray bottle or hose. Use plain water at first. This removes loose brake dust and dirt.
Get all the surfaces: the caliper body, the piston area, the brake pads, and the rotor. Don’t be shy. Brake dust is messy and you want to move it away from the good parts.
Let the water sit for a minute. This softens up the dried-on gunk.
Spray again and wipe with a rag. Repeat this process until the water runs mostly clear.
Step 6: Apply Brake Cleaner
Shake your brake cleaner can really well. The instructions on the can say to do this, and they mean it.
Spray brake cleaner on all the caliper surfaces. Focus on the pistons, the mounting bracket, and anywhere you see buildup.
Let it soak for a few seconds. The cleaner needs time to dissolve the gunk.
Wipe it away with a clean rag. You’ll see the dirty residue come off on the rag.
Repeat spraying and wiping several times. Keep going until the rags come back mostly clean. Don’t stop after one or two passes.
Step 7: Scrub with Your Brush
Now grab your wire brush or stainless steel brush. Scrub all the flat surfaces of the caliper gently.
Use smooth, circular motions. Don’t scrub like you’re trying to remove paint. You want to loosen stuck-on debris without damaging anything.
Pay special attention to the corners and crevices where dust collects.
Get your small brush into the tight spaces around the pistons. This is where gunk really likes to hide.
Spray more brake cleaner as you brush. The cleaner dissolves the gunk while your brush helps it along.
Step 8: Clean the Rotor
Your rotor needs attention too. The rotor is the flat disc that the brake pads squeeze against.
Spray it with brake cleaner and wipe it clean with a rag.
If the rotor is really dirty or has stubborn spots, you can brush it gently, but be careful. The rotor surface is precision-finished, so don’t scrub hard.
If your rotor has deep cracks or heavy scoring, replacement is better than cleaning.
Step 9: Final Rinse and Dry
Give everything one final spray with clean water to rinse away any remaining brake cleaner.
Wipe everything down with clean, dry rags. Get as much moisture off as possible.
Use your air compressor if you have one. Compressed air dries everything fast and gets into places rags can’t reach.
Let everything air dry for a few minutes before you drive.
Step 10: Reinstall the Wheel
Lift your vehicle slightly with the jack to take pressure off the jack stands.
Line up the wheel with the lug bolt holes and slide it onto the studs.
Put the lug nuts back on by hand first. Get them snug but not tight yet.
Remove the jack stands and lower the vehicle all the way down.
Now tighten the lug nuts in a star pattern. Go from one nut to the opposite nut. This ensures even tightening.
Tighten them firmly but don’t over-tighten. You can hurt the studs if you make them too tight.
Step 11: Repeat on Other Wheels
You’ve done one wheel. Do the same process on the other three wheels.
It’s important to clean all four brake calipers if you want even braking. If you only do the front wheels, you’ll have imbalanced braking.
Take your time and follow the same steps for each wheel. Quality matters more than speed.
Cleaning Calipers Without Removing the Wheel
You don’t always have to remove the wheel to do basic cleaning. If your calipers aren’t too dirty, you can do it in place.
First, loosen the wheel bolts. Don’t remove the wheel yet.
Jack up the vehicle and secure it with jack stands just like before.
You can now spray and brush without taking the wheel off. You’ll have less room to work, but it’s doable.
The disadvantage is you can’t clean the rotor as well, and you can’t inspect the brake pads thoroughly. But for quick maintenance cleaning, this saves time.
Deep Cleaning for Severely Dirty Calipers
Sometimes calipers get really grimy. Maybe you haven’t cleaned them in a long time, or you drive in harsh conditions.
For deep cleaning, you might need to remove the brake pads themselves. This lets you access the area behind the pads.
To do this safely, you’ll need to know your vehicle’s specific brake system. Some calipers have retaining pins, others don’t. Check your owner’s manual before attempting this.
If you’re not comfortable removing brake pads, a professional mechanic can do a deep clean quickly.
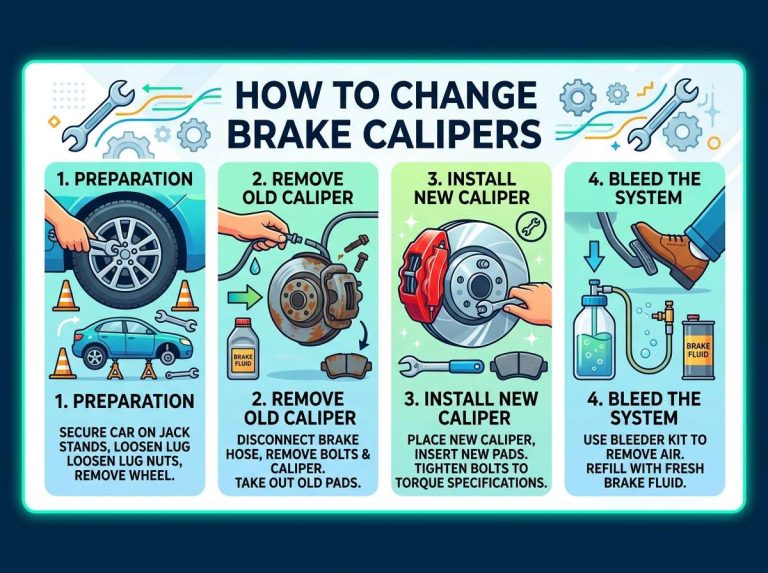
Sometimes heavily corroded calipers need more than cleaning. If you see white or orange powdery corrosion, you might need caliper replacement instead. Corrosion can damage the internal seals and cause brake fluid leaks.
Common Mistakes to Avoid
People often make mistakes when cleaning calipers. Here’s what to avoid.
Don’t use strong acids or harsh chemicals beyond brake cleaner. These can damage paint and rubber seals.
Never use sandpaper on caliper parts. This creates rough surfaces where corrosion can start.
Don’t forget to use jack stands. This is how people get seriously hurt working on cars.
Avoid getting brake cleaner on painted surfaces. It can strip off clear coat and paint.
Don’t leave brake components wet. Always dry everything completely before driving.
Don’t pour brake cleaner down drains. It’s toxic and bad for the environment. Let it evaporate in a safe area or take it to a hazardous waste facility.
Don’t neglect the other brake components. Clean calipers are great, but make sure your brake pads have thickness left and your rotors aren’t damaged.
How Often Should You Clean Your Brake Calipers?
This depends on your driving habits and climate.
If you drive mostly on highways with gentle braking, once a year is fine.
If you drive in heavy traffic with lots of stop-and-go, clean them every six months.
If you live near the ocean where salt spray is common, clean them every three months. Salt causes rust fast.
If you notice brake dust on your wheels, that’s a sign your calipers need cleaning soon.
A good rule is to inspect your calipers whenever you rotate your tires. If they look dirty, spend 30 minutes cleaning them.
Professional Cleaning vs. DIY
You can definitely clean brake calipers yourself. It’s a straightforward job that doesn’t require special skills.
A mechanic will do the same thing you’re doing, but they’ll charge you labor time. Expect to pay around one to two hours of labor per axle at a shop.
The advantage of professional cleaning is that mechanics can spot problems you might miss. They can check if your brake fluid is contaminated and if your calipers are actually functioning properly.
If you’re not comfortable working under your vehicle or you don’t have the tools, professional cleaning is worth the cost.
If you’re mechanically inclined and have a jack and jack stands, DIY is cheaper and gives you a chance to learn your vehicle better.
Safety Considerations You Can’t Ignore
Working on your brakes means working on a critical safety system. Here are the safety rules you absolutely must follow.
Always use jack stands. Never work under a car supported only by a jack.
Wear safety glasses to protect your eyes from spray and debris.
Wear gloves to keep brake dust off your skin. Some studies suggest brake dust might contain harmful materials.
Make sure your parking brake is engaged and your vehicle is in park or in gear.
Never work on a busy street or near traffic.
Don’t start the engine while you’re working underneath the vehicle.
If you’re not sure about something, ask a professional. Your safety is more important than saving money.
What to Do If You Find Problems
While cleaning your calipers, you might discover other issues.
If brake pads are less than one-quarter inch thick, replace them now. Worn pads can damage your rotor.
If fluid is dripping from the caliper, you have a seal leak. This needs professional repair.
If the rotor has deep scoring or cracking, it needs replacement. A damaged rotor can’t be fixed by cleaning.
If the caliper piston won’t move when you push it gently, it might be seized. A seized piston means the caliper won’t release properly and needs replacement.
If you hear a grinding sound while braking, something is seriously wrong. Stop driving and get professional help immediately.
Tips for Keeping Your Calipers Clean Longer
Once you’ve done the hard work of cleaning, you want them to stay clean.
Drive smoothly and brake gently when possible. Smooth driving creates less brake dust.
Avoid wet, salty conditions if you can. Saltwater creates rust and corrosion.
Have your brake system inspected regularly. Early problems are easier to fix.
Don’t ignore brake warning lights. They tell you something needs attention.
Consider using a wheel cleaner regularly. This helps prevent dust from building up in the first place.
The Environmental and Health Side of Brake Dust
Brake dust is more than just annoying. It’s actually something to take seriously.
The dust created by braking contains metal particles from your brake pads and rotors. These particles include copper, iron, and other metals.
Brake dust settles on roads and gets into the air. Some research suggests it might be harmful to breathe in regularly.
Wearing gloves while cleaning protects your skin from these particles. Washing your hands after working on brakes is a good habit.
The brake cleaner you use is also toxic. It shouldn’t touch your skin for extended periods.
Disposing of brake cleaner properly is important. Don’t pour it down the drain or throw it in regular trash. Check your local hazardous waste facility for proper disposal.
Troubleshooting Brake Calipers After Cleaning
Sometimes after cleaning, you notice problems.
If your brakes feel spongy, you might have gotten water in your brake lines. Spray your brakes gently with clean water and let them air dry completely. If the problem persists, bleed your brake lines or take it to a mechanic.
If your brakes feel harder to push, you might have dried-on cleaner in the brake system. Pump the brakes gently several times while driving slowly. This usually fixes it.
If one wheel locks up while braking, something is stuck in that caliper. Return to step 7 and brush and spray that caliper again.
If you still hear squeaking after cleaning, it might be something else. Sometimes pads just squeak naturally, and it’s not a problem.
If brakes still feel weak after cleaning, you might have a bigger issue like worn pads or a damaged rotor.
Final Thoughts on Brake Caliper Maintenance
Cleaning your brake calipers is one of the best maintenance tasks you can do yourself. It’s safe, affordable, and makes a real difference in how your brakes work.
You don’t need fancy tools or years of experience. Just follow the steps carefully and take your time.
Your reward is better braking performance, safer driving, and cleaner-looking wheels. That’s worth a few hours of work.
Remember: brakes are critical for safety. If anything feels wrong or looks really damaged, get professional help. There’s no shame in having a mechanic handle serious brake issues.
Now grab your tools and get started. Your calipers will thank you, and so will your brakes.

Peterson is an automotive enthusiast and auto parts reviewer with a passion for vehicle maintenance, upgrades, and performance. He enjoys researching and testing car parts, tools, and accessories to help drivers make informed buying decisions. Through AutoPartsTalk.com, Peterson shares honest reviews, practical maintenance tips, and expert guides to keep vehicles running safely and efficiently.