How to Jack Up a Car with a Floor Jack?
So you need to lift your car. Maybe you want to change a flat tire. Maybe you want to swap out your brake pads or do a quick oil change. No matter the reason, knowing how to jack up a car with a floor jack is one of the most useful skills you can have as a car owner.
The good news? It’s not hard at all. You just need to do it the right way.
This guide walks you through every step. We cover the tools you need, the safety rules you must follow, and exactly how to place and use a floor jack. By the time you finish reading, you’ll feel totally ready to lift your car on your own.
Let’s get into it.
What Is a Floor Jack and Why Does It Matter?
A floor jack is a low-profile hydraulic tool that rolls along the ground. You slide it under your car, pump the handle, and the car goes up. It’s faster and easier to use than the little scissor jack that comes with most cars.
Floor jacks come in different sizes. A two-ton floor jack works for most small and mid-size cars. A three-ton floor jack is better for trucks and SUVs. You’ll also see aluminum floor jacks and steel floor jacks. Aluminum ones are lighter and easier to carry around.
Unlike a scissor jack, a floor jack gives you much better control. You can raise the car smoothly and lower it just as smoothly. That makes your job safer and less stressful.
Tools and Equipment You Need Before You Start
Before you touch the jack, gather everything you need. Don’t start the job and then realize you’re missing something.
Here’s what you need:
- A hydraulic floor jack – Make sure its weight rating is higher than your car’s weight. Check your owner’s manual for the car’s curb weight.
- Jack stands – These are non-negotiable. Never rely on a floor jack alone to hold your car up while you work under it.
- Wheel chocks or bricks – These go behind the tires to stop the car from rolling.
- Owner’s manual – This tells you exactly where the jack points are on your specific car.
- Gloves – Optional, but they keep your hands clean and protect them from sharp edges.
- A flat, solid surface – You need a level concrete floor or driveway. Never jack up a car on soft ground, grass, or gravel.
Got everything? Good. Now let’s talk safety.
Safety Rules You Cannot Skip
This is the most important section in this whole guide. Please read it carefully.
Lifting a car the wrong way can get you seriously hurt. Cars are heavy. A two-ton car falling on you is not something you walk away from. So follow these rules every single time.
Rule 1: Always use jack stands.
A floor jack can fail. The hydraulic system can leak. The car can shift. Jack stands do not fail the same way. Once you raise the car, put jack stands under it before you go near the underside.
Rule 2: Work on a flat, level surface.
If the ground is uneven, the car can tip when it’s in the air. Always use a hard, flat surface like a garage floor or concrete driveway.
Rule 3: Engage the parking brake.
Before you lift anything, put the car in park (for automatics) or in gear (for manuals), and pull the parking brake. This stops the car from rolling.
Rule 4: Use wheel chocks.
Place chocks or bricks on both sides of the tires that stay on the ground. This gives extra protection against rolling.
Rule 5: Never go under a car held up only by a floor jack.
Repeat after me: the floor jack lifts the car. The jack stands hold the car. You never crawl under a car that’s only on a floor jack.
Rule 6: Check the jack’s weight limit.
Use a jack that can handle your car’s weight with room to spare. A jack at its maximum limit is a jack close to failing.
Rule 7: Keep kids and pets away.
This is not a spectator sport. Keep bystanders back from the work area.
Find the Jack Points on Your Car
Every car has specific jack points. These are reinforced spots on the frame or body where it’s safe to place a jack. If you jack up your car in the wrong spot, you can crack the body panels, bend the frame, or damage the rocker panels.
Open your car’s owner’s manual. Look for the section on jacking or tire changes. You’ll see a diagram showing the exact jack point locations.
For most cars, the jack points are:
- For the front – There’s usually a reinforced frame rail just behind the front wheels, or a crossmember under the engine bay.
- For the rear – Look for a solid metal point near the rear axle or along the frame.
- For the side (single-wheel lift) – There’s a notch or flat metal tab on the pinch weld (the seam where the body panels meet) near each wheel.
Some floor jacks come with a rubber pad on the saddle. That pad protects your car’s jack point from getting damaged. If your jack doesn’t have one, you can buy a rubber jack pad adapter or use a thick piece of rubber between the jack and the car.
How to Jack Up a Car with a Floor Jack: Step by Step
Now we get to the actual process. Follow these steps in order. Don’t skip anything.
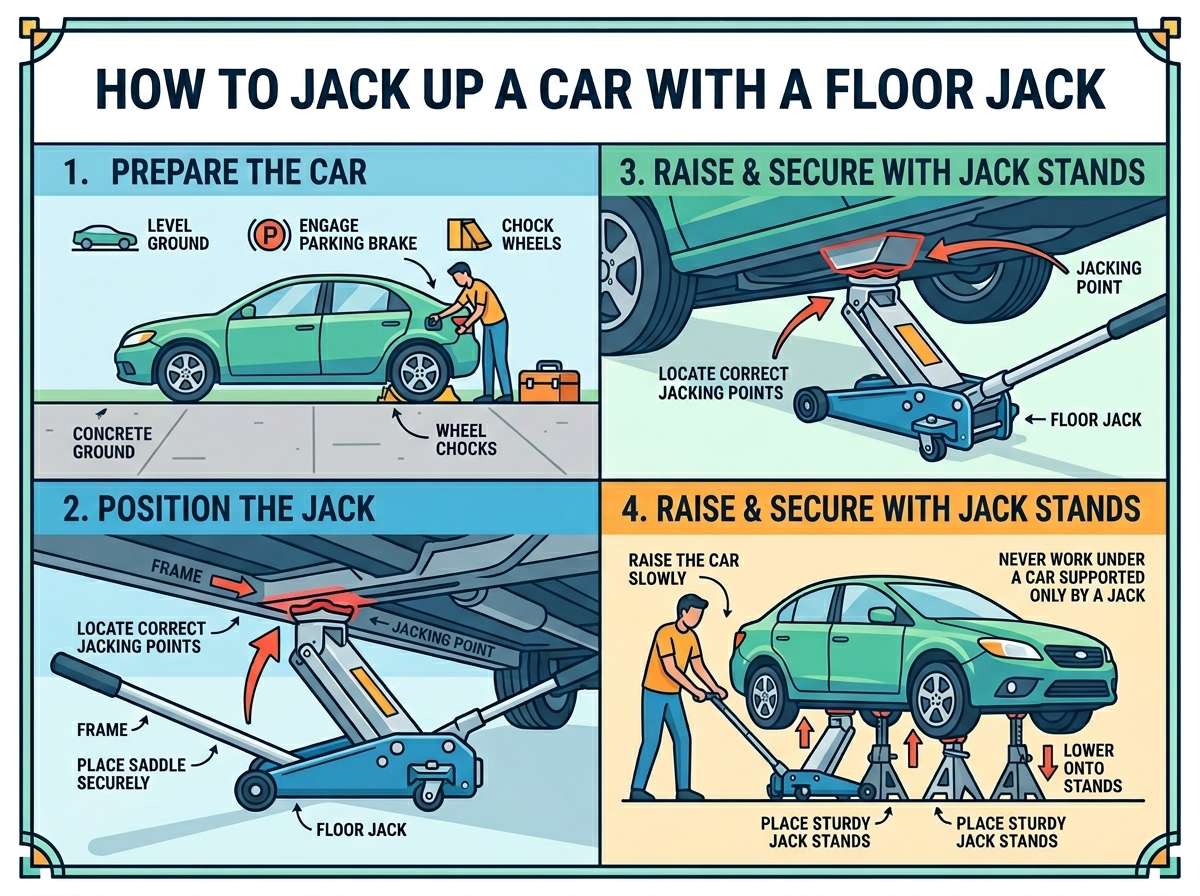
Step 1: Park on a Flat Surface
Drive your car onto a flat, solid, level surface. Turn off the engine. Put the car in park or in first gear. Pull the parking brake all the way up.
Don’t skip the parking brake. It takes two seconds and could save your life.
Step 2: Place the Wheel Chocks
Get your wheel chocks or bricks. Place them in front of and behind the tires that will stay on the ground.
For example, if you’re lifting the front of the car, put the chocks around both rear tires. If you’re lifting one rear corner, chock the front tires.
This keeps the car from rolling even a little bit while it’s in the air.
Step 3: Get Your Floor Jack Ready
Roll the floor jack over to the side of the car where you want to lift. Make sure the release valve on the jack is closed. On most floor jacks, you close the valve by turning it clockwise with the handle.
If the valve is open, the jack won’t build pressure and the car won’t go up.
Also check the jack’s oil level if it’s been sitting for a while. A low oil level means the jack won’t work right.
Step 4: Locate the Correct Jack Point
Look under the car and find the right jack point for the area you want to lift. Use your owner’s manual if you’re not sure.
You want the center of the jack’s saddle (the part that touches the car) to sit directly under the jack point. Take a moment to line it up before you start pumping.
Getting this alignment right is key. If the jack slips off the point while lifting, the car can fall.
Step 5: Slide the Floor Jack Under the Car
Roll the floor jack into position. Slide it under the car slowly until the saddle lines up with the jack point.
Make sure no part of the jack is touching the bumper cover, exhaust pipes, brake lines, or any plastic underbody panels. You only want metal on metal, or metal on rubber pad.
Step 6: Start Pumping the Handle
Put the jack handle into the pump socket. Pump it up and down slowly. You’ll feel resistance as the saddle rises and makes contact with the car’s jack point.
As soon as the saddle touches the jack point, stop. Check the alignment one more time. Is the saddle centered on the metal jack point? Is anything else getting pushed or squeezed?
If everything looks good, keep pumping. The car will start to rise.
Pump slowly and steadily. Don’t rush this part. Keep watching the jack point and the surrounding area as the car goes up.
Step 7: Lift the Car to the Right Height
Raise the car only as high as you need to for the job. The higher you go, the less stable things get.
For a tire change, you need just enough clearance to get the tire off the ground. For brake work or oil changes, you may need a bit more room to work.
Once the car is at the right height, stop pumping.
Step 8: Place the Jack Stands
Here comes the most important step.
Get your jack stands. Place them under a solid, reinforced part of the car’s frame near the jack point. Don’t place them under plastic, thin sheet metal, or anywhere near the fuel tank or brake lines.
Most cars have frame rails or designated jack stand points close to the same areas as the floor jack points. Check your owner’s manual for these spots too.
Extend the jack stands to the right height. Slide them into position. Then slowly lower the floor jack until the car rests on the jack stands.
Give the car a gentle shake from the side. It should feel solid and stable. If it wobbles, something is off. Raise it back up with the floor jack, reposition the stands, and try again.
Never work under a car that doesn’t feel rock solid on the stands.
Step 9: Do Your Work
Now that the car is up and resting on jack stands, you can get to work.
Do your tire change, brake job, oil change, or whatever task you set out to do. Work carefully. Don’t bump or shake the car too hard. Keep your tools organized so you don’t lose track of anything.
If you’re changing a tire, now is when you remove the lug nuts the rest of the way and pull the tire off. Swap on the new tire, hand-tighten the lug nuts in a star pattern, and wait to fully torque them until the car is back on the ground.
How to Lower the Car Safely
You’ve done your work. Now it’s time to bring the car back down.
Step 1: Put the Floor Jack Back Under the Jack Point
Roll the floor jack back under the car. Slide it under the same jack point you used to lift. Pump the handle until the saddle touches the car and takes the weight off the jack stands.
Step 2: Remove the Jack Stands
Once the car’s weight is on the floor jack again, pull the jack stands out from under the car. Set them aside safely.
Step 3: Open the Release Valve Slowly
Find the release valve on the floor jack. Turn it counterclockwise just a little bit at a time. The car will start to come down slowly.
Don’t open the valve all the way at once. If you do, the car drops fast. That’s bad for the car and dangerous for you.
Lower the car slowly until all four wheels are on the ground.
Step 4: Remove the Floor Jack
Once the car is fully down, slide the floor jack out from under the car. The release valve can now be opened fully to lower the saddle the rest of the way.
Step 5: Remove the Wheel Chocks
Pull the wheel chocks away from the tires. Stow your equipment.
If you changed a tire, now fully torque your lug nuts in a star pattern with a torque wrench set to your car’s specs.
Common Mistakes Beginners Make (And How to Avoid Them)
Even with a good guide, people still make mistakes. Here are the most common ones.
Jacking up at the wrong spot. Always use the correct jack points. Jacking under a plastic panel or the wrong part of the frame can cause serious damage.
Skipping the jack stands. Never do this. Not even for a “quick” task. Not even for two minutes. Always use jack stands.
Working on a slope. If you don’t have a flat surface, don’t do the job. Find a level spot first.
Losing control of the release valve. Open the valve slowly. A fast drop is never good.
Not checking the jack’s condition. If your floor jack feels soft, doesn’t hold pressure, or leaks oil, don’t use it. Get it serviced or replaced.
Forgetting to re-torque the lug nuts. After a tire change, always torque the lugs to spec with a torque wrench once the car is back on the ground.
How to Maintain Your Floor Jack
A good hydraulic floor jack can last for years if you take care of it. Here’s how to keep it working well.
Store it properly. Keep your jack in a dry place. Moisture causes rust and damages the hydraulic system.
Keep it clean. Wipe it down after use. Remove grease, dirt, and debris from the wheels and pump.
Check the hydraulic oil. Floor jacks use hydraulic fluid. If the jack feels spongy or doesn’t hold its lift, the fluid may be low or need replacing. Most jacks have a fill plug near the pump.
Don’t overload it. Stay within the rated capacity. Overloading damages the seals and internal parts.
Test it before use. Before you put the car on it, pump it up and down a few times without a load to make sure it’s working right.
Quick Reference: Tools and Safety Checklist
Before every lift, run through this quick checklist.
- [ ] Car parked on flat, solid ground
- [ ] Engine off, parking brake engaged
- [ ] Car in park or in gear
- [ ] Wheel chocks placed around tires that stay on the ground
- [ ] Correct jack points located using owner’s manual
- [ ] Floor jack in good working condition
- [ ] Jack stands ready and rated for the car’s weight
- [ ] No bystanders in the work area
- [ ] Release valve on floor jack is closed
If every box is checked, you’re ready to lift safely.
Frequently Asked Questions
Can I use a floor jack on gravel or grass?
No. Always use a floor jack on a hard, flat surface. Soft ground can cause the jack to sink or tip. That’s extremely dangerous.
Do I need jack stands if I’m only changing a tire?
Yes. Even for a tire change, you should use jack stands. The floor jack can fail at any time. Jack stands give you a backup.
What happens if I jack up the car at the wrong spot?
You can crack plastic panels, dent rocker panels, or damage the car’s frame. In some cases, the jack can slip, and the car can fall. Always use the correct jack point.
How do I know if my floor jack is strong enough?
Check the label on the jack for its rated capacity. Then check your car’s curb weight in the owner’s manual. The jack should have a higher rating than the car’s curb weight. For safety, use a jack rated for at least 1.5 times the weight you’re lifting.
Can I jack up both sides of the car at once?
Yes, but only if you use a center jack point (like the rear differential on rear-wheel-drive cars or a front crossmember). You’d then put jack stands under both sides. This is common for doing work that needs all four wheels off the ground.
Final Thoughts
Lifting a car with a floor jack is not complicated. You just need the right tools, the right information, and the right mindset.
The biggest thing to remember is this: the floor jack lifts the car. The jack stands hold the car. Never skip the stands. Never rush the process. Always use the correct jack points.
Take your time the first few times you do this. Double-check every step. You’ll quickly get comfortable with the process, and it will start to feel like second nature.
Once you know how to safely jack up your car, a whole world of DIY car maintenance opens up. Oil changes, brake jobs, suspension work, tire rotations — all of it becomes doable at home with the right knowledge and tools.
You’ve got this. Now go get that car in the air safely.

Peterson is an automotive enthusiast and auto parts reviewer with a passion for vehicle maintenance, upgrades, and performance. He enjoys researching and testing car parts, tools, and accessories to help drivers make informed buying decisions. Through AutoPartsTalk.com, Peterson shares honest reviews, practical maintenance tips, and expert guides to keep vehicles running safely and efficiently.