
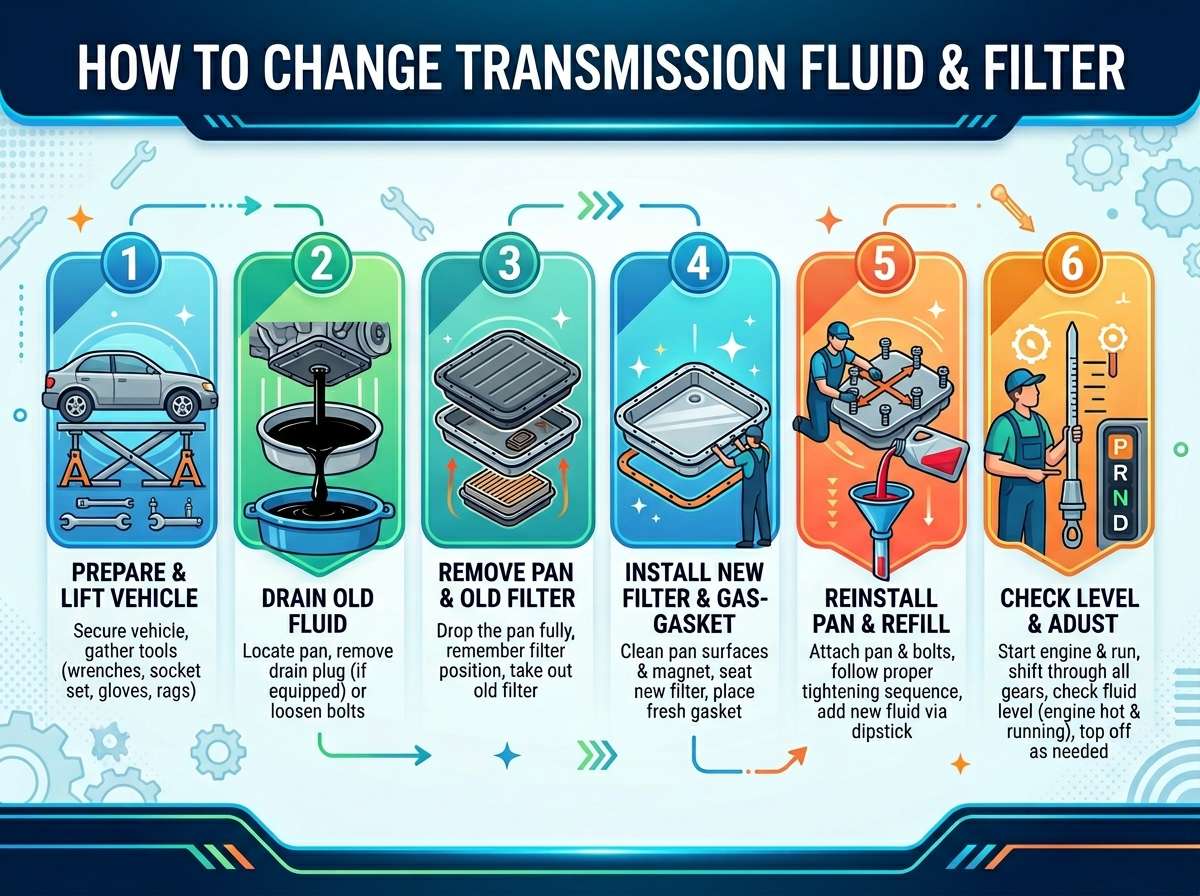
How to Change Transmission Fluid and Filter?
If you’ve ever wondered what keeps your transmission running smoothly, the answer is transmission fluid. This bright red or pink liquid is basically the lifeblood of your transmission system. Over time, this fluid breaks down and gets contaminated with dirt, metal particles, and debris. When that happens, your transmission starts to suffer. The good news? You can change your transmission fluid and filter yourself and save a ton of money.
In this guide, we’ll walk you through the entire process step by step. Whether you’re a total beginner or someone who likes to tinker with your car, you’ll find everything you need to know right here.
Why Your Transmission Fluid Needs Changing
Let’s start with the basics. Your transmission fluid does several important jobs. It lubricates all the moving parts inside your transmission, keeps things cool, cleans the system, and helps transmit power from the engine to the wheels. It’s basically doing multiple jobs at once, which means it takes a beating.
Over time, transmission fluid breaks down. Heat, friction, and age all play a role in destroying its ability to work properly. Contamination makes things worse. Metal shavings from gears, dirt from the air, and other debris float around in your fluid. This gummy, worn-out fluid can’t protect your transmission anymore. It can’t lubricate properly, and it can’t keep things cool.
Neglecting your transmission fluid is one of the quickest ways to destroy your transmission. A new transmission can cost anywhere from thousands to tens of thousands of dollars. Changing your fluid regularly? That costs less than a hundred bucks and takes a couple of hours. The math is simple.
Most manufacturers recommend changing your transmission fluid between 30,000 and 60,000 miles. Some newer cars go longer. The best thing to do is check your owner’s manual to see what your specific vehicle needs. If you tow heavy loads or drive in stop-and-go traffic a lot, you should change it more often. Severe driving conditions break down fluid faster.
What You’ll Need Before You Start
Before you get under your car, gather all your supplies. Running to the store halfway through the job is annoying and wastes time. Here’s what you need:
Tools and Equipment
You’ll need a jack and jack stands to safely lift your vehicle. Never work under a car supported only by a jack—it’s dangerous. A socket set and wrench set are essential for removing bolts and drain plugs. Get yourself some wheel chocks to keep the car from rolling. Grab a drain pan that can hold several gallons of fluid. You don’t want transmission fluid all over your driveway or garage floor.
A clean rag or paper towels are important for cleaning and wiping things down. You’ll also want a new transmission filter. Get the right one for your specific make and model. An old filter wrench or a specialized filter socket makes removing the old filter way easier. If you’re nervous about stripping the filter, a wrench designed for this job is worth it.
A new gasket or seal kit comes with most filters, but double-check before you buy. You’ll also need new transmission fluid. The type matters a lot. Automatic transmissions, manual transmissions, and continuously variable transmissions (CVTs) all use different fluids. Check your owner’s manual or ask at the auto parts store to get the right type. Put your creepers or a small stool nearby so you can slide under the car comfortably.
Safety Gear
Wear safety glasses to keep fluid out of your eyes. Transmission fluid is toxic, so gloves are a must. Some folks use latex, others use nitrile—either works fine. Have a paper towel dispenser or clean cloth ready. A flashlight or headlamp helps you see what you’re doing under the car. A small waste container for your old filter is useful too.
The Step-by-Step Process
Step 1: Warm Up Your Transmission
Drive your car for about ten minutes to warm up the transmission fluid. Warm fluid flows better than cold fluid and drains more completely. This isn’t a long highway drive—just enough to get the fluid working and flowing. Don’t let it get too hot though. Shut off the engine when it’s warm to the touch.
Step 2: Lift Your Vehicle Safely
Park your car on a level surface. Engage the parking brake and put the gear in park (or neutral for manual transmissions). Chock the rear wheels with wheel chocks to prevent rolling. Now lift the front of the vehicle using your jack. Once it’s high enough, place jack stands under the frame rails on both sides. Lower the car onto the jack stands carefully.
Always double-check that the vehicle is stable before you get under it. Shake it gently to make sure it’s not going anywhere. Your safety depends on this step.
Step 3: Access the Transmission
Some vehicles have splash guards or undertray panels that block access to the transmission. You may need to remove these first using a socket set or wrench. Take your time and remember where all the bolts go—you’ll need to put them back. Some people take photos to remember the layout.
Locate the transmission pan. It’s a large, flat pan at the bottom of the transmission that holds the fluid. The drain plug is typically on the lowest point of this pan. Look for a bolt head sticking out of the pan.
Step 4: Drain the Old Fluid
Position your drain pan under the transmission drain plug. This is where all that old, dirty fluid is about to come out. Loosen the drain plug by turning it counterclockwise with a wrench or socket. Once it’s loose enough, you can finish unscrewing it by hand. Be careful—the fluid might still be warm. Let it drain completely into your pan.
Once the fluid stops dripping, wipe off the drain plug with a clean rag. While the fluid is draining, this is a good time to inspect the drain plug and get it ready to reinstall. Some people like to replace the crush washer on the drain plug, especially if it looks flattened or damaged.
Step 5: Remove the Old Filter
The transmission filter location varies by vehicle. Some filters are inside the transmission pan, while others are mounted on the outside of the transmission. Check your owner’s manual or a repair guide to find yours.
If your filter is inside the pan, you’ll need to remove the transmission pan. The pan is bolted all the way around with several bolts. Start by loosening all the bolts a little bit, then removing them completely. Some fluid might still be in the pan, so be ready for a small spill.
If the filter is external, it screws right onto the transmission body. Use your filter wrench to grip it and turn it counterclockwise. It should come off with a little effort. Have your drain pan ready because some fluid will spill when you remove it.
Wipe away any fluid or debris from the filter area. Take a moment to inspect the filter housing and the pan. If you see excessive metal shavings or debris, your transmission might have internal problems. This is worth noting for the future.
Step 6: Prepare for the New Filter
If you’re replacing an inside pan filter, clean the pan while it’s off. Wipe out all the old fluid, debris, and metal shavings using a clean rag. You want a clean environment for the new filter and fresh fluid. Don’t use compressed air as it can blow debris into tight spaces where you don’t want it.
Check the old gasket or seal on the pan. If it looks dried out, cracked, or damaged, replace it with the new gasket that likely came with your filter kit. Apply a thin layer of new transmission fluid to the new gasket. This helps it seal properly when you reinstall the pan.
Step 7: Install the New Filter
For inside pan filters, simply place the new filter into its housing. Make sure it seats completely and that the gasket is positioned right. The filter should sit flat and snug.
For external filters, apply a thin coating of new transmission fluid to the rubber gasket on the new filter. Screw it onto the transmission body by hand until the gasket contacts the engine. Then turn it about three-quarter turn more. Don’t over-tighten it. Finger-tight plus a small turn with a wrench is all you need.
Step 8: Reinstall the Transmission Pan
If you removed the pan, it’s time to put it back. Make sure your new gasket is properly seated in the groove on the pan. Carefully raise the pan back up and align it with the bolt holes on the transmission. Insert the bolts by hand first.
Tighten the bolts in a star or cross pattern. This helps the pan seat evenly and prevents leaks. Don’t crank on them hard—snug them down firmly but not aggressively. Most transmission pans only need to be about 10 to 20 foot-pounds of torque. Check your repair manual for the exact specification.
Step 9: Reinstall the Drain Plug
Make sure your drain plug is clean and the crush washer (also called a crush ring) is still good. If it looks flat and damaged, replace it with a new one if you have it. Screw the drain plug back in by hand first, then tighten it with your socket or wrench. Again, don’t over-tighten. These plugs don’t need extreme force.
Step 10: Add the New Fluid
Before you lower your car, look at your transmission fluid level. Some transmissions have a dipstick for checking levels. Others have a fill plug on top of the transmission. Check your manual to see which applies to your vehicle.
Lower your car back down carefully. Once it’s on the ground, locate the transmission fill opening. This is where you pour the new fluid in. Some cars have a dipstick tube you remove. Others have a threaded fill plug you unscrew.
Pour your new transmission fluid in slowly. You don’t want to splash it everywhere or introduce air into the system. Add fluid in small amounts and check the level as you go. The proper level varies by vehicle, so refer to your dipstick markings or your owner’s manual.
For some modern vehicles, you’ll fill until fluid just starts to come out of an overflow. For others, you fill to a specific mark on the dipstick. Take your time and get it right. Too much fluid is as bad as too little.
Step 11: Check for Leaks
Start your engine and let it run for a few minutes. Listen for any unusual noises from the transmission area. Watch underneath for any leaks. If you see red fluid dripping, shut the engine off immediately and check your work.
Common leak spots are the drain plug, the new filter, and the pan bolts. Tighten anything that seems loose. Let the fluid drain back into the pan and try again. Make sure you have enough fluid. Some cars will display an error if the level is too low.
Step 12: Take a Test Drive
Drive your car around the block at normal speeds. Pay attention to how it shifts. Does it feel smooth? Are there any clunks, jerks, or strange noises? Everything should feel normal or even better than before. Old, degraded fluid can make shifting feel rough or delayed. Fresh fluid makes everything smoother.
When you get back, let the transmission cool down a bit, then check the fluid level one more time. Add a little more if needed. Remember, the level changes as the fluid warms up.
Common Mistakes to Avoid
People make the same mistakes over and over when changing transmission fluid. Learn from them so you don’t have to.
Don’t use the wrong type of fluid. This is the biggest mistake. Putting automatic transmission fluid in a manual transmission will ruin it fast. CVT fluid is different from both of those. Always check your manual or ask an expert if you’re unsure.
Don’t overfill your transmission. More fluid isn’t better. Too much fluid creates pressure problems and can damage seals and gaskets. The level needs to be just right.
Don’t skip the warm-up step. Cold fluid won’t drain completely, leaving old contaminated fluid in your system. Those few minutes of warming really matter.
Don’t over-tighten bolts and plugs. Transmission pans are made of soft aluminum. You can strip the threads or crack the pan by turning things too tight. Snug but not super tight is the way to go.
Don’t work under an unsecured vehicle. This is dangerous and can kill you. Jack stands are not optional. They’re essential.
Don’t reuse the old drain plug washer or gasket. These are cheap and replaceable. They only work one time.
When to Call a Professional
Some situations call for professional help. If you find excessive metal in the transmission pan, your transmission might be failing internally. Have a mechanic look at it.
If your vehicle is still under warranty, check whether doing this work yourself voids any coverage. Sometimes it does. If you’re unsure about your specific vehicle’s layout or procedures, a shop has the right information and tools.
If you experience problems after the fluid change—like slipping, delayed engagement, or strange noises—get professional help right away. These could indicate bigger problems.
Benefits of DIY Transmission Fluid Changes
Doing this work yourself has real benefits. You save money on labor costs. You know exactly what fluid went into your car and when. You get to practice car maintenance and understand your vehicle better. There’s satisfaction in handling your own car care.
Regular transmission fluid changes extend the life of your transmission. You’re preventing expensive failures by doing simple preventive maintenance. Your transmission will shift smoother and run cooler. Your car’s overall reliability improves.
Special Situations
High-Mileage Vehicles
If your car has very high mileage and you’ve never changed the fluid, be careful. Old, degraded fluid can be gluing deposits and particles together. Fresh fluid can loosen these and clog your filter or cause shifting problems. Some mechanics recommend a flush instead of just a drain and fill on high-mileage vehicles. A flush uses a machine to completely remove all old fluid before adding new fluid. If your car has over 100,000 miles and this is the first fluid change, consider a flush.
Vehicles with Transmission Problems
If your transmission already shifts rough or slips occasionally, a fluid change might help or might not make a difference. Fresh fluid improves lubrication, so sometimes rough shifting improves. But if internal damage exists, fluid changes alone won’t fix it. Get a professional diagnosis if you suspect transmission problems.
Different Types of Transmissions
Manual transmissions need different fluid than automatics. Manual gearbox fluid is often heavier and has different additives. CVTs require special CVT fluid. Don’t mix them up. Take a moment to confirm which type your car has before buying supplies.
Transmission Fluid Recycling
Don’t dump your old transmission fluid down the drain or in the trash. It’s toxic and harmful to the environment. Take it to a recycling center, your local auto parts store (many take old fluid for free), or a mechanic shop. Many shops will recycle fluid for free. Some charge a small fee. Either way, proper disposal protects the environment.
Conclusion
Changing your transmission fluid and filter is a straightforward job that most car owners can do at home. It doesn’t require special talents or crazy skills. You need basic tools, a little patience, and the willingness to follow instructions. The money you save on labor is significant, and you know the job is done right because you did it.
Your transmission will thank you with smoother shifts, better performance, and a longer lifespan. Regular fluid changes are one of the simplest and most effective ways to maintain your vehicle. After you do this once, you’ll see it’s not as scary as it seemed. The next time around, you’ll do it even faster.
Take your time, follow the steps, stay safe under the car, and enjoy knowing you just maintained one of the most important systems in your vehicle. That’s a pretty good feeling.
Frequently Asked Questions
How often should I change transmission fluid? Most manufacturers recommend every 30,000 to 60,000 miles. Check your owner’s manual for your specific vehicle. Severe driving conditions might require more frequent changes.
Can I drive with low transmission fluid? Short distances might be okay, but prolonged driving with low fluid will damage your transmission. Get it topped off as soon as possible.
What does transmission fluid smell like? Fresh transmission fluid has a sweet, slightly chemical smell. Old fluid smells burned or acrid. If it smells like burning, your transmission might be overheating.
Why is transmission fluid red? The red color contains dyes that help manufacturers and mechanics identify transmission fluid. It also makes leaks easier to spot under your car.
Is transmission fluid the same as power steering fluid? No, they’re different. Don’t mix them up. Using the wrong fluid causes problems. Check your manual to make sure you get the right type.
Do I need a torque wrench? A torque wrench helps ensure you tighten bolts to the correct specification. For transmission work, it’s handy but not absolutely required if you’re careful. Snug but not overly tight usually works fine.
What if my car has a transmission fluid filter but no drain plug? Some vehicles drain by removing the transmission pan. The pan has the drain point. This is totally normal. Follow the same basic process.
Can I change transmission fluid without changing the filter? Technically yes, but you shouldn’t. The filter needs changing at the same time. Old filters trap particles and won’t work properly with new fluid.
What happens if I overfill transmission fluid? Excess fluid creates pressure problems. Seals and gaskets can fail. Fluid might foam or aerate. The transmission won’t shift smoothly. Always maintain the correct level.
Should the engine be running when I check transmission fluid? Most vehicles need you to check fluid with the engine running or just turned off with the transmission in park. Some have specific procedures. Check your owner’s manual for your vehicle’s exact procedure.

Peterson is an automotive enthusiast and auto parts reviewer with a passion for vehicle maintenance, upgrades, and performance. He enjoys researching and testing car parts, tools, and accessories to help drivers make informed buying decisions. Through AutoPartsTalk.com, Peterson shares honest reviews, practical maintenance tips, and expert guides to keep vehicles running safely and efficiently.