5 Best Headlight Restoration Kit In 2026
Cloudy, yellow headlights make a car look older than it is. They also cut down on night visibility, and that is a real safety problem. The good news is that most foggy lenses can be fixed at home with a restoration kit and about an hour of patient work. The bad news is that not every kit delivers the same results, and some are a better fit for certain jobs than others.
This roundup looks at five popular headlight restoration kits. For each one, you’ll find a clear product description, the best use cases, the key features explained in plain language, the real-world strengths and weaknesses people tend to report, and a straight answer on value for money. At the end, you’ll find a buying guide, a list of common mistakes, and a final verdict to help you pick the right kit for your car and your budget.
Why Headlights Turn Cloudy in the First Place
Most modern headlight lenses are made from polycarbonate, a tough plastic that is light and resistant to impact. The downside is that polycarbonate does not hold up well to sunlight on its own. Ultraviolet rays slowly break down the plastic surface over time. The lens starts to look hazy, then yellow, then sometimes almost opaque. Engineers call this oxidation, and it is the main reason headlights lose their shine.
Road grime, sand, bug residue, and small scratches make the problem worse. Dirt gets trapped in the tiny pits in the surface and dulls the light even more. Many car owners assume the lens is cracked or damaged, but in most cases the plastic just needs a fresh, clear surface and a protective coating.
This is where a headlight restoration kit comes in. Most kits work in three basic stages. First, you clean the lens and remove the top layer of damaged plastic with sanding. Second, you polish the surface until it looks smooth and clear. Third, you seal the lens with a UV-resistant clear coat so the sunlight has a harder time doing the same damage again. Some kits skip sanding and rely on a chemical wipe or cleaner instead, and that difference matters a lot when you compare products.
How These Kits Were Judged
Each kit in this roundup was reviewed based on what comes in the box, the steps the instructions ask for, and the general experience that users and reviewers tend to describe. Nothing here is based on lab measurements, so think of the findings as practical guidance rather than exact scientific data.
The main points that shaped the ratings were how well the kit handles heavy yellowing, how much effort it takes to finish the job, how long the results seem to last, how easy it is to follow the steps, and how much the kit costs compared with what you get. A kit that works well on light haze but struggles with deep yellowing was marked down for that. A kit that is simple but gives a shorter-lasting result was also marked down, though not always by as much.
Quick Comparison Table
| Kit | Best For | Sanding Included | Sealant Included | Difficulty | Price Level |
|---|---|---|---|---|---|
| CERAKOTE Ceramic Headlight Restoration Kit | Light haze and quick touch-ups | No (wipe-based) | Yes (ceramic) | Easy | Mid-range |
| 3M Ultra Headlight Restoration Kit (39195) | Moderate to heavy yellowing | Yes | Yes (UV clear coat) | Moderate | Mid-range |
| Chemical Guys Headlight Restoration & Ceramic Kit | Enthusiasts who like detailing products | Limited | Yes (ceramic) | Easy to moderate | Mid-range |
| 3M Ultra Headlight Restoration Kit 39195, 2 Pack | Two cars or two headlight sets | Yes | Yes (UV clear coat) | Moderate | Higher upfront, lower per set |
| SYLVANIA Headlight Restoration Kit | Beginners on a budget | Yes | Yes (UV protectant) | Easy to moderate | Budget-friendly |
1. CERAKOTE Ceramic Headlight Restoration Kit, 10 Wipe Kit
Product Description
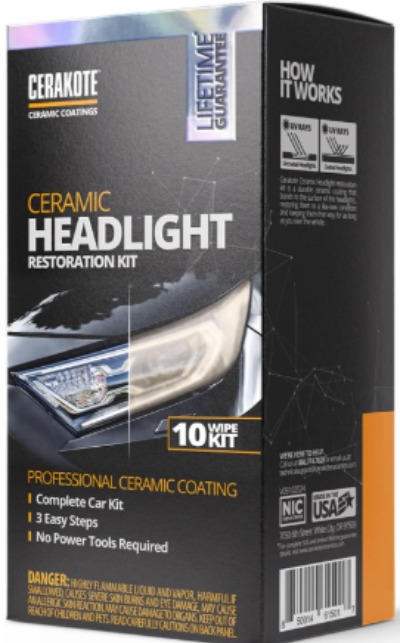
The CERAKOTE kit is built around pre-moistened wipes. Instead of sanding the lens by hand, you wipe the surface to clean it, restore clarity, and leave behind a ceramic layer that helps block UV light. The package includes ten wipes, which is enough for several headlights depending on how much haze you’re dealing with.
The product is aimed at people who want a clean, fast result with minimal mess. There is no sandpaper and no spray bottle to manage, so the process feels more like detailing a car than doing a repair job.
Best Use Cases
This kit works best on lenses that are only lightly cloudy. Think of a car that has a faint haze after a few seasons outside, or headlights that look a bit dull but are not yellow. It is also a good fit for a regular maintenance routine, where you refresh the coating every so often to keep the lens clear.
It is a less natural pick for lenses that are deeply yellowed or have visible pitting. The wipes can improve the surface, but they do not remove heavy oxidation the way sanding does.
Key Features Explained Simply
The wipes clean and clarify the lens in one step. The ceramic layer adds a protective barrier that helps slow the return of haze. Because the process is wipe-based, there is very little prep work, and you do not need masking tape to protect the paint around the headlight.
Real-World Usage Insight
Most people who use this kit report that the first wipe is the most noticeable step. The lens often looks brighter right away, which can be encouraging. The main limitation people mention is that very stubborn yellowing does not fully disappear with wipes alone. In those cases, users often end up combining this kit with a sanding-based kit for the best outcome.
Pros
The process is quick and clean. There is no sanding, so there is less risk of scratching the lens by mistake. The ceramic coating adds protection, and the kit works well as a maintenance product. It is also a good first step for someone who is nervous about sanding.
Cons
The restoration effect is limited on heavy yellowing. Results depend heavily on how bad the lens was to begin with. Ten wipes may not stretch far if you have to work through two or more headlights with thick grime.
Performance Discussion
On light to moderate haze, the CERAKOTE kit can make a visible difference in one session. The lens looks clearer, and the surface feels smoother. On badly oxidized lenses, the improvement is real but often not dramatic enough to make the headlights look brand new. Think of it as a refresh rather than a full overhaul.
Ease of Use
This is one of the easiest kits in the group. The steps are simple, and there is very little setup. A beginner can finish the job in about twenty to thirty minutes per pair of headlights, depending on the condition of the lenses. Clean the headlights well before you start, since any grit left on the surface can get dragged across the lens during wiping.
Value for Money
For light haze, the value is good because the process is fast and the coating adds real protection. For heavy yellowing, the value drops, since you may need to buy a second product to get the look you want. If your goal is a full restoration, a sanding-based kit will usually give you more for the same money.
2. 3M Ultra Headlight Restoration Kit, Model 39195
Product Description
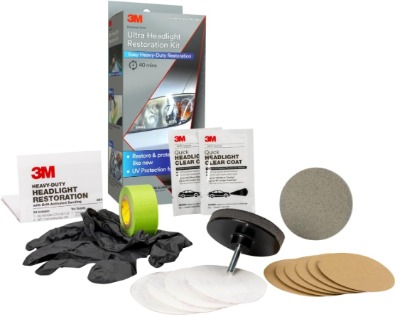
The 3M Ultra kit is one of the most common restoration kits on the market, and it is built for heavier jobs. The box includes masking tape to protect the paint around the headlight, sanding discs in several grits, a polishing pad, and a UV-resistant clear coat to seal the lens at the end. The kit is designed for plastic lenses and works on headlights and taillights.
The idea is simple. You start with coarse sanding to remove the damaged top layer, move through finer grits to smooth the surface, polish to a clear finish, and then seal the lens with the protective coat.
Best Use Cases
This kit suits headlights that are yellow, hazy, or pitted. It is a strong choice when a light wipe-based product has not been enough. It also works well on taillights and other plastic lenses that have faded over time.
It is less ideal for people who want a quick, no-mess job. The process takes real effort, and there is a learning curve around sanding evenly.
Key Features Explained Simply
The sanding discs remove the oxidized layer, which is the main reason the lens looks cloudy. The masking tape protects the paint so you do not accidentally sand the body of the car. The polishing step brings back a glossy shine, and the clear coat helps the lens resist UV damage going forward.
Real-World Usage Insight
Many people find that the sanding stage takes longer than they expect. It helps to work with a steady spray of water and to use light, even pressure. Users often say that the first few minutes of sanding can look worse before they look better, because the surface turns matte and frosted as the old layer comes off. That is normal, and the polish afterward is what brings back the shine.
Pros
The kit handles heavy yellowing better than wipe-based products. The included tape and instructions make it easier to protect the paint. The sealant layer adds protection that helps the results last longer. The product is widely available, so replacement parts and similar kits are easy to find.
Cons
The process takes time and care. Sanding too hard or too long in one spot can leave marks that are hard to fix. The results depend a lot on technique, so a rushed job may look uneven. People with very limited patience may find the steps tiring.
Performance Discussion
When done carefully, this kit can take a yellowed headlight from dull to noticeably clear. The shine is strong, and the lens often looks close to new in good light. The protective coat helps the result hold up better than a polish alone. On very badly damaged lenses, you may still see some faint marks, especially if the plastic has deep pitting.
Ease of Use
The kit is moderately difficult. It is not hard to follow the steps, but the process asks for patience and attention. Expect to spend about an hour or a bit more per headlight if you are new to sanding. Keep the lens wet while sanding, follow each grit in order, and never skip the polish stage, since that is where the clarity comes back.
Value for Money
For the results it can deliver, this is a solid value. A single kit covers at least one pair of headlights, and the sealant helps the result last. The main cost is your time, so if you value speed above all else, the value may feel lower.
3. Chemical Guys Headlight Restoration & Ceramic Kit, with Applicator
Product Description
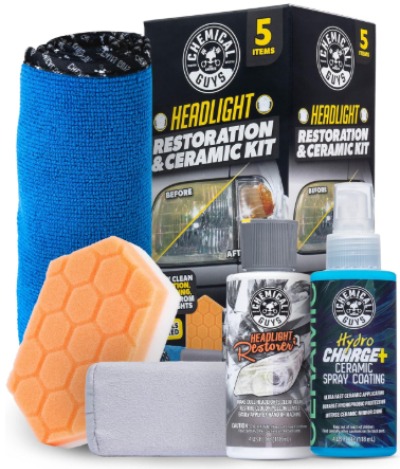
The Chemical Guys kit is aimed at car enthusiasts and detailing fans who want a clean, polished look. It includes a restoration product, a ceramic sealant, an applicator, and microfiber towels. The brand is known for its car care products, and this kit follows that style with a focus on finishing and protection.
The kit is a bit lighter on sanding than the 3M options. It leans more toward cleaning, polishing, and sealing, so it works best when the lens is already in fair shape.
Best Use Cases
This kit suits headlights with mild to moderate haze and anyone who already enjoys detailing their car. It is also a good option for someone who wants to protect the lens and give it a shine as part of a regular cleaning routine.
It may not be the best choice for deep oxidation or heavy yellowing unless you add a dedicated sanding step. Always check the packaging to see exactly which steps are included.
Key Features Explained Simply
The restoration step clears the surface and brings back gloss. The ceramic sealant provides a protective layer against UV and everyday grime. The applicator makes it easier to spread the product evenly, and the microfiber towels help buff the surface without leaving lint or streaks.
Real-World Usage Insight
People who enjoy detailing often like this kit because it fits into a larger routine. The products feel pleasant to use, and the results look clean. Many users say the ceramic coating makes the headlights easier to wipe down afterward. The common complaint is that mild yellowing may improve only partly, and heavy damage may need more work than this kit provides.
Pros
The kit is easy to use and feels polished. The ceramic sealant adds protection and a nice gloss. The applicator and towels make the process neater. It is a good match for people who already own other detailing products from the same brand.
Cons
The restoration effect on heavy yellowing is limited. If sanding is needed, you will have to add your own abrasives or buy another kit. Results can vary depending on the condition of the lens and how carefully the steps are followed.
Performance Discussion
On light haze, this kit can make the headlights look clean and bright again. The gloss is pleasant, and the ceramic layer helps the result last reasonably well. On badly yellowed lenses, you may see some improvement, but it may not be enough to make the headlights look fully restored.
Ease of Use
This is an easy to moderate kit. The steps are straightforward, and the applicator makes the sealing stage simple. Most people can finish a pair of headlights in about thirty to forty-five minutes, though the time goes up if you need extra cleaning or a second coat.
Value for Money
The value is good for people who already want a complete detailing setup. For someone who only needs headlight restoration, the price may feel a bit high compared with a dedicated sanding kit, since sanding is often what delivers the biggest change on yellowed lenses.
4. 3M Ultra Headlight Restoration Kit 39195, 2 Pack (2 Kits)
Product Description
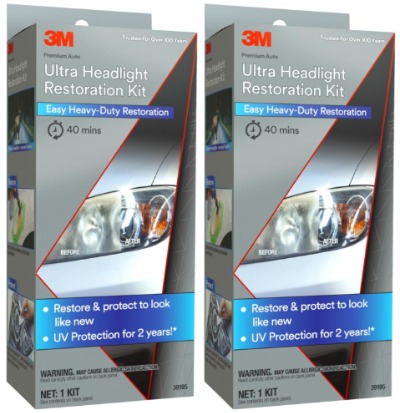
This is the same 3M Ultra kit described above, sold as a two-pack. The bundle includes two complete kits, each with masking tape, sanding discs in multiple grits, a polishing pad, and a UV clear coat. The package is designed for people who need to restore more than one set of headlights, or who want a spare kit on hand.
Because the core product is the same, the performance and steps are identical to the single kit. The main difference is the quantity and the per-kit price.
Best Use Cases
This two-pack suits households with two cars, a shared garage that handles several vehicles, or people who plan to restore headlights for friends and family. It also works well for anyone who expects to redo their lenses over time, since a spare kit saves a trip to the store.
It is less useful for someone with one car and a single pair of headlights who will not need the extra kit.
Key Features Explained Simply
The main features are the same as the single 3M Ultra kit. The sanding discs remove the damaged layer, the polishing pad brings back shine, and the clear coat protects the lens. The two-pack simply doubles the supply so you can work on more than one vehicle without buying again.
Real-World Usage Insight
People who buy the two-pack often do so because they have two vehicles of similar age. Once they get comfortable with the process on the first pair, the second pair usually goes faster. Some users also mention that the spare kit is useful if they make a mistake on the first attempt and need extra sanding discs or tape.
Pros
You get two full kits, which lowers the cost per set. It is convenient for multiple cars or for a backup supply. The performance matches the single kit, so you get the same reliable results.
Cons
The upfront cost is higher, which may feel like a lot if you only need one set of headlights. The same sanding and time demands apply, so the two-pack does not make the job easier, only more affordable per use.
Performance Discussion
The results are the same as the single 3M Ultra kit. When done carefully, the headlights can look clear and bright again, even on fairly yellowed lenses. The sealant helps the results last, and the polish stage gives a glossy finish that looks close to factory condition in good light.
Ease of Use
The ease of use matches the single kit, which is moderate. The first headlight will take the most time as you learn the sanding rhythm. The second headlight, or the second car, usually goes faster because you already know what to expect.
Value for Money
This is where the two-pack earns its place. If you need two sets of headlights, the cost per set is lower than buying two single kits. If you only need one set, the extra kit may sit unused, so the value depends entirely on how many headlights you plan to restore.
5. SYLVANIA Headlight Restoration Kit, Restores to Like-New Condition
Product Description
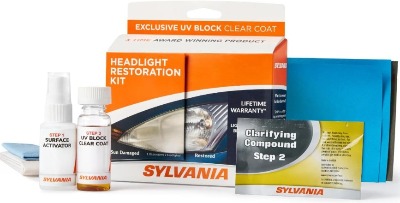
The SYLVANIA kit is a budget-friendly option aimed at beginners. It includes sanding pads, a polishing compound, a UV protectant, and basic supplies to help you work through the steps. SYLVANIA is well known for automotive lighting products, so this kit is a natural extension of that line.
The package is designed to be simple. It follows the familiar three-stage process of sanding, polishing, and sealing, with clear instructions meant for first-time users.
Best Use Cases
This kit suits beginners who want to try headlight restoration without spending much money. It also works well for older cars where the headlights are not worth a large investment, but still need to be safe to drive at night. It is a reasonable option for moderate yellowing and light to medium haze.
It may not be the best pick for severe oxidation or for someone who expects a showroom finish. Results are good for the price, but they are not the same as premium kits.
Key Features Explained Simply
The sanding pads remove the damaged top layer. The polish brings back clarity and shine. The UV protectant helps slow future yellowing by blocking some of the sun’s harmful rays. The kit is simple enough that a first-timer can follow along without much confusion.
Real-World Usage Insight
Many beginners find this kit a good starting point. The steps are easy to follow, and the results are often a clear improvement over the original look. The common complaint is that the protective layer may not last as long as premium sealants, so people who want long-term protection may need to reapply the coating more often.
Pros
The kit is affordable and easy to follow. It handles moderate yellowing well for the price. The included steps are beginner-friendly, and the product line has a solid reputation in automotive lighting. It is a practical choice for older cars.
Cons
The protective layer may not last as long as the more expensive options. Results on very badly damaged lenses may be limited. Some users find the sanding pads wear out faster than they would like, so extra supplies may be needed for a larger job.
Performance Discussion
On moderate yellowing, the SYLVANIA kit can deliver a clear improvement that makes the headlights look noticeably better. The gloss is decent, and the protective coat helps slow down new haze. On heavy oxidation, results are more modest, and you may still see some cloudiness after the job is done.
Ease of Use
This kit is easy to moderate. The steps are simple, and the instructions are clear for beginners. Expect to spend about an hour per pair of headlights, especially on your first try. Keep the lens wet while sanding, and do not rush the polish stage.
Value for Money
The value is strong for a budget-minded buyer. The kit gives you a real improvement without a high price, which makes it a good starting point. The trade-off is durability, so you may need to redo the protective step sooner than you would with a premium kit.
Comparison Insights
Once you look at all five kits side by side, a few patterns stand out. The biggest split is between wipe-based kits and sanding-based kits. The CERAKOTE kit and, to a degree, the Chemical Guys kit focus on cleaning, polishing, and sealing with little or no sanding. They are quick, tidy, and easy to use, but they struggle with heavy yellowing. The 3M Ultra kits and the SYLVANIA kit include sanding discs, which means they can tackle deeper damage, but they ask for more time and care.
The second pattern is about protection. Every kit in this roundup includes some kind of UV-resistant coating, but the quality and durability of that coating varies. Ceramic-based sealants, like the ones in the CERAKOTE and Chemical Guys kits, tend to be marketed for longer protection. Traditional UV clear coats, like the one in the 3M Ultra kits, are known for solid performance when applied correctly. The SYLVANIA protectant is a practical middle ground.
The third pattern is about value. The 3M Ultra two-pack stands out for people with more than one vehicle, since the per-set cost drops. The SYLVANIA kit stands out for budget shoppers. The CERAKOTE kit is a strong pick for light maintenance. The Chemical Guys kit makes the most sense for people who already enjoy detailing.
If you are trying to decide between kits, start by looking at how bad the damage is. Light haze can be handled well by wipe-based products. Moderate to heavy yellowing usually needs sanding. Then think about how much time you want to spend and how many headlights you need to restore. Those three questions will narrow the list quickly.
Buying Guide: What to Look for in a Headlight Restoration Kit
A good headlight restoration kit does more than make the lens look shinier for a day. It removes the damaged layer, brings back clarity, and protects the surface from future UV damage. Here are the main factors to think about before you buy.
Level of Damage
Check your headlights in daylight and at night. If the lens looks slightly dull or has a faint haze, a wipe-based kit may be enough. If the lens is clearly yellow, has a rough texture, or looks frosted, you will probably need a kit with sanding discs. Deep pitting or cracks are different problems. A restoration kit can improve the look of surface damage, but it cannot repair structural cracks.
Sanding Versus Non-Sanding
Sanding kits do the heavy lifting on yellowed lenses. They are more effective, but they take more time and carry a small risk of scratching the lens if you are careless. Non-sanding kits are gentler and simpler, but they have limits on how much they can fix. Many people start with a non-sanding kit and move to sanding only if the results are not enough.
Protective Coating
Look for a kit that includes a UV-resistant clear coat or sealant. Without this step, the lens can start to yellow again within a relatively short time. Ceramic coatings are often marketed for long-lasting protection, while traditional UV clear coats are known for solid performance. Either can work well if applied properly.
Ease of Use
If you have never done this kind of work before, look for a kit with clear, numbered steps and a simple process. Kits that include masking tape, a polishing pad, and basic instructions tend to be easier for beginners. Experienced detailers may prefer a kit that gives them more control over each step.
Quantity and Value
Check how many headlights the kit can handle. Most single kits are enough for one pair. If you have two vehicles or plan to do more work later, a multi-pack may save money. Compare the price of the kit to the cost of a professional restoration, which can be significantly higher, to see if it makes sense for your situation.
Compatibility
Make sure the kit is designed for plastic lenses, since most modern headlights use polycarbonate. Some kits are also marketed for taillights and fog lights. Read the product description carefully so you know exactly what the kit is meant to work on.
Who Should Buy These Kits
A headlight restoration kit is a good fit for a wide range of drivers, but it works best for certain groups.
Beginners who want to try a simple project at home will find the SYLVANIA kit or the CERAKOTE kit easy to start with. The steps are clear, and there is little risk of making a costly mistake. Budget-minded drivers with older cars will also appreciate the lower price and the real improvement these kits can deliver.
Drivers with yellowed or moderately hazy headlights will get the most from the 3M Ultra kits. The sanding discs and clear coat are well suited to lenses that need more than a quick wipe. People with two vehicles or a larger household of cars will find the 3M Ultra two-pack convenient and cost-effective.
Car enthusiasts who already enjoy detailing may prefer the Chemical Guys kit. It fits into a larger care routine, and the ceramic finish is appealing for anyone who likes a glossy, polished look.
Drivers who expect a perfect, showroom-level finish on badly damaged lenses may be disappointed by any of these kits. Restoration kits can improve a lens a lot, but they cannot fully replace a worn-out or cracked headlight assembly. In those cases, replacing the headlight may be the better long-term option.
Common Mistakes to Avoid
Even a good kit can give poor results if the process goes wrong. These are the most common mistakes people make, and how to avoid them.
Skipping the Cleaning Step
Dirt and grit on the lens can scratch the surface when you start sanding or wiping. Wash the headlights thoroughly with soap and water, then dry them before you begin. This small step makes a big difference in the final result.
Sanding Too Dry
Sanding without water can heat the plastic and leave deep scratches. Keep the lens wet throughout the sanding stage. A simple spray bottle works well for this, and it helps the sanding discs move smoothly across the surface.
Using Too Much Pressure
Pushing hard on the sanding disc does not speed things up. It usually leaves uneven marks and can damage the lens. Use light, even pressure and let the abrasive do the work.
Skipping Grits or Rushing the Steps
Each grit in a sanding kit has a purpose. Moving to the next grit too early leaves visible scratches that the polish cannot fully hide. Follow the grit order exactly as the instructions describe.
Forgetting the Protective Coat
The polish brings back shine, but it does not protect the lens from UV rays. Without a sealant, the yellowing often returns faster. Always finish with the clear coat or protectant included in your kit.
Working in Direct Sunlight
Heat and direct sun can dry the product too quickly and cause streaks. Work in a shaded spot, ideally on a mild day, so the products spread and cure evenly.
Not Protecting the Paint
Skipping the masking tape can leave sanding marks on the car body. Take the extra few minutes to tape around the headlight, especially along the edges where the paint meets the lens.
Expecting Miracles on Cracked Lenses
Restoration kits improve the surface of the lens. They do not fix cracks, deep internal fogging, or broken housings. If the damage goes beyond the surface, plan for a replacement.
How to Restore Headlights at Home: A Simple Overview
The exact steps will depend on the kit you choose, so always follow the included instructions. That said, most sanding-based kits follow a similar pattern, and knowing the basics can help you feel more confident.
Start by washing the headlights with mild soap and water, then dry them completely. Tape the area around each headlight so the paint stays protected. If the kit calls for sanding, start with the coarsest grit and keep the lens wet. Work in straight, overlapping passes until the yellow layer is gone and the surface looks evenly frosted. Move to the next finer grit, rinsing the lens between stages, and repeat until the surface is smooth.
Next comes the polishing stage. Apply the polish with a pad or towel and work in small circles until the lens starts to look clear and glossy. Wipe away any residue, then apply the UV clear coat or protectant according to the instructions. Let the coating cure fully before exposing the headlights to heavy rain or a car wash.
Non-sanding kits follow a simpler path. Clean the lens, apply the restoration wipe or product, buff the surface, and then apply the ceramic or protective coat. These steps are quicker, but the results are usually milder.
Frequently Asked Questions
How long do headlight restoration results last?
Results vary based on the kit, the condition of the lens, and how much sun and weather the car is exposed to. Kits with a strong UV coating tend to hold up better, but the protection will wear down over time. Many people schedule a refresh once the lens starts to look hazy again.
Can I restore headlights without sanding?
Yes, but the results depend on how damaged the lens is. Light haze can often be improved with a wipe-based product or a polish. Heavy yellowing usually needs sanding to remove the damaged top layer.
Is headlight restoration safe for the car?
When done carefully, it is safe for the lens and the surrounding paint. The main risks come from sanding too hard, skipping the masking tape, or working on a dirty surface. Following the instructions closely keeps the risk low.
Do I need special tools?
Most kits come with everything you need, but a spray bottle, a clean microfiber towel, and a bucket of soapy water are helpful extras. A drill with a polishing pad can speed up the polish stage, but it is not required and should be used with care.
Can restoration fix a cracked headlight?
No. A restoration kit can improve the look of surface haze and yellowing, but it cannot repair a crack or a broken lens. If the headlight is cracked, replacement is the safer option.
Does restoring headlights help with night driving?
Yes, in many cases. A clearer lens lets more light reach the road, which can improve visibility at night. The effect is most noticeable on heavily yellowed lenses. That said, the exact improvement depends on the condition of the headlight and the bulb inside.
Final Verdict
If you want the biggest improvement on yellowed or hazy headlights, the 3M Ultra kit is the most reliable choice in this group. Its sanding discs, polishing pad, and UV clear coat give you a strong result when you follow the steps carefully. If you have two vehicles, the 3M Ultra two-pack is the better value, since you get two complete kits for a lower cost per set.
If you are a beginner on a tight budget, the SYLVANIA kit is a practical starting point. It handles moderate yellowing well for the price, and the instructions are easy to follow. Just expect the protective layer to need refreshing sooner than it would with a premium product.
If your headlights only have light haze and you want a quick, clean job with minimal mess, the CERAKOTE kit is a good pick. It is simple to use and adds real protection, though it will not fully fix heavy yellowing on its own.
If you already enjoy detailing and want a polished, ceramic finish that fits into a larger care routine, the Chemical Guys kit is a solid option. It is best for lenses that are already in fair shape, or for people willing to add a sanding step when needed.
No kit can replace a damaged headlight assembly, and no restoration will look perfect on every lens. Still, for most drivers with yellowed or hazy headlights, a good kit and a few hours of careful work can make a noticeable difference. Start with an honest look at the damage, match the kit to the job, and take your time with each step. The result will be clearer lights, a fresher-looking car, and better visibility on the road after dark.
Peterson is an automotive enthusiast and auto parts reviewer with a passion for vehicle maintenance, upgrades, and performance. He enjoys researching and testing car parts, tools, and accessories to help drivers make informed buying decisions. Through AutoPartsTalk.com, Peterson shares honest reviews, practical maintenance tips, and expert guides to keep vehicles running safely and efficiently.