How to Fix Mazda 5 Middle Row Latch?
Getting Started With Your Seat Latch Problem
Your Mazda 5 seat latch is acting up, and now you’re stuck with a middle row seat that won’t stay in place. Don’t panic. This is a fix you can handle yourself without spending hundreds at the dealership. The middle row latch mechanism on your Mazda 5 is actually pretty straightforward once you know what you’re looking at.
Before we dive into the repair, let me tell you something—this problem happens all the time. The seat latch mechanisms in Mazda 5 vehicles wear out, break, or get stuck. It’s not a reflection on how you take care of your car. Seats get used, latches get stressed, and eventually something gives. The good news is that fixing a broken seat latch doesn’t require special tools or advanced mechanical skills.
Why Your Middle Row Seat Latch Fails
The middle row latch on your Mazda 5 is a mechanical device that holds your seat in the folded position. Think of it like a lock that keeps the seat from popping up when you’re not pushing it. Every time you fold and unfold that seat, you’re putting stress on the latch mechanism.
Several things can cause your latch to stop working. The latch spring might lose its tension over time. Plastic parts can crack or break from constant use. Sometimes dirt and debris get inside the mechanism and prevent it from locking properly. If your seat latch is stuck, it could be jammed with something as simple as a snack crumb or as complicated as a bent metal piece.
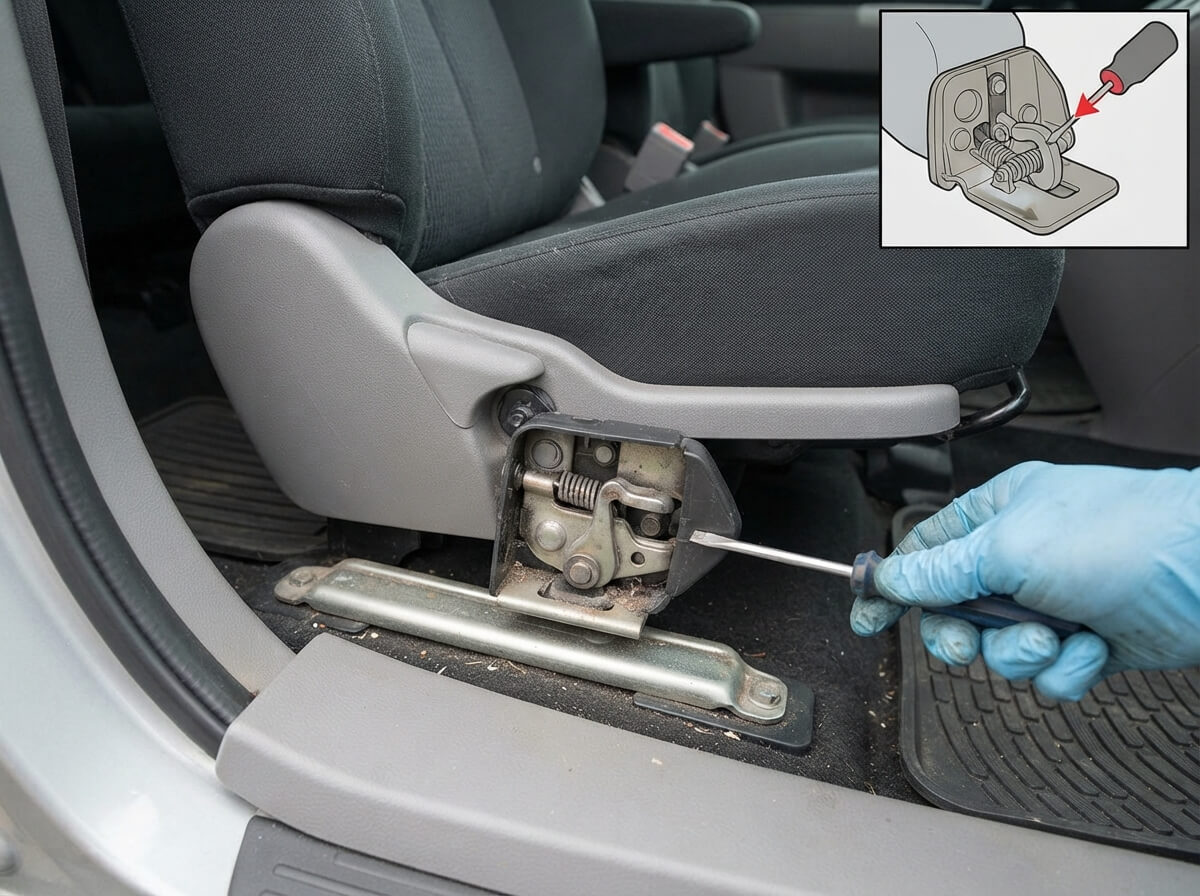
The latch itself sits at the base of your seat, usually near the floor of your vehicle. It’s connected to the seat frame and the car’s body by metal hinges and springs. When you push the seat down to fold it, the latch catches and holds it in place. A broken latch means that connection fails, and your seat won’t stay folded.
What You’ll Need Before Starting
Gather these tools and materials before you begin any repair work. Having everything ready means you won’t waste time hunting for things halfway through the job.
First, get yourself a basic screwdriver set with both Phillips and flathead options. You’ll need these to remove trim pieces and access the latch. A socket wrench set helps if you need to remove bolts, though many Mazda 5 latches come off with screws instead.
Grab a flashlight or headlamp so you can see inside the tight spaces around the seat. This area gets dark fast, and you need good lighting to see what you’re working with. A small inspection mirror also helps you see angles that your head can’t reach.
You’ll want some cleaning supplies on hand. Get a brush, compressed air, or a small vacuum to clean out debris from the latch mechanism. Sometimes the problem isn’t broken parts—it’s just dirt jamming things up.
Keep some penetrating oil nearby. This stuff helps loosen stuck bolts and mechanisms. WD-40 or similar products work great for this job.
Have some rags or towels ready for wiping your hands and the work area. You might also want gloves to keep your hands clean while you work.
If you’re replacing the latch completely, you’ll need to know the exact part number for your Mazda 5 model. Write this down before you start so you can order the right replacement if needed.
How to Access Your Middle Row Latch
Start by removing the seat to get proper access to the latch mechanism. This isn’t as hard as it sounds. First, move the seat all the way forward to expose the brackets underneath.
Look underneath the seat where it connects to the car’s frame. You’ll see metal brackets on both sides of the seat, usually held on with four bolts. These bolts have Phillips or hex heads depending on your model.
Remove these bolts slowly and carefully. Sometimes they’re tight, so apply steady pressure with your screwdriver or wrench. Don’t force anything—if a bolt won’t turn, spray it with penetrating oil and wait a few minutes.
Once you remove the bolts, you need to disconnect the seat belt connector. Look for a red or black plastic connector on the side of the seat. This releases the electrical connection for the seat belt warning system.
Carefully lift the seat out of your Mazda 5. Have another person help you if possible. These seats are heavier than they look, and you don’t want to hurt your back. Lay the seat upside down on a clean work surface like a tarp in your driveway.
Now you can see the latch mechanism clearly. Look at the bottom of the seat frame. You’ll see metal pieces attached to the plastic and metal seat base. The latch itself is usually a dark colored metal piece with springs attached to it.
Inspecting Your Seat Latch For Damage
With the seat out and flipped over, take time to really examine the latch. Look for obvious signs of damage like cracks, bent metal, or broken plastic pieces. Run your fingers along the mechanism to feel for rough spots or broken sections.
The latch spring is usually the first thing to fail. This small metal spring should have tension and bounce back when you press it. If it stays compressed or has no tension, it needs replacement.
Check the latch’s metal frame for cracks. These parts take a lot of stress, especially if your car gets driven over rough roads or bumpy parking lots. Cracks spread quickly once they start, so catch them early.
Look for stripped bolts or worn threads. If the bolt holes look damaged or enlarged, the bolts won’t hold tight anymore.
Spin the latch through its full range of motion by hand. It should move smoothly and lock into each position. Any grinding sounds or resistance means something is wrong inside.
Clean out any visible dirt or debris around the latch. Use your brush or compressed air to blow out dust. Sometimes just cleaning the latch gets it working again.
Fixing a Stuck or Jammed Latch
If your latch is just stuck and not actually broken, you might fix it with cleaning and lubrication. Start by spraying penetrating oil into the latch mechanism. Get the oil into all the moving parts. Let it soak for thirty minutes to an hour.
Work the latch back and forth gently by hand. Don’t force it, just move it slowly through its full range of motion. The oil will loosen stuck parts. Repeat this a few times, adding more oil if needed.
After it loosens up, clean out the old oil and dirt with compressed air. Blow out everything you can see. Use a small brush to scrub away stubborn grime.
Once it’s clean and dry, apply fresh lubricant. Use a light machine oil or silicone-based lubricant designed for plastic parts. Don’t use grease—it attracts dirt and makes things worse over time. Apply just enough to coat the moving parts.
Work the latch again to spread the lubricant. It should move smoothly now. If it doesn’t, you’ve got a broken part that needs replacement.
Replacing a Broken Latch Spring
The latch spring often fails first. If your spring is broken, cracked, or has no tension, replacing it usually solves the problem.
You can buy replacement springs from online car parts retailers or Mazda dealers. Search for “Mazda 5 seat latch spring” to find the right part. They’re cheap, usually under twenty dollars.
To replace the spring, locate the bolt that holds it to the latch frame. Using your wrench or screwdriver, remove this bolt. The spring might pop out or fall free once you remove the bolt, so watch for it.
Take your new spring and position it exactly where the old one was. The spring should attach to the latch at one end and the frame at the other end. Make sure it’s oriented the same way as the original.
Insert the bolt through the hole and hand-tighten it. Don’t over-tighten—these are usually small bolts that strip easily if you crank too hard. Hand-tight is usually the right amount.
Test the spring by pressing the latch. It should have good tension and return to its resting position smoothly.
Installing a Complete New Latch Assembly
Sometimes the damage is too extensive to repair individual parts. The latch assembly itself is cracked or bent beyond use. In this case, you need to replace the whole thing.
Order a complete latch assembly from a parts supplier. Make sure you get the right one for your Mazda 5 model. The assembly comes with all the springs and pieces already installed.
Locate all the bolts that hold your old latch to the seat frame. Usually there are two to four bolts depending on your model. Remove each bolt carefully and set them aside.
Some latches also have clips or hooks that connect to the seat frame. Check both sides and the front and back of the latch to make sure you disconnect everything.
Once everything is disconnected, the latch should come free. Lift it out and set your old latch aside.
Position your new latch assembly in the exact same spot where the old one was. Align the bolt holes perfectly. This matters because if the latch sits wrong, your seat won’t fold or lock correctly.
Start all your bolts by hand first. This prevents you from cross-threading them. Once all bolts are threaded by hand, tighten them down with your wrench. Again, don’t over-tighten. Hand-tight plus a small turn is usually perfect.
Reinstalling Your Middle Row Seat
With your latch fixed or replaced, it’s time to put that seat back in your Mazda 5. Make sure your work area is clean so you don’t drop anything into the car.
Carefully lift the seat and position it back into the vehicle. Line up the four bolt holes on the bottom of the seat with the threaded holes in the car’s frame. This takes a little maneuvering, so go slow.
Once the seat is positioned, insert all four bolts by hand. Start them all before tightening any of them. This ensures everything is aligned properly.
Tighten each bolt a little bit, then move to the next one, going around in a pattern. This distributes the pressure evenly and prevents the seat from tilting. Finish by giving each bolt a final snug tighten.
Reconnect the seat belt connector. This usually just clicks into place, but make sure you hear the click and see it’s fully inserted.
Push the seat all the way back to make sure it slides smoothly. Test the recline function if your Mazda 5 has it. Everything should move without grinding or resistance.
Testing Your Repair
Now comes the moment of truth. Fold and unfold your middle row seat several times. It should move smoothly and lock firmly into each position. When folded, the seat should stay completely flat without wobbling.
If the seat pops back up or feels loose, check that all your bolts are tight. A loose bolt can make a brand new latch feel broken.
Test the latch from inside the vehicle if possible. Sit in the seat and see how it feels. Make sure it’s comfortable and doesn’t rock side to side.
Take your Mazda 5 for a short drive to a parking lot. Drive over a few bumps and test the seat again. If everything holds solid, your repair is working.
Common Mistakes to Avoid
Don’t rush through removing bolts. A stripped bolt hole means bigger problems down the road. Take your time and use the right size tool.
Never force any part of the mechanism. If something won’t move, spray it with penetrating oil and wait. Forcing things breaks them.
Don’t forget to reconnect your seat belt connector. Forgetting this sets off warning lights on your dashboard.
Don’t over-tighten bolts. Use steady, even pressure instead. Plastic parts crack easily if you crank too hard.
Don’t work on a dirty seat. Clean everything first so you can see what you’re doing.
When to Call a Professional
If you open everything up and see damage beyond your repair skills, stop and call a shop. Water damage inside the latch, severely bent metal, or cracks that go through important parts might need professional help.
If you break a bolt or strip a hole, you might need a professional to fix the hole properly. They have tools and knowledge for these situations that you probably don’t.
If your latch still doesn’t work after trying these fixes, a professional can diagnose what’s actually broken. Sometimes the problem isn’t the latch itself—it’s the seat frame or the connection points.
Cost Breakdown
Doing this repair yourself costs between thirty and a hundred dollars. A new latch spring costs fifteen to twenty dollars. A full latch assembly costs fifty to ninety dollars. Most of this is the part cost—labor is just your time.
Taking your Mazda 5 to a dealership for this repair costs three hundred to eight hundred dollars when you include labor charges. Independent repair shops usually charge two hundred to five hundred dollars. Doing it yourself saves serious money.
Final Tips for Success
Take pictures with your phone as you take things apart. These photos help you remember how everything goes back together.
Work in good lighting. A dark workspace leads to missed bolts and accidents.
Don’t rush. This job takes an hour or two if you’re careful. Hurrying causes mistakes.
Keep your small parts organized. Use a container or bag so you don’t lose bolts in your driveway.
Have your Mazda 5 owner’s manual nearby. It has specific instructions for your model that might help.
Wrapping Up
Your Mazda 5 middle row latch doesn’t have to be a dealership problem. With basic tools and a little mechanical confidence, you can fix this yourself. Most repairs take just a couple hours and cost a fraction of what a shop would charge.
The key is taking your time, following these steps carefully, and not forcing anything that doesn’t want to move. Clean thoroughly, replace worn parts, and test everything before calling the job done.
Your middle row seat will work like new again, and you’ll have the satisfaction of fixing it yourself. That’s a win on every level.