How to Flush a Heater Core?
Is your car blowing cold air even when the heat is cranked all the way up? Does your cabin smell like something sweet and a little weird? Or maybe your windows keep fogging up for no obvious reason? All of these are signs that your heater core might be clogged.
The good news? You don’t need to be a mechanic to fix this. Flushing a heater core is something most people can do at home with basic tools and a little patience. This guide walks you through the whole process in plain, simple language. No confusing jargon. No skipped steps.
Let’s get into it.
What Is a Heater Core, Anyway?
Before you start wrenching, it helps to know what you’re dealing with.
The heater core is a small radiator-like device tucked behind your dashboard. Hot coolant from the engine flows through it. A blower fan pushes air over it. That warm air comes out through your vents and heats your cabin.
It’s basically a mini heat exchanger. And just like your main radiator, it can get clogged over time with rust, scale, and old coolant residue. When that happens, the flow of coolant slows down or stops completely. Your heater stops working right.
Flushing the heater core clears out all that gunk and restores proper coolant flow. It’s one of the most underrated car maintenance tasks you can do.
Signs Your Heater Core Needs a Flush
Not sure if your heater core is the problem? Here are the most common symptoms:
- Weak or no heat — The heater blows air, but it’s lukewarm or cold even after the engine warms up.
- Sweet smell inside the car — Coolant has a distinct sweet odor. If you smell it in the cabin, coolant may be leaking from the heater core.
- Foggy windows — A leaking heater core can cause a thin oily film on your windshield that’s hard to wipe off.
- Wet carpet on the passenger side — This means coolant is actively dripping inside the car.
- Coolant loss with no visible leak — If you keep losing coolant but can’t find a leak outside, the heater core might be leaking internally.
If you have one or more of these symptoms, a flush is a great first step. It’s cheap, easy, and often fixes the problem completely.
What You’ll Need
Gather everything before you start. It makes the job much easier.
- Garden hose with decent water pressure
- Bucket (at least 2 gallons)
- Flathead screwdriver or pliers
- Hose clamp pliers (if your clamps are spring-type)
- New coolant / antifreeze (the right type for your car)
- Distilled water
- Flush kit (optional but helpful — available at any auto parts store)
- Funnel
- Safety glasses
- Rubber gloves
That’s it. Nothing exotic. Most of this stuff you probably already have at home.
Safety First
Coolant is toxic. It tastes sweet, which makes it dangerous to pets and kids. Always handle it carefully.
- Let the engine cool down completely before you start. A hot cooling system is under pressure. Opening it while it’s hot can spray scalding coolant and cause serious burns. Wait at least two hours after driving.
- Work in a well-ventilated area.
- Wear your gloves and safety glasses.
- Dispose of old coolant properly. Don’t pour it down the drain. Most auto parts stores will take it.
Take your time. There’s no rush here.
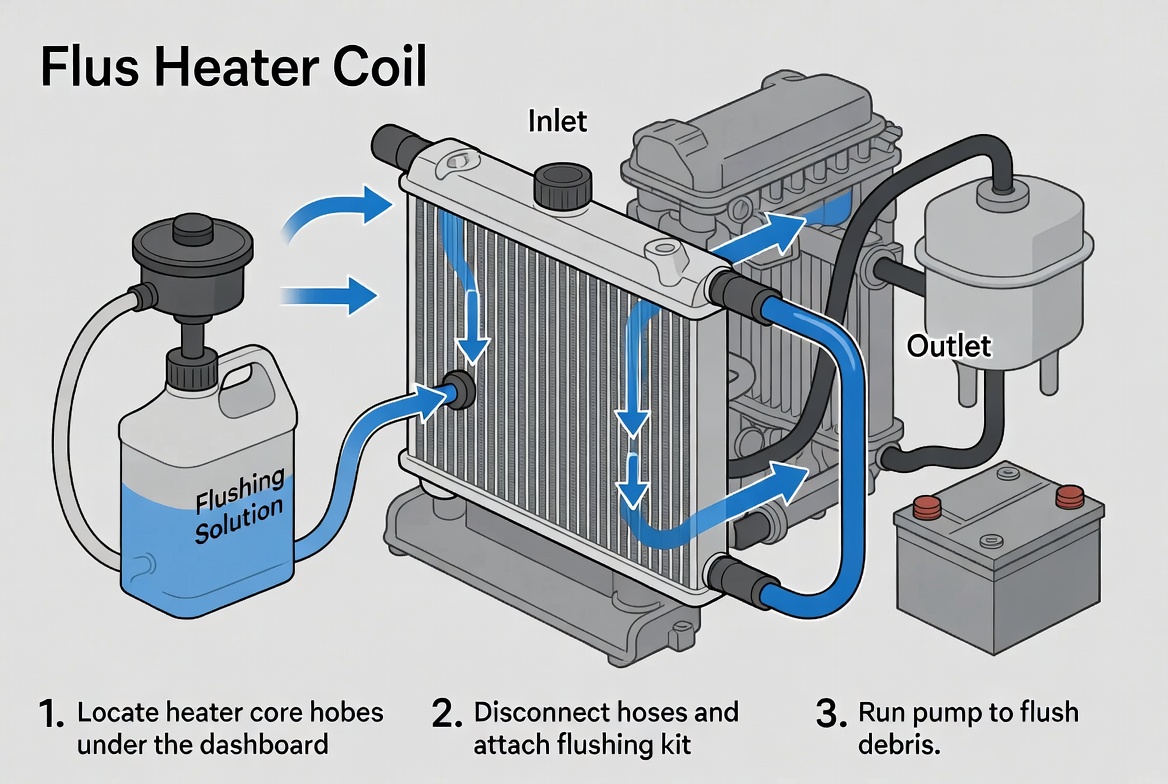
Step 1: Locate the Heater Core Hoses
Pop the hood and find the firewall. That’s the metal wall between the engine bay and your cabin. Look for two rubber hoses that go through the firewall — those are your heater core hoses.
They’re usually around 5/8 inch to 3/4 inch in diameter. Both hoses connect to the heater core on one end and to the engine cooling system on the other end. One hose brings hot coolant in (the inlet). The other carries it back out (the outlet).
If you’re not sure which is which, that’s okay. You’ll work with both of them.
On some cars, these hoses are easy to access. On others, they’re buried a bit deeper. Either way, you can usually get to them without removing any major components.
Step 2: Drain the Coolant
Before you disconnect anything, you need to drain the coolant from the system. Skip this and you’ll have a big mess.
Place your bucket under the radiator drain valve (also called a petcock). It’s usually at the bottom corner of the radiator. Open it up and let the coolant drain out completely.
If your car doesn’t have a petcock, you can also remove the lower radiator hose to drain it. Just have your bucket ready.
Once the coolant stops draining, close the valve or reconnect the hose.
Step 3: Disconnect the Heater Core Hoses
Now go back to those two heater core hoses at the firewall.
Use your pliers or screwdriver to loosen the hose clamps. Slide the clamps back along the hose. Then carefully twist and pull each hose off its fitting.
Be ready for a little coolant to spill out. Have a rag nearby.
Once both hoses are off, you have access to the heater core inlet and outlet ports. These are the two metal or plastic nipples sticking out of the firewall.
Step 4: Flush with Water
Here’s where the magic happens.
Take your garden hose and put it into one of the heater core ports. Turn the water on to a medium pressure — not full blast, just steady.
Let the water run through the heater core and out the other port into your bucket.
Watch what comes out. At first, it might be brown, rusty, or cloudy. That’s the old coolant and buildup getting washed out. Keep flushing until the water runs clear.
This can take a few minutes or it can take 10 to 15 minutes if the core was really clogged. Be patient.
Then switch the hose to the other port and flush in the opposite direction. This helps dislodge any stubborn deposits that didn’t come out the first way.
Keep going until the water coming out is completely clear from both directions.
Step 5: Use a Flush Kit for Stubborn Clogs (Optional)
If the heater core was really gunked up and plain water isn’t cutting it, a heater core flush kit can help a lot. These kits usually come with a T-fitting and a chemical flush solution.
You add the flush chemical to the cooling system, run the engine briefly to circulate it, and then flush it all out with water. The chemicals break down rust, scale, and mineral deposits that water alone can’t remove.
Follow the instructions on the kit — each brand is a little different. But the general idea is the same: chemical flush, then rinse clean with water.
A popular choice is a radiator and heater flush product from brands like Prestone or Thermocure. These are widely available and easy to use.
Step 6: Check the Hoses While You’re at It
Since you already have the heater hoses off, take a second to inspect them.
Squeeze each hose. A healthy hose feels firm but flexible. If it feels hard and brittle, or soft and mushy, it’s due for replacement. Look for cracks, swelling, or soft spots near the ends.
Replacing old hoses now saves you a bigger headache later. Heater hoses are cheap. A blown hose on the road is not a fun situation.
Step 7: Reconnect the Hoses
Once you’re happy with the flush and the water runs clear, it’s time to put everything back together.
Push the heater core hoses back onto their fittings firmly. Slide the clamps back into position over the fittings. Tighten them down snugly — not crazy tight, just secure.
Give each hose a tug to make sure it’s seated well. You don’t want a loose connection dripping coolant later.
Step 8: Refill with Fresh Coolant
Now you need to put fresh coolant back in the system.
Check your owner’s manual or the cap on your coolant reservoir to find out what type of antifreeze your car takes. This is important. Different types don’t mix well. Using the wrong one can cause chemical reactions that actually speed up corrosion.
Common types include:
- Green (traditional silicate-based)
- Orange or red (OAT — Organic Acid Technology)
- Yellow or gold (HOAT — Hybrid OAT)
Mix the coolant with distilled water in a 50/50 ratio unless you’re in an extremely cold or hot climate. Never use tap water — it contains minerals that cause buildup inside the cooling system.
Use a funnel and pour the mixture into the coolant reservoir or directly into the radiator if it has a cap. Fill it up to the “MAX” line.
Step 9: Bleed the Air Out of the Cooling System
This step is easy to forget, but it matters.
When you flush a heater core and refill the coolant, air pockets can get trapped in the system. Those air pockets stop coolant from circulating properly. Your heater won’t work right, and your engine can overheat.
Here’s how to get the air out:
- Leave the radiator cap off (or the coolant reservoir cap open).
- Start the engine and let it warm up to operating temperature.
- Turn the heater on full blast with the fan on high.
- Watch the coolant level in the reservoir or radiator. As the thermostat opens and air burps out, the level may drop. Keep adding coolant as needed to keep it full.
- Squeeze the upper radiator hose a few times. This helps push air bubbles through.
- Once the engine is fully warm and you feel real heat coming from the vents, the air is mostly out.
- Turn the engine off and let it cool. Then top off the coolant one more time.
Some cars have a bleeder screw on the cooling system specifically for this job. If yours does, open it slowly while filling to let air escape — then close it once coolant starts to dribble out.
Step 10: Test Drive and Check for Leaks
Go for a short drive around the block. Turn the heat on full and see how it feels.
You should notice the heat coming on strong and quickly once the engine warms up. If you had a clogged heater core, the difference is usually obvious right away.
When you get back, pop the hood. Look around the heater hose connections for any signs of drips or wet spots. Check the coolant level again once the engine cools down.
Everything looks dry and the heat works? You just successfully flushed your heater core. Nice work.
How Often Should You Flush the Heater Core?
Most mechanics recommend flushing the entire cooling system — including the heater core — every two to three years or every 30,000 miles, whichever comes first.
But if you push your coolant further than that or skip coolant changes, the heater core can clog up faster. Old, acidic coolant is the main cause of internal corrosion in cooling systems.
The best prevention is simple: change your coolant on schedule and use the right type. Fresh coolant has corrosion inhibitors that protect the metal inside your heater core, radiator, and water pump.
What If Flushing Doesn’t Fix It?
Sometimes a flush brings the heater back to life. Other times, the heater core is too far gone — cracked, corroded, or leaking internally in a way that flushing can’t fix.
If you’ve done a full flush and you still have no heat, foggy windows, or a sweet smell inside the car, the heater core might need to be replaced. That’s a bigger job that usually requires removing the dashboard, which most people prefer to leave to a professional.
But before you go that route, also check these things:
- Thermostat — A stuck-open thermostat means the engine never fully warms up, so the heater stays cold. This is an easy and cheap fix.
- Coolant level — Low coolant can reduce heat output even with a good heater core.
- Blend door actuator — This is the little motor that controls the mix of hot and cold air in the cabin. If it’s broken, the heater won’t work even if the core is fine.
Diagnose before you replace. You might save yourself a lot of money.
Quick Tips to Keep Your Heater Core Happy
- Use distilled water when mixing coolant. Tap water causes mineral deposits.
- Never let your coolant get old and acidic. Old coolant turns corrosive.
- Check coolant levels regularly — at least once a month in cold weather.
- If your car overheats, get it checked right away. Overheating damages the entire cooling system, including the heater core.
- Don’t ignore a sweet smell inside the car. Catch a small coolant leak early and you might save yourself a heater core replacement.
Final Thoughts
Flushing a heater core sounds intimidating, but it’s really just a matter of disconnecting two hoses, running some water through, and putting it all back together with fresh coolant.
Most people can do this in under two hours, even on their first try. The whole job costs maybe $20 to $40 in supplies if you already have the basic tools. A shop would charge you anywhere from $100 to $200 for the same job.
Beyond saving money, you learn a little more about how your car works. And that knowledge adds up over time.
So the next time your heater starts acting up, don’t panic. Grab your hose, drain the old stuff out, flush it clean, and fill it back up. Your car — and your cold-weather commute — will thank you.