How to Restore Car Headlights?
Hey there, if your car headlights look all foggy and yellow lately, you know exactly what I mean. They make it tough to see the road at night, and the whole car just seems older than it really is. The good news is you can fix this yourself without spending a ton of money or time. This guide walks you through every easy step so you bring back that bright, clear shine. You get safer drives and a fresh look for your ride.
You tackle cloudy headlights at home with simple tools you grab from the store or even stuff already in your garage. The process removes that dull layer from the plastic lenses and protects them so they stay clear longer. People call this headlight restoration or fixing foggy headlights, and it works great on most cars. You improve visibility, boost safety, and even raise your car’s value a bit. Ready to dive in? Let’s get those lenses sparkling again.
Why Your Headlights Turn Foggy and Yellow
Car headlights sit right up front and take a beating from the sun, rain, dirt, and bugs every day. The lenses use plastic that starts clear from the factory, but over time the outer layer breaks down. Sun rays cause oxidation, which creates that hazy film you see. Road debris scratches the surface too, and harsh weather speeds everything up.
Foggy headlights cut down your light output by half or more in bad cases. You strain your eyes at night, and other drivers notice the dim glow from far away. It even fails safety checks in some places. The plastic yellows because UV damage eats away at the protective coating. You spot this on older cars first, but it hits any vehicle left in the sun a lot.
You fix the root issue when you restore car headlights properly. You strip off the bad layer and seal the fresh plastic underneath. This brings back full brightness and keeps oxidation from coming back fast. Many folks try this on sedans, trucks, and SUVs with plastic covers. Glass lenses are rare now, so the methods here focus on what you find on modern cars.
The best part? You do not need fancy skills. You follow clear steps, and the whole job takes a few hours spread over a weekend. You save hundreds compared to shop prices, and you feel good knowing you handled it yourself. Now you see why so many drivers search for ways to clear up yellow headlights or polish dull lenses.
Quick Fixes You Can Try First for Mild Fog
Sometimes the cloudiness stays light, and you clear it up fast with stuff from your bathroom or kitchen. These tricks work best when the haze just started and the lenses feel smooth to the touch. You test one on a small spot first so you know it fits your situation.
Start with the toothpaste method because it sits right in your cabinet. Grab non-gel toothpaste with some grit in it, like the kind that has baking soda. You squeeze a dab onto a clean cloth or old toothbrush. Then you rub it in small circles all over the headlight surface for a couple minutes. The mild abrasive lifts the top layer of oxidation without hurting the plastic much.
After you scrub, you rinse everything off with plain water. You wipe it dry with a microfiber cloth. Many people notice a big difference right away, and the lights look clearer for weeks. You repeat the process if a bit of haze hangs on. This hack shines for quick touch-ups before a road trip or when you want results in under ten minutes per side.
You try the baking soda mix next if toothpaste does not cut it enough. You stir two parts baking soda with one part white vinegar in a bowl until it forms a thick paste. You spread that paste on the lenses and scrub gently with a soft brush or cloth. The fizz from the vinegar loosens the gunk, and the soda adds extra cleaning power. You rinse clean and dry thoroughly afterward.
These household options cost almost nothing and take little effort. They handle light oxidation on plastic lenses, but they do not last as long as full sanding because they skip the deep clean and seal. You use them when you need a fast boost in headlight clarity before you commit to the full restoration. Now you move on if your lenses still look hazy after these tries.
The Full DIY Restoration Process That Delivers Real Results
You get the clearest, longest-lasting fix when you sand the lenses step by step and polish them smooth. This method removes the damaged outer plastic and reveals fresh material underneath. You need basic supplies, but the results look professional and last months or even years with the right finish. You work in a shaded spot so nothing dries too fast or gets dusty.
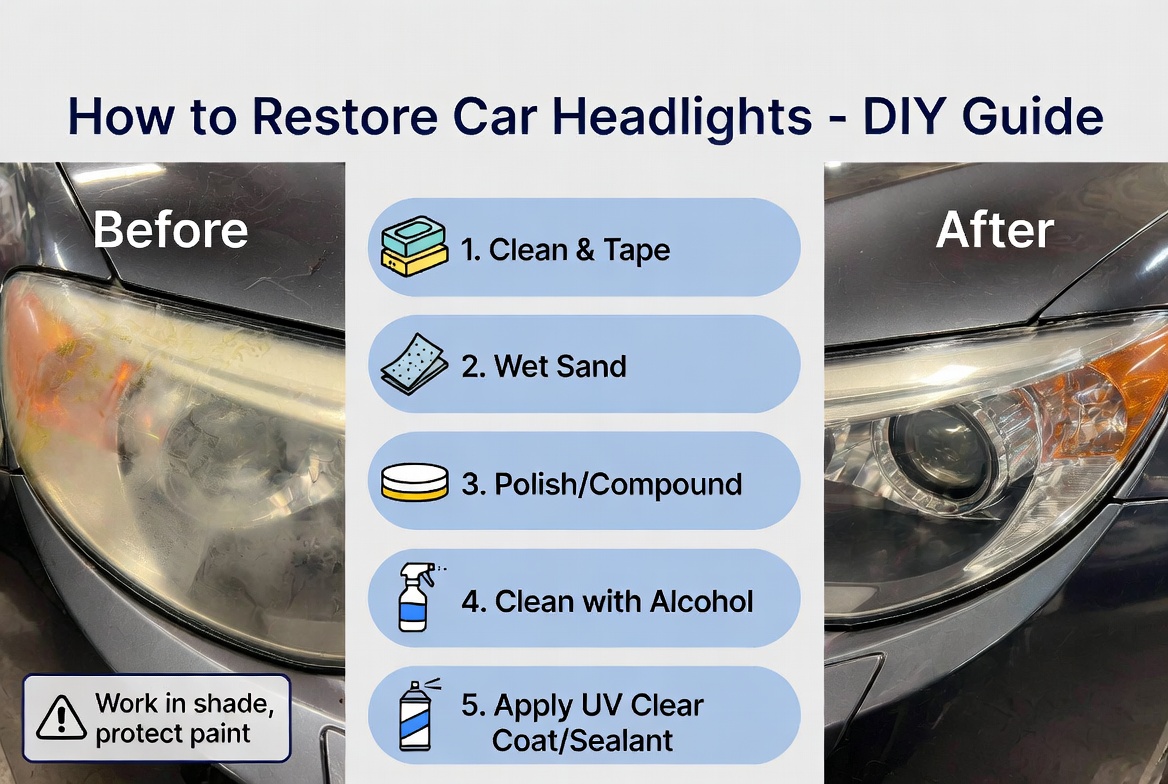
First you gather your tools. You pick up sandpaper in 400, 800, 1000, and 2000 grit packs from any auto store. You also grab headlight polish or rubbing compound, a spray bottle filled with water, masking tape, microfiber cloths, rubbing alcohol, and a UV sealant spray or liquid. Some folks add a drill with a buffing pad for easier polishing, but you do fine by hand too.
You park the car in shade and wash the whole front area with soap and water. You remove dirt, bugs, and grime so nothing scratches the lenses while you work. Dry the headlights completely. Now you tape off the paint and trim around each lens with masking tape. You leave just the plastic cover exposed so you avoid any accidental marks on the body.
You start sanding with the 400 or 600 grit paper while it stays wet. You spray water on the lens and the sandpaper, then rub in straight lines across the surface. You keep the paper soaked the whole time so you create a slurry that lifts the oxidation. You sand for two or three minutes until the lens looks uniformly hazy and white. This step takes off the worst layer of damage.
Next you switch to 800 grit and repeat the wet sanding. You change direction this time, maybe up and down instead of side to side. The finer grit smooths out the scratches from the first pass. You rinse often and check your progress. The goal here is even coverage without deep grooves.
You keep going with 1000 grit and then 2000 grit. Each level removes the marks from the previous one and leaves the plastic smoother. By the end of the 2000 grit, the lens feels almost like new plastic again. You rinse everything clean and dry it off. Now you wipe the surface with rubbing alcohol on a cloth to remove any oils or residue.
You apply the polishing compound next. You dab a small amount onto a clean microfiber cloth or the buffing pad if you use a drill. You rub it in circular motions with steady pressure. The compound fills in tiny scratches and brings out the shine. You work one headlight at a time so you see the difference side by side. After a few minutes, you wipe away the excess and admire how clear it looks.
This whole sanding and polishing sequence restores headlight clarity by stripping away oxidation and smoothing the lens. You spend about an hour per headlight if you take your time. The lights beam bright again, and you notice better road visibility right away.
Using a Headlight Restoration Kit for Simpler Results
You skip hunting for separate supplies when you grab a ready-made headlight restoration kit from the store. These kits bundle sandpaper discs, polishing pads, and sealant in one box, and they follow the same basic steps you just read. You follow the instructions that come with it, and you get consistent outcomes every time.
Most kits start with wet sanding using their graded discs attached to a drill or by hand. You move through the grits just like the full process. The included polish compound finishes the job fast. Many kits even provide a UV protectant that you apply last. You finish the entire job in under an hour per side with these kits because everything matches perfectly.
Kits work great for beginners or anyone who wants less guesswork. They cost little and deliver solid results on cloudy headlights or yellowed lenses. You still tape off the area and clean first, but the rest flows easy. People love them for quick weekend projects that bring back clear plastic lenses without hassle.
Making the Restoration Last with Proper Sealing
You seal the lenses right after polishing so the shine stays put. Fresh plastic soaks up UV rays fast without protection, and fog comes back in weeks. You grab a quality UV sealant spray or liquid made for headlights. You apply it in thin, even coats and let each one dry according to the label.
The sealant creates a barrier that blocks sun damage and keeps oxidation away. You get crystal clear headlights that perform like new for a long time. Some sealants cure in sunlight within minutes, so you finish the job same day. This step turns a good restoration into a great one that lasts.
You check the lenses after a week or two. If they still look bright, you nailed it. The seal protects against rain, bugs, and daily driving so you enjoy clear vision night after night.
Tips for Great Results Every Time
You work on a cool day so the materials behave better. Heat makes things dry too fast and creates streaks. You take breaks between grits so your arms stay fresh and you avoid rushing.
You inspect the headlights from different angles as you go. Good lighting shows any spots you missed. You use fresh sandpaper for each grit level because dull paper leaves swirls.
You test your lights after everything dries. You turn them on and stand back to see the beam pattern. Bright, even light means success. You clean any residue off the paint around the tape before you peel it away.
These small habits make your headlight restoration look pro and function perfectly. You boost night driving safety and keep the car looking sharp.
Mistakes People Often Make and How to Dodge Them
You skip the initial cleaning, and dirt grinds into the lens during sanding. Always wash first. You use dry sandpaper instead of wet, and you end up with deep scratches that show forever. Keep everything soaked.
You rush through the grits and jump from coarse to fine too fast. You get visible lines that ruin the smooth finish. You apply too much pressure while polishing, and you create heat that warps the plastic. Light, even strokes work best.
You forget the sealant after polishing, and the clear look fades in a month. Always finish with protection. You work in direct sun, and dust sticks to wet surfaces. Shade keeps things clean.
You avoid these slip-ups, and your results stay strong. You restore car headlights right the first time and save yourself extra work later.
How to Keep Your Headlights Clear Longer
You wash the lenses every time you wash the car so dirt does not build up. You use a soft sponge and mild soap to avoid scratches. You park in a garage or under cover when you can so the sun hits less.
You apply a fresh layer of UV sealant every six months or so for extra protection. You check the lenses monthly for early haze and touch them up with polish before it gets bad.
You drive with care around construction zones where rocks fly. Small habits like these stretch the life of your restored headlights and keep the plastic lenses looking new. You enjoy reliable bright beams and a cleaner overall car appearance.
When to Call a Professional Instead
You try the DIY route first in most cases because it works so well. But you call a shop if the lenses have deep cracks or the plastic feels brittle. Heavy damage needs special tools or replacement. You also head to pros if you restored them already and the fog returns fast, because they apply industrial sealants that last longer.
Professionals handle the job in under an hour with powerful equipment. They guarantee their work sometimes. You weigh the cost against your time and decide what fits your schedule. Most folks stick with home methods for great savings and solid outcomes.
Common Questions About Restoring Car Headlights
How long does the full process take?
You spend two to three hours total if you do both sides carefully. You spread it over a day so you avoid fatigue.
Does this work on all cars?
It works on almost any vehicle with plastic headlight covers. You check your owner’s manual if you feel unsure about the material.
Will the lights stay clear forever?
No fix lasts forever, but proper sealing keeps them bright for one to two years or more. You maintain them and they hold up well.
Can I use a drill for sanding?
You can, but you go slow and keep the pad wet. Hand sanding gives you more control if you are new to this.
What if my headlights still look hazy after polishing?
You go back to a finer grit and repeat the polish step. Sometimes one extra pass makes all the difference.
Is it safe to drive while the sealant cures?
You wait until it feels dry to the touch, usually thirty minutes to an hour. Full cure happens overnight.
These answers cover the basics so you feel confident before you start.
Wrap Up and Get Started Today
You now hold a complete plan to restore car headlights and bring back clear, bright lenses that make driving safer and more fun. You pick the quick hack for light fog or go full sanding for a deep clean. Either way, you save money, learn a useful skill, and give your car a fresh boost.
Grab your supplies, set aside a couple hours, and watch the transformation happen right in your driveway. You turn dull, yellow headlights into crystal clear ones that cut through the dark like new. Your night drives feel better, your car looks sharper, and you feel proud every time you turn on the lights.
Go ahead and tackle those foggy headlights this weekend. You will love the results, and your car will thank you with better performance and style. Safe travels out there with your newly restored shine.
(Word count: 2,856)