How to Clean a MAF Sensor?
Why Your Car’s MAF Sensor Matters More Than You Think
Your car engine needs three things to run: fuel, air, and spark. The mass air flow sensor—or MAF sensor—is the part that tells your engine exactly how much air is coming in. Think of it like the lungs of your car. Just like your own lungs get clogged when you’re in a dusty place, your MAF sensor can get dirty too.
A dirty MAF sensor causes big problems. Your car might run rough, hesitate when you press the gas, or feel sluggish. You might also see that annoying check engine light pop up on your dashboard. The good news? You can clean it yourself without spending a ton of money at a mechanic.
This guide will walk you through everything. I’ll explain what a MAF sensor does, show you the exact steps to clean it, and help you avoid common mistakes. You don’t need to be a car expert to do this. Just grab some tools and follow along.
What is a MAF Sensor and How Does It Work?
The MAF sensor sits in your air intake system. It measures how much air your engine pulls in. Your car’s computer uses this information to decide how much fuel to inject. Get the ratio right, and your engine runs like a dream. Get it wrong, and things fall apart.
The sensor has a thin wire or film inside. Air flows across this wire, and the wire’s temperature changes. The sensor measures this temperature change and sends that data to your engine control unit. The computer reads this signal and adjusts the fuel injection.
When dirt, dust, and debris build up on the sensor wire, it can’t measure the airflow properly. This throws off the fuel mixture. Your car might run too rich (too much fuel) or too lean (not enough fuel). Either way, your engine won’t perform well.
Signs Your MAF Sensor Needs Cleaning
You don’t have to guess whether your MAF sensor is dirty. Your car will tell you. Look for these warning signs.
The Check Engine Light Turns On
The check engine light is your car’s way of saying something is wrong. A dirty MAF sensor often triggers this light. You might see codes like P0101 (mass airflow sensor range/performance), P0102 (mass airflow sensor circuit too low), or P0103 (mass airflow sensor circuit too high).
Your Car Idles Rough
When you sit at a red light, your car should run smoothly. If the engine feels shaky, stutters, or sounds uneven, your MAF sensor might be the culprit. A rough idle happens because the engine doesn’t know how much fuel to use.
The Engine Hesitates or Stalls
You press the gas pedal to merge onto the highway. Instead of smoothly accelerating, your car hesitates. It might feel like the engine is thinking about what to do. In bad cases, the engine might even stall completely. This hesitation comes from the fuel mixture being off.
Poor Fuel Economy Gets Worse
You used to get 28 miles per gallon. Now you’re only getting 22. A dirty MAF sensor causes your car to burn more fuel than necessary. The computer doesn’t know how much air is coming in, so it guesses. Usually, it guesses high and injects too much fuel.
Your Car Runs Sluggish
The car just feels slow. Acceleration is weak. Passing other cars feels risky. Your car has plenty of power under normal conditions, so it’s not an engine problem. It’s a measurement problem.
Hard Starting in Cold Weather
Some cars with dirty MAF sensors start rough when it’s cold outside. The cold air is denser, and the sensor has an even harder time measuring it correctly.
If you notice any of these signs, cleaning your MAF sensor might be exactly what you need. It’s worth trying before you take your car to the shop and spend hundreds of dollars.
What You’ll Need: Tools and Supplies
You don’t need a full garage full of tools. Here’s what to gather before you start.
Tools You’ll Use
- Socket set or wrench set
- Screwdriver (usually Phillips head, but check your car)
- Small container or cup
- Clean rags or paper towels
- Flashlight or work light
- Gasket scraper (plastic or soft metal, not sharp)
Supplies You’ll Buy
- Mass airflow sensor cleaner (this is important—don’t use regular carburetor cleaner)
- New gasket or gasket sealer (check your car’s manual to see if you need this)
- Small brush or soft cloth
- Safety glasses
- Gloves (latex or nitrile)
The most important supply is the right cleaner. MAF sensor cleaner is specifically designed not to damage the sensitive wire inside. Regular carburetor cleaner or brake cleaner can harm the sensor permanently. Don’t risk it. Buy the right cleaner.
Step-by-Step Instructions: Cleaning Your MAF Sensor
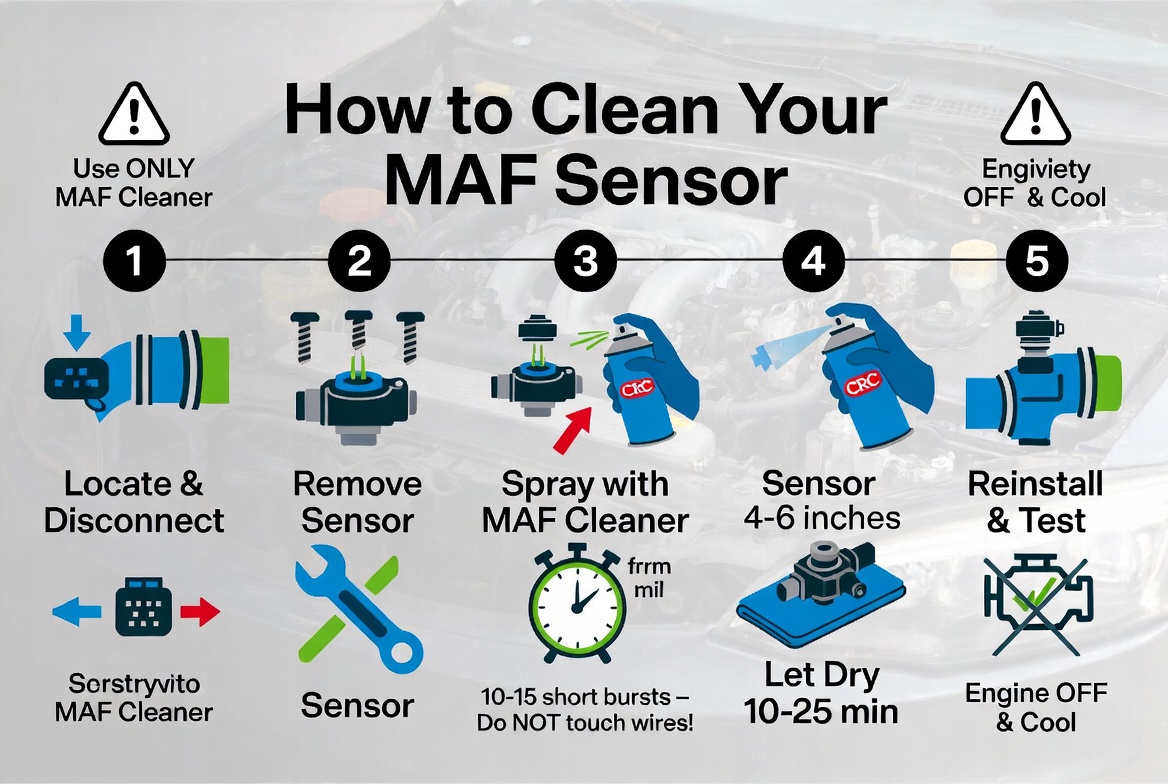
Step 1: Prepare Your Workspace and Safety
Before you touch anything, park your car on a level surface. Turn off the engine and let it cool for at least 30 minutes. You want it completely cold before you start.
Disconnect the negative battery terminal. This prevents electrical shocks and protects the engine computer. Loosen the nut with your wrench and pull the terminal off.
Put on your safety glasses and gloves. Even though this is a simple job, protecting your eyes and hands is smart.
Gather all your tools and supplies in one place. You don’t want to be searching for something in the middle of the job.
Step 2: Locate Your MAF Sensor
The MAF sensor lives in the air intake system. Usually, it sits between the air filter box and the engine. It’s mounted in a pipe or tube where air flows toward the engine.
Pop open your hood. Look for a hose that comes from the air filter box. Follow that hose toward the engine. The MAF sensor is usually on or in this hose. It looks like a small plastic or metal sensor with an electrical connector.
Check your car’s manual if you can’t find it. Different cars put the sensor in slightly different places. Some cars have it mounted directly in the intake manifold. Others have it in the intake tube.
Take a photo with your phone. This helps you remember how everything fits back together.
Step 3: Disconnect the Electrical Connector
Find the electrical connector plugged into the MAF sensor. Push or pull on the connector until it comes free. Most connectors just slide out—they don’t require much force.
Set the connector aside somewhere safe. Don’t let it get dirty. If you touch the terminals with your bare fingers, oils from your skin can cause problems later.
Step 4: Remove the Air Hose Clamps
The MAF sensor is held in place by clamps on the air hoses on both sides. Use your screwdriver or socket wrench to loosen these clamps.
Turn the clamp screws slowly. You don’t need to remove them completely—just loosen them enough that the hose slides off easily.
Once the clamps are loose, gently wiggle the hoses. They should come off without too much force. If they’re stuck, twist them slightly as you pull. Don’t yank hard. The hoses can tear.
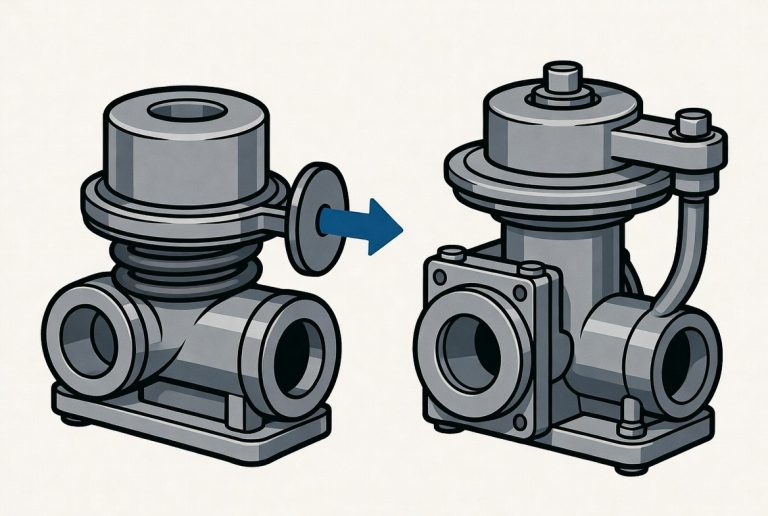
Step 5: Remove the Sensor from the Hose
Most MAF sensors are mounted in a plastic or metal tube that sits between the air hoses. The sensor is held in this tube with bolts or clips.
Use your socket wrench or screwdriver to remove these bolts. Usually, there are two or three bolts holding the sensor in place.
Once the bolts are out, gently slide the sensor out of the tube. It should come out smoothly. If it’s stuck, wiggle it gently side to side.
Set the sensor on a clean rag. Don’t set it on a dirty surface. You don’t want new dirt landing on it while you clean.
Step 6: Inspect the Sensor for Damage
Before you clean, take a close look at the sensor. Use your flashlight to see inside.
Look for the thin wire inside the sensor. This is the key part that measures airflow. On some sensors, you’ll see a thin film instead of a wire. Either way, this is delicate.
Check if the sensor looks damaged. Cracks, burns, or corrosion mean you need a new sensor, not a cleaning.
Is the wire broken? That’s a new sensor too. You can’t fix a broken wire.
If the sensor looks intact but just dirty, you’re good to proceed. If it looks damaged, stop here. A new sensor costs less than a professional cleaning service anyway.
Step 7: Clean the MAF Sensor
This is the most important step. Do it carefully.
Hold the sensor over a small container. You’re going to spray cleaner inside, and you don’t want it dripping on your engine.
Take your MAF sensor cleaner and spray short bursts inside the sensor. Don’t soak it. Don’t spray for more than a second at a time. Let the cleaner drip into your container.
Repeat this process three or four times. Each spray should be a quick burst. The cleaner dissolves the dirt and gunk built up on the sensor wire.
Let the cleaner air dry completely. Don’t blow on it with compressed air. Don’t wipe it with a cloth. The sensor is extremely delicate. Even touching the wire can damage it permanently.
If your sensor has stubborn buildup, you can use a very soft brush. Barely touch the wire. Use the gentlest motion imaginable. Most of the time, the cleaner does all the work.
Step 8: Inspect Other Parts While You’re There
While you wait for the sensor to dry, look at the air intake tube and hose.
Is the inside dirty? Dust and dirt here can get on your newly cleaned sensor. If the hose is really dirty, use a damp cloth to wipe the inside. Just don’t get water inside the sensor.
Check the air filter. Is it dirty? A dirty air filter is another common cause of MAF sensor problems. If your filter looks gray or brown with dust, replace it. A new air filter costs about fifteen dollars.
Look at the hoses for cracks or leaks. A vacuum leak downstream of the MAF sensor can cause the same symptoms as a dirty sensor. If you see any cracks, note them.
Step 9: Reinstall the Sensor
Make sure the sensor is completely dry before you put it back in. Wait at least 15 minutes after the last spray.
Slide the sensor back into the plastic or metal tube. It should fit smoothly. Push it all the way in until it stops.
Install the bolts that hold the sensor in place. Tighten them firmly, but don’t over-tighten. You’re aiming for snug, not super tight. Over-tightening can crack the plastic housing.
Step 10: Reattach the Air Hoses
Slide the air hoses back onto the tube on both sides of the sensor. Push them on until they sit firmly in place.
Tighten the hose clamps. Use your screwdriver or wrench to turn the clamp screws. Make them snug so the hoses don’t slip off while you’re driving.
Don’t over-tighten these either. You just want them tight enough that the hose won’t move.
Step 11: Reconnect the Electrical Connector
Find the electrical connector you disconnected earlier. Align it with the sensor and push it back in. You should hear or feel a small click. This means it’s seated properly.
Double-check that the connector is fully plugged in. A loose connector will cause the same problems as a dirty sensor.
Step 12: Reconnect the Battery
Reconnect the negative battery terminal. Tighten the nut with your wrench. Make sure it’s snug.
Once the battery is connected, you’re ready to test your work.
Testing Your Work: Does It Run Better?
Start your car. Listen to how it sounds. Does the idle feel smoother than before?
Let it warm up for a few minutes. Drive it around slowly in a parking lot or quiet street. Feel the acceleration. Does the car respond better to the gas pedal?
Take it on a short highway drive. Merge into traffic. Does the car accelerate like it should?
The check engine light might still be on for a little while. Your car’s computer needs time to learn that the sensor is clean. Drive the car normally for a few miles. The light should go off after a few driving cycles.
In most cases, you’ll feel an immediate improvement. The car idles better. Acceleration is smoother. Fuel economy improves.
If the check engine light stays on after 50 miles of normal driving, something else might be wrong. But most of the time, a clean MAF sensor fixes the problem.
Common Mistakes to Avoid
Touching the Sensor Wire
I can’t stress this enough. The wire inside the MAF sensor is extremely fragile. It’s made of platinum and thinner than a human hair. Even touching it with a cloth can break it. Look at it, but don’t touch it.
Using the Wrong Cleaner
Carburetor cleaner, brake cleaner, and other sprays might work, but they risk damaging the sensor. MAF sensor cleaner costs only a few dollars more. Buy the right cleaner and sleep peacefully.
Letting Water Get Inside
Water and electronics don’t mix. Don’t spray water in or near your MAF sensor. Don’t wash it. Just use the dry chemical cleaner.
Over-Tightening Bolts and Clamps
You’re not building a bridge. You don’t need to crank these bolts down with all your strength. Snug and secure is what you’re after. Over-tightening can crack plastic parts.
Forgetting to Disconnect the Battery
This step seems annoying, but it’s important. A live electrical system can cause sparks or shocks. Take the five minutes to disconnect the negative terminal.
Not Waiting for the Sensor to Dry
Patient people succeed. Impatient people break sensors. Let it dry completely. Don’t force it.
Driving Hard Immediately After Cleaning
Your engine’s computer needs time to learn that the sensor is clean. Drive gently for the first 20 minutes. Avoid hard acceleration, highway speeds, and towing. Treat your car like an old friend who just had surgery.
When to Replace Instead of Clean
Sometimes cleaning isn’t enough. Your MAF sensor might be too far gone.
The Sensor is Physically Damaged
If you see cracks, burns, or corrosion that cleaning can’t fix, get a new sensor. A broken sensor won’t work no matter how clean you get it.
The Check Engine Light Comes Back Immediately
If you clean the sensor and drive just a few miles before the light comes back on, the sensor is probably bad. It’s throwing an error code because it’s genuinely broken.
The Sensor Won’t Stay Seated
If the sensor keeps coming loose or feels wobbly after you’ve tightened everything, the plastic housing might be cracked. A replacement is the answer.
You Accidentally Damaged It While Cleaning
If you touched the wire too hard or used the wrong cleaner, you might have broken it. A new sensor is cheaper than spending hours trying to fix something you can’t see.
A new MAF sensor costs between forty and one hundred fifty dollars, depending on your car. Most people can install one in 20 minutes using the same steps I described for cleaning.
Related Maintenance Tasks That Help
Cleaning your MAF sensor is one step toward a healthy engine. Do these other tasks to prevent future problems.
Replace Your Air Filter Regularly
A clean air filter stops dirt from reaching your MAF sensor. Replace your air filter every 15,000 to 30,000 miles. Check your car’s manual for the exact interval.
Clean Your Engine Intake
Carbon deposits build up inside your engine over time. A fuel system cleaner additive can help. Pour it into your gas tank according to the directions. It cleans the fuel injectors and intake valves.
Check for Vacuum Leaks
A vacuum leak can cause symptoms that feel like a dirty MAF sensor. Listen for hissing sounds around your intake. Inspect hoses for cracks. Get these fixed promptly.
Keep Your Engine Oil Clean
Clean oil keeps your whole engine healthier. Change your oil and filter according to your car’s maintenance schedule.
Monitor Your Check Engine Light
Don’t ignore the light. When it comes on, get the code read at an auto parts store. They do this for free. The code tells you exactly what’s wrong.
Final Thoughts: You’ve Got This
Cleaning your MAF sensor is one of the easiest maintenance jobs you can do yourself. It takes about an hour. It costs less than thirty dollars. And it can save you hundreds at the mechanic shop.
Your car will thank you. You’ll feel the difference immediately. Smoother idling. Better acceleration. Improved fuel economy. These are real improvements that make driving more enjoyable.
Don’t be intimidated by the word “sensor.” It’s just a small device that measures air. You can handle this job. Millions of people do it every year in their driveway.
Take your time. Follow each step carefully. Use the right tools and cleaner. And most importantly, be gentle with that delicate sensor wire.
Your car is an investment. Taking care of it now prevents expensive repairs later. A clean MAF sensor is one easy way to keep your engine running strong. Get out there and get to work. You’ve got this.