How to Change Brake Calipers?
Brake calipers are one of those car parts that sound intimidating until you actually work on them. Here’s the thing: you don’t need to be a professional mechanic to replace your brake calipers. With the right tools, a little patience, and clear instructions, you can do it yourself and save a ton of money.
This guide walks you through every step. We’ll start with the basics so you know what you’re dealing with, then move into the actual work. By the end, you’ll have the confidence to tackle this project on your own.
What Are Brake Calipers and Why Do They Matter?
Let’s start with the simple stuff. Your brake calipers are the parts that squeeze your brake pads against your rotors when you press the brake pedal. Think of them like hands gripping a spinning disk. When they grip, friction stops your car.
Over time, brake calipers wear out. The seals inside crack. The pistons get stuck. The caliper body might corrode or develop leaks. When this happens, your brakes don’t work as well. You might feel your brake pedal getting soft or spongy. Your car might pull to one side when you brake. These are signs your calipers need replacing.
New brake calipers will restore your stopping power and make your brakes feel responsive again. They also prevent damage to other brake parts. A bad caliper can ruin your brake pads and rotors faster than normal, which means more money spent on repairs down the road.
Types of Brake Calipers
Before you buy new calipers, you should know there are different kinds.
Fixed Calipers: These calipers stay in place and don’t move. They have multiple pistons on both sides of the rotor. They’re common on performance cars and sports cars because they give better stopping power. They’re also more expensive to replace.
Floating Calipers: These slide on guide pins. They have pistons only on one side. When you hit the brakes, the caliper slides to squeeze the pads. They’re cheaper and easier to work on, which is why most everyday cars use them.
Sliding Calipers: These are basically the same as floating calipers. The terms get used interchangeably. They slide on a single guide pin or bracket.
For this guide, we’re focusing on floating and sliding calipers because most people drive cars with these types. If you have a fixed caliper, the process is similar, but you’ll need to check your specific car’s manual.
Tools and Parts You’ll Need
Getting the right tools makes this job way easier. You don’t need fancy equipment. Most of this stuff you probably already have or can borrow.
Tools Required:
- Socket set or wrenches (check your car’s manual for sizes)
- Screwdrivers (both flathead and Phillips)
- Jack (make sure it’s rated for your car’s weight)
- Jack stands (absolutely essential for safety)
- Brake fluid (the type your car uses)
- Brake cleaner or degreaser
- New brake pads (while you’re in there, might as well replace them)
- Caliper piston tool or old brake pads (to push the piston back)
- Rags or shop towels
- Wheel chocks (to keep your car from rolling)
- Pliers or brake pad retention clip removal tool
- Bucket (for old brake fluid)
Parts You’ll Need:
- Replacement brake calipers for your vehicle
- Brake hoses (if the old ones are damaged)
- Brake fluid
- Possibly new rotors (depends on their condition)
Don’t cheap out on calipers. They’re critical safety parts. Buy quality replacements from a trusted auto parts store. If you’re not sure what type you need, give them your car’s year, make, and model.
Safety First: How to Prepare
Safety is not something to skip. Your car will be up in the air, so you need to make sure it stays there and doesn’t come down on you.
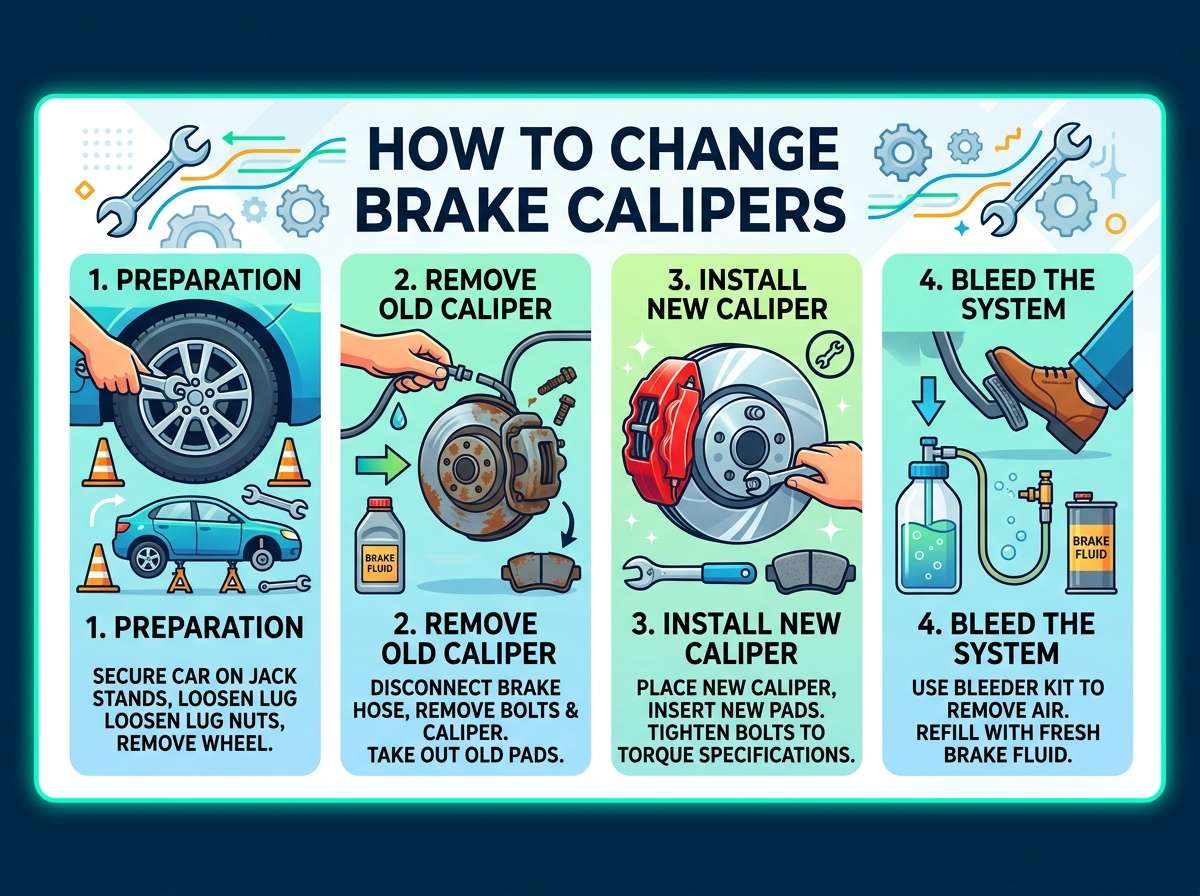
Step 1: Find a Safe Workspace
Pick a flat, level surface. Your driveway or a garage is perfect. Avoid sloped driveways or uneven ground. You need stability. Make sure you have good lighting. You don’t want to be reaching under your car in the dark.
Step 2: Secure Your Vehicle
Put your car in park. Engage the parking brake. Put wheel chocks behind the rear wheels (or in front if you’re working on the rear brakes). These prevent your car from rolling.
Step 3: Loosen the Lug Nuts
Before you jack up the car, loosen the lug nuts on the wheel you’re working on. You only loosen them, not remove them completely. The tire still on the ground gives you leverage. Trying to loosen them after the wheel is in the air is much harder.
Step 4: Jack Up Your Car
Use the jack to lift one corner of your car. Lift at the reinforced jack point, not just anywhere under the frame. Check your manual if you’re not sure where that is.
Once the wheel is off the ground, place a jack stand under the car. Lower the car onto the jack stand. Don’t rely only on the jack. Jacks can fail. Jack stands are your backup.
Step 5: Remove the Wheel
Now unscrew those lug nuts completely. Set them somewhere safe where you won’t lose them. Pull the wheel straight toward you to remove it.
The Brake Caliper Replacement Process
Now we get to the actual work. Take your time here. Rushing is where mistakes happen.
Part 1: Remove the Old Caliper
Step 1: Identify Your Caliper Bolts
Look at your caliper. You’ll see two bolts holding it to the steering knuckle or caliper bracket. Some calipers have two bolts on the side facing the wheel. Others have bolts on the back. Check which type yours is.
Step 2: Disconnect the Brake Hose
This is important: the brake hose carries brake fluid to your caliper. Before you remove the bolts, you need to disconnect this hose. Look for where the brake hose connects to the back of the caliper. You’ll see a banjo fitting here.
Have your bucket ready. Unscrew the banjo bolt slowly. Brake fluid will drip out. Catch it in the bucket. Once disconnected, plug the hose end with a clean rag or buy a brake line cap to prevent fluid loss and contamination.
Step 3: Remove the Caliper Bolts
Use your socket set to remove those two bolts holding the caliper. Keep them safe. Don’t lose them. Once the bolts are out, pull the caliper straight off. It should come away easily.
Step 4: Remove the Brake Pads
Your old brake pads are still in the caliper. Pop them out. If they’re stuck, a screwdriver or pry tool helps. Don’t throw them away yet. You’ll need them in the next step.
Part 2: Prepare for the New Caliper
Step 1: Clean the Bracket
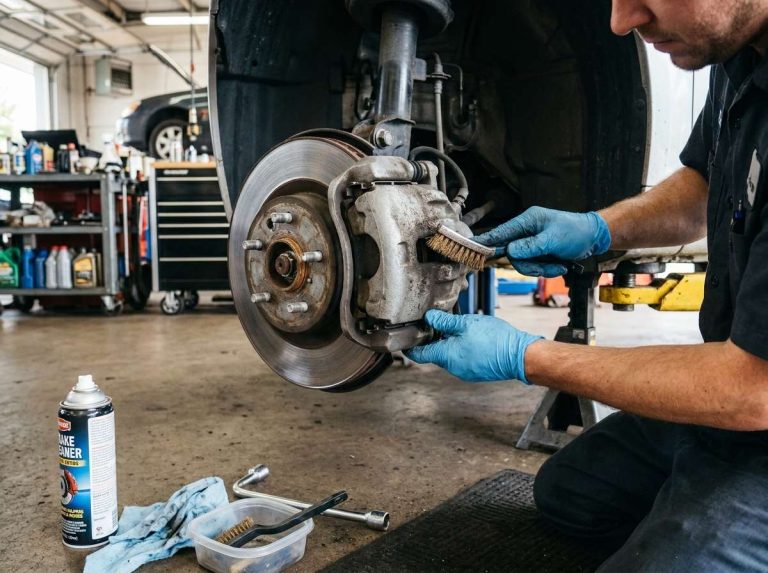
Look at what’s left: the caliper bracket bolted to your wheel. This bracket gets dirty over time. Spray it with brake cleaner. Wipe it clean with a rag. A clean surface prevents problems later.
Step 2: Check the Guide Pins
Your old caliper sat on guide pins. These pins slide through rubber bushings. Check if they’re clean and not corroded. If they look crusty, clean them with a wire brush. If they’re seized or damaged, you might need to replace them. But usually they’re fine.
Step 3: Remove the Old Piston
Here’s a trick that saves time later. Use your old brake pads as a spacer. Push them back into the bracket opening where the caliper was. This protects the piston space while you work.
Or use a C-clamp and the old brake pads to push the piston back into its bore. You want to create space for the new caliper to slide on. Don’t force it. Go slow.
Step 4: Check Your Rotor
While you’re in here, look at your rotor. Run your fingers across the surface. If it feels rough or has deep grooves, it probably needs replacing too. Rotors and calipers often go bad together. Replacing both together saves you work later.
Part 3: Install the New Caliper
Step 1: Prepare the New Caliper
Take your new caliper out of the box. It probably came with a protective cap on the piston. Remove that cap. Check the brake hose connection to make sure it’s clean.
Step 2: Connect the Brake Hose
Take your brake hose and connect it to the new caliper. Use the banjo bolt that came with the new caliper. Screw it in by hand first to avoid cross-threading. Then tighten it with your socket set. Don’t over-tighten. You just need it snug enough that it won’t leak.
Step 3: Slide the Caliper On
Carefully slide your new caliper over the brake pads and rotor. Align the holes in the caliper with the holes in the bracket. Push it fully home until it seats properly.
Step 4: Install the Caliper Bolts
Insert those two bolts you removed earlier. Screw them in by hand first. Then tighten them with your socket set. The specific torque spec is in your car’s manual. If you don’t have one, search online for your vehicle’s specs. Usually these bolts need about 40-50 foot-pounds of pressure. Don’t go crazy tight. Snug is what you want.
Step 5: Install New Brake Pads
Most new calipers come with new brake pads. If yours doesn’t, use quality pads. Slide them into the caliper. Make sure they sit flat against the rotor. Give them a gentle tug to confirm they’re seated.
Bleeding Your Brakes: Why It Matters
After you install new calipers, your brake system probably has air in it. Air in your brake lines is bad. It makes your brake pedal feel soft and spongy. Your brakes won’t work right.
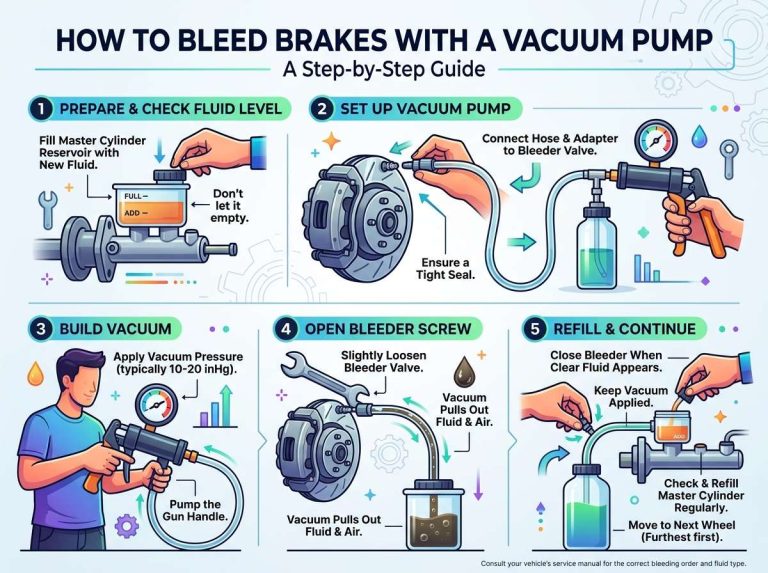
Bleeding your brakes removes this air. You force brake fluid through the system, pushing the air out.
How to Bleed Your Brakes
Step 1: Check Your Brake Fluid Level
Open your hood. Find the brake fluid reservoir. It’s usually a white plastic container with “Brake” written on it. Check the fluid level. It should be near the “max” line. If it’s low, top it off with fresh brake fluid. Use the correct type for your car.
Step 2: Gather Your Supplies
You need: a small hose that fits your brake bleeder valve, a container for old fluid, a wrench that fits your bleeder valve, and another person (making this solo is possible but harder).
Step 3: Start with the Farthest Wheel
You bleed starting from the brake nearest the master cylinder and working your way out. Most people start with the rear brakes. If you’re only replacing front calipers, start with the rear brakes, then do the front.
Step 4: Open the Bleeder Valve
Locate the bleeder valve on your caliper. It’s a small screw on the caliper body. Slip the hose over it. Have your helper sit in the driver’s seat.
Tell them to press the brake pedal slowly to the floor. While they do this, open the bleeder valve a quarter turn. You’ll see brake fluid flow through the hose. Once the pedal is at the floor, close the bleeder valve. Your helper releases the pedal and pumps it again.
Repeat this process. Each time, you’ll see less and less air bubbles in the hose. Once the hose shows only solid fluid with no bubbles, you’re done with that caliper.
Step 5: Do All Four Wheels
If you’re replacing both front calipers, do the passenger side first, then the driver side. Then do the rear brakes. Always work from back to front (or farthest to nearest to the master cylinder).
Step 6: Check Your Fluid Level Again
As you bleed brakes, the fluid level drops. Check it often. Top it off as needed. Never let the reservoir run dry during bleeding.
Testing Your Work
Once you’ve installed the new calipers and bled the brakes, you need to test everything before driving.
Test 1: Check Your Brake Pedal
Sit in the driver’s seat with the engine off. Press the brake pedal. It should feel firm, not spongy. If it feels soft, you have air still trapped in the lines. Bleed again.
Test 2: Listen for Sounds
Press the brake pedal and listen. You shouldn’t hear any grinding or squealing. Some new pads squeal at first, but that goes away after a few stops.
Test 3: Reinstall the Wheel
Put the wheel back on. Screw the lug nuts on by hand first. Lower the car completely onto the ground. Then tighten the lug nuts in a crisscross pattern. Get them good and tight.
Test 4: Take a Test Drive
Drive slowly in an empty parking lot. Apply the brakes gently at first. Feel how they respond. Then apply them harder. Your brakes should stop the car smoothly without pulling to one side.
Go back and inspect everything if something feels off.
Common Mistakes to Avoid
Even seasoned DIYers mess up sometimes. Here are the most common mistakes and how to dodge them.
Mistake 1: Not Bleeding the Brakes
This is the biggest one. New calipers mean air gets in the system. Skip bleeding and your brakes won’t work right. Don’t skip this step.
Mistake 2: Over-Tightening Bolts
Brake caliper bolts don’t need to be cranked super tight. Crushing them actually damages them. Use the torque spec from your manual and stick to it.
Mistake 3: Forgetting Brake Fluid
Brake fluid is hygroscopic. It absorbs water from the air. Old fluid gets contaminated. When you replace calipers, pour out the old fluid and add fresh fluid. Your brakes will thank you.
Mistake 4: Reusing Old Brake Pads
You have new calipers but old worn pads. This creates uneven wear and poor braking. Spend the money and buy new pads with the calipers.
Mistake 5: Skipping the Jack Stands
Never work under a car supported only by a jack. Jacks fail. People die. Use jack stands. Always. No exceptions.
Mistake 6: Disconnecting the Wrong Line
Make sure you’re disconnecting the brake hose, not something else. Look twice before you unbolt anything.
Mistake 7: Not Checking Your Work
After installation, inspect everything. Check that bolts are tight. Check that the hose isn’t kinked. Check that pads are seated right. Spend five minutes looking. It beats a brake failure on the highway.
When to Call a Professional
Sometimes the job is beyond DIY. Here are situations where you should take your car to a shop.
You should get professional help if your caliper bolts are rounded off and won’t budge. If your brake hose is damaged and needs replacing. If you can’t get your brakes to feel right after bleeding. If something breaks during installation. If you don’t feel confident at any point.
A professional can do the job in an hour or two. You pay for the labor, but you get a warranty and peace of mind. That’s worth something.
Cost Breakdown
Let’s talk money. How much does this save you?
Professional Shop Cost: A mechanic charges anywhere from $300 to $800 per wheel for caliper replacement. That’s $600 to $1,600 for both front wheels.
DIY Cost:
- New calipers: $150-$400 each (depending on quality)
- Brake pads: $50-$150
- Brake fluid: $10-$20
- Jack stands (if you don’t have them): $30-$50
Total for both front calipers: $400-$900, depending on what you buy.
That’s a savings of $200 to $800 just for labor. Plus, you learn something new and get the satisfaction of doing it yourself.
Tools You Might Already Have
Before you buy tools, check what’s in your garage. Most people already own:
- Socket set
- Wrenches
- Screwdrivers
- A jack
- Rags
You really only need to buy jack stands if you don’t have them. Everything else is standard stuff.
Why Replace Calipers and Not Just Rebuild Them?
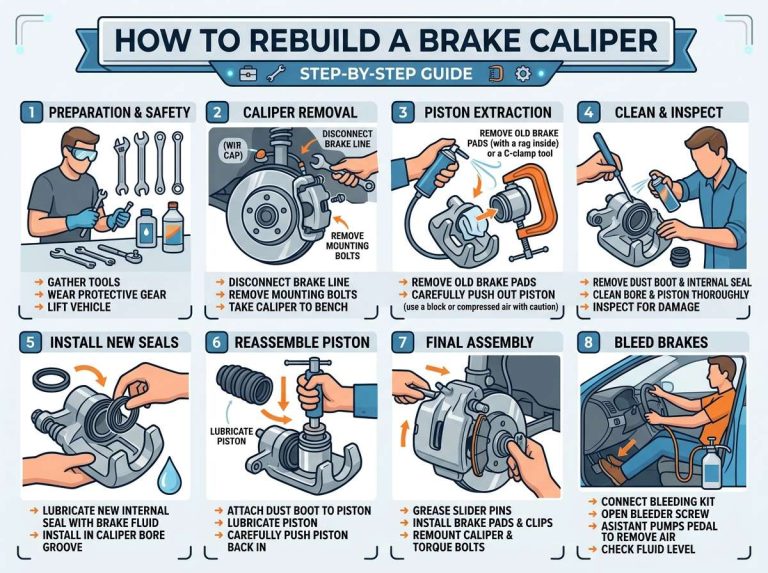
You might hear about caliper rebuilds. This is where you take apart your old caliper, replace the seals and piston, and put it back together.
Here’s the truth: rebuilding calipers is cheaper upfront but riskier. If you miss something, your brakes fail. New calipers come from the factory, tested, and ready to go. They cost more, but they’re safer.
For a beginner, buying new is the right call.
Maintenance Tips to Extend Caliper Life
Your new calipers will last longer if you take care of them.
Drive Gently: Aggressive braking wears calipers faster. Smooth, easy stops extend their life.
Keep Your Brakes Clean: Don’t let brake dust and grime build up. Rinse your wheels sometimes.
Use Quality Brake Fluid: Fresh fluid prevents corrosion inside the caliper.
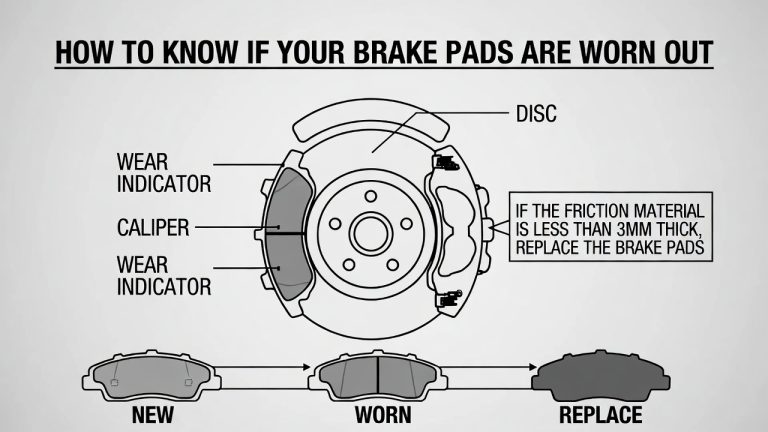
Check Your Pads Regularly: Worn pads damage calipers. Replace pads early.
Have Your Brakes Inspected: A pro can spot problems before they become expensive.
Final Thoughts
Changing brake calipers is a big job, but it’s doable. With patience and the right approach, you can do it in a Saturday afternoon. You’ll save serious money and feel great when you’re done.
The key is taking your time, following the steps, and not rushing. Your brakes are too important to mess up. If you’re ever unsure about anything, don’t guess. Ask for help or take it to a professional.
Your car will stop better, feel safer, and last longer once your new calipers are installed. That’s a win in anyone’s book. Good luck with your project.

Peterson is an automotive enthusiast and auto parts reviewer with a passion for vehicle maintenance, upgrades, and performance. He enjoys researching and testing car parts, tools, and accessories to help drivers make informed buying decisions. Through AutoPartsTalk.com, Peterson shares honest reviews, practical maintenance tips, and expert guides to keep vehicles running safely and efficiently.