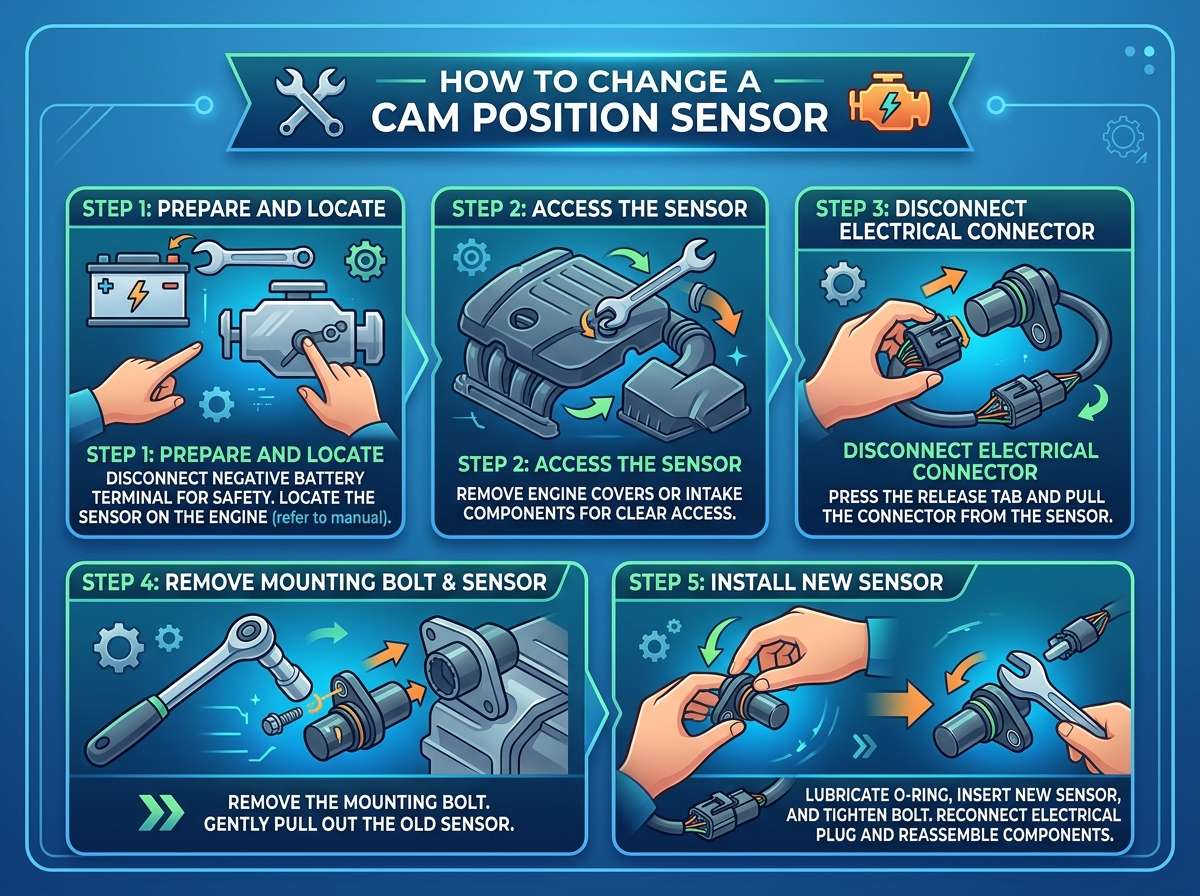
How to Change a Cam Position Sensor?
Your car’s engine has tons of tiny parts working together to keep everything running smoothly. One of the most important ones is the cam position sensor. If this little device fails, your vehicle can run rough, misfire, or even refuse to start. The good news? You can replace it yourself without spending hundreds of dollars at a mechanic.
In this guide, I’ll walk you through everything you need to know about changing your cam position sensor. We’ll cover what it does, why it matters, and how to swap it out step by step. Let’s get started.
What Is a Cam Position Sensor Anyway?
Before we dig into the replacement process, let’s understand what we’re dealing with.
The cam position sensor is a small electronic device that sits on or near your camshaft. Your camshaft is a spinning shaft inside your engine that controls when the valves open and close. The cam position sensor watches this shaft and sends signals to your engine’s computer about its position.
Your engine’s computer uses this information to time the spark plugs and fuel injectors perfectly. Without accurate camshaft position data, your engine can’t run right. It’s like the sensor is your engine’s eyes, constantly watching the timing of everything happening inside.
These sensors are often called CMP sensors for short. They’re usually made of metal housings with electronic components inside. They typically have a connector with wires attached so they can talk to your vehicle’s main computer.
Why Does a Cam Position Sensor Go Bad?
Cam position sensors don’t last forever. Several things can cause them to fail.
Heat and vibration are the biggest enemies. Your engine gets extremely hot when it runs. The cam position sensor sits right in the middle of this heat, day after day, year after year. Over time, the internal electronics can’t handle the constant temperature changes. Vibrations from the engine also shake these sensors, and eventually something inside might crack or loosen.
Oil leaks can destroy a cam position sensor fast. If oil drips onto the sensor or gets inside it, the electronics short out. Once water or moisture gets in there, rust starts forming on the internal circuits.
Wiring problems happen too. The connector attached to the sensor wire can corrode or loosen. Rodents sometimes chew through wires under your hood. A loose connection means the sensor can’t send its signal to the computer.
Bad timing is another issue. If your timing chain or belt is stretched, the camshaft might not spin exactly right. This throws off the sensor’s readings even if the sensor itself is still working.
Old age is simply the most common reason. Most cam position sensors last between 80,000 and 150,000 miles. After that, they just wear out.
Signs Your Cam Position Sensor Is Dying
Your car will give you warning signs before the sensor completely fails. Pay attention to these signals.
The check engine light will likely pop on first. This light means your engine’s computer detected a problem. When the cam position sensor starts acting weird, the computer notices the readings don’t make sense and turns on this warning light.
Rough idle is another big clue. When you’re sitting at a red light with the engine running, it should feel smooth. If your car shakes or vibrates a lot at idle, your cam position sensor might be sending bad signals to the computer.
Misfires and hesitation happen when the timing is off. You might feel your engine stumble when you accelerate. It’ll feel like someone is tapping the brakes for a split second. That’s a misfire.
Starting problems come next. Your car might crank but take a long time to start. It might even refuse to start at all. Since the sensor helps time the spark, a bad sensor means the engine doesn’t know when to fire the plugs.
Poor fuel economy seems weird but makes sense. If your engine’s timing is off, it wastes fuel trying to run inefficiently. You might notice you’re filling up more often.
Engine stalling while driving is scary but possible. If the sensor dies completely while you’re on the road, your engine might just stop running.
If you notice any of these signs, get your sensor checked soon. Driving with a bad sensor puts extra stress on your engine and can cause other damage.
Tools and Parts You’ll Need
Replacing a cam position sensor is one of those jobs where having the right tools makes everything easier.
Basic hand tools are your starting point. You’ll need a socket set, a wrench set, and a screwdriver set. These are standard tools that most home mechanics have lying around. Get regular sized sockets because most sensor bolts aren’t too big.
A breaker bar helps loosen tight bolts that have been on there for years. Regular socket wrenches sometimes don’t give you enough leverage for stubborn fasteners.
A flashlight or headlamp is essential. You’ll be working in tight spaces in your engine bay, and you need to see what you’re doing. A small LED flashlight works great.
Pliers come in handy for removing connectors and clips. Get both regular and needle-nose pliers.
A new cam position sensor is obviously required. Head to an auto parts store and tell them your vehicle’s year, make, and model. Get the exact sensor for your car. Prices usually run between thirty to eighty dollars depending on your vehicle.
The replacement gasket or seal should come with your new sensor, but double-check. Some sensors come with gaskets included, others don’t.
Engine oil or gasket maker might be needed if your sensor has an oil seal. Check your manual to see if your sensor uses one.
A clean rag keeps your workspace tidy and helps wipe away old oil or dirt.
Your vehicle’s repair manual is super valuable. Different cars have slightly different layouts. Your specific manual will show exactly where your sensor is and which bolts to remove.
Safety First: Preparing Your Vehicle
Before you touch anything under the hood, make your car safe to work on.
Let your engine cool down completely. Don’t work on a hot engine. You can seriously burn yourself. If you just drove, wait at least thirty minutes. Better yet, work on your car in the morning before starting it.
Park on level ground away from traffic. You need stable work space. If you’re working in a driveway, make sure no one is going to drive nearby and surprise you.
Disconnect the negative battery terminal. Use a wrench to loosen the negative cable on your battery. This kills the electrical power to your engine and prevents accidental sparks or shorts. It’s the most important safety step you can take.
Chock your wheels with blocks or heavy bricks. This prevents your car from rolling even if the parking brake somehow fails.
Never work alone if you can help it. Having someone nearby in case of emergency is smart. Even if it’s just someone inside the house, it’s better than being totally alone.
Wear safety glasses to protect your eyes from debris. Engine bays can hide little particles that can fly up and scratch your eyes.
Finding Your Cam Position Sensor
The location of the cam position sensor varies wildly depending on your vehicle. Some are easy to access, others are tucked up under the intake manifold.
Check your repair manual first. This is the fastest way to find your sensor. The manual has a diagram showing exactly where it sits on your specific engine.
Look near the camshaft. The sensor is usually mounted on the cylinder head near the front or back of the camshaft. It might be right on top of the engine or tucked off to the side.
Follow the wiring. Even if you can’t immediately spot the sensor, find the thick black wire that’s labeled as the cam position sensor circuit in your manual. Follow it. It’ll lead you right to the sensor.
Check both sides. Some engines have sensors on the intake camshaft and the exhaust camshaft. Your car might have two sensors. Check your manual to see if you need to replace one or both.
Take a photo once you find it. Use your phone to snap a picture of how everything connects. This will help you remember how to put it back when you’re done.
Many cam position sensors are held in place with just one or two bolts. They connect to the engine with a simple cylinder shape. The wiring harness plugs in from the top or side.
Step-by-Step Replacement Instructions
Now let’s do the actual replacement. Take your time and don’t rush.
Step One: Disconnect the Wiring Harness
Find where the wiring harness plugs into your sensor. It’s usually a plastic connector with a little clip or button on it.
Gently wiggle the connector side to side while pulling it. Don’t yank on the wires themselves because you can break them. The connector should pop off with a little resistance. If it’s super tight, use your fingers to press the release clip while pulling.
Some connectors have a small tab you need to press down first. Look carefully at how your connector sits. There’s always a way to release it.
Once it’s unplugged, set the connector aside. Don’t let it dangle and get pinched when you move engine parts around.
Step Two: Remove the Mounting Bolts
Most cam position sensors have one, two, or three bolts holding them in place. Use your socket wrench to loosen these bolts.
Turn the wrench counterclockwise. If the bolts are really tight, don’t strain yourself. Use a breaker bar for extra leverage. Slow pressure beats hard yanking every time.
Once the bolts are loose, unscrew them by hand and set them in a safe place. Don’t lose these bolts. Putting a sensor back with loose bolts is a common mistake.
Some sensors pull straight out once the bolts are gone. Others might need a little wiggling or gentle prying to break them free. Don’t force anything. If it won’t budge, you might have missed a bolt.
Step Three: Remove the Old Sensor
Now slide the old sensor out of its mounting location. You might see some oil or gasket material around where it was sitting. That’s normal.
Look at where the sensor was sitting. Note any gasket material or rubber seal that was under it. You might need to clean this surface before installing the new sensor.
Set the old sensor aside. If you want, you can test it later or return it for a core charge at some auto parts stores. Many shops will give you a few bucks back if you return your old sensor.
Step Four: Prepare the New Sensor
Before you install the new sensor, check if it has a gasket or seal attached. Some sensors come with fresh gaskets already installed. Others need you to clean the mounting area and apply new gasket maker.
If your sensor came with a rubber seal, check that it’s sitting right on the sensor. Make sure it’s not twisted or creased.
If you need to use gasket maker, apply a thin bead around the sensor’s base. You only need a tiny amount. Too much gasket maker creates a mess and can interfere with proper installation.
Some newer sensors have a rubber O-ring seal that’s reusable. Make sure it’s in good shape. If it looks dry-rotted or cracked, replace it with a new one from your parts store.
Step Five: Install the New Sensor
This step is simple but needs to be done carefully.
Slide the new sensor into the same spot where the old one came out. Push it in gently until it seats completely against the mounting surface. You should feel it settle into place.
If the sensor has a gasket, you might see it squish slightly as you push. That’s okay. The gasket is supposed to compress.
Once the sensor is seated, install the mounting bolts by hand. Just screw them in finger-tight. Don’t tighten them with your wrench yet.
Now use your socket wrench to snug down the bolts. They don’t need to be super tight. Just tight enough that the sensor won’t move around. Over-tightening can crack the sensor or break off the bolt.
A good rule: tighten until you feel resistance, then turn a quarter turn more. That’s usually plenty.
Step Six: Reconnect the Wiring Harness
Now comes the easiest part.
Push the wiring connector back onto the sensor. You should feel it click into place. The connector will seat with a satisfying snap.
Give it a gentle tug to make sure it’s fully seated. If it comes off, reseat it and push harder. It should stay in place without any wiggling.
Some connectors have a locking tab on the side. If yours does, make sure that tab clicks into the locked position. You’ll hear or feel a little click.
Step Seven: Reconnect the Battery
Now go back to your battery and reconnect the negative cable. Tighten the terminal clamp with your wrench. Make it snug but don’t crank it super tight.
This restores power to your engine’s computer and all the electrical systems.
Step Eight: Test Your Work
Now for the moment of truth.
Get in your car and close the hood. Sit in the driver’s seat and start the engine. Listen carefully to how it sounds.
The engine should start normally and run smoothly. You shouldn’t hear any odd noises or feel any shaking.
Let it idle for a minute and listen. The idle should feel smooth and steady. No rough vibration.
The check engine light might stay on for a few driving cycles while your computer relearns the engine’s parameters. This is totally normal. Just drive the car normally and the light should go off within a few days.
Take the car on a short test drive if you feel confident. It should accelerate smoothly without hesitation or stumbling.
If something feels wrong, stop driving immediately and check your work. Make sure the connector is fully seated. Make sure all bolts are tight.
Common Mistakes to Avoid
Even simple jobs go wrong sometimes. Here’s what people mess up most often.
Not fully seating the connector is number one. People think it’s plugged in when it’s only halfway connected. This causes electrical gremlins that confuse your engine computer.
Forgetting to disconnect the battery before starting work can cause electrical shorts. This is dangerous and can fry your computer.
Dropping bolts into the engine happens more often than you’d think. Use a magnetic parts tray or small container to hold your bolts. Keep them organized by location.
Over-tightening bolts can crack plastic sensor housings. Use reasonable pressure. Listen to your wrench. You’ll feel when resistance gets strong.
Installing the new sensor backwards seems impossible but happens. Check that the connector faces the right direction and the sensor holes line up with the mounting location.
Not letting the engine cool before starting work can burn you badly. Hot engines reach 250 degrees or higher. That’ll give you a nasty burn instantly.
Cross-threading the bolt holes happens when bolts go in at an angle. Start bolts by hand first. If it doesn’t screw in smoothly, back it out and try again.
What If You Mess Up?
Don’t panic if something goes sideways.
If the engine won’t start, check that the connector is fully seated. Reseat it and try again. Also make sure the battery terminal is properly reconnected.
If you see a code for the cam position sensor, the sensor might be bad, or you might not have the connector fully plugged in. Try reseating the connector first.
If the check engine light won’t turn off, drive the car normally for a few hundred miles. The computer needs time to relearn. If it’s still on after a week of driving, get it scanned with a code reader.
If oil drips from under the sensor, you might need a new gasket. This is an easy fix. Just go through the removal and installation steps again, but with a fresh gasket.
If you stripped a bolt hole, you can use a slightly larger bolt with a corresponding larger hole. Or you can have a shop use a thread repair insert to fix the hole.
The key is don’t get frustrated. Most problems are simple fixes. Just slow down and think through what went wrong.
When to Call a Professional
Sometimes the DIY route isn’t the best choice.
If you’re not comfortable working under the hood, that’s totally fine. Some people would rather let a pro handle it. There’s no shame in that.
Call a mechanic if the sensor is tucked in a spot that requires removing major engine components. Some cars bury the sensor deep where you need to pull off the intake manifold or move other stuff. If getting to it requires more than two hours of work, hire someone.
Call a mechanic if you don’t have basic hand tools. Buying all new tools might cost more than just paying a shop.
Call a mechanic if you accidentally damaged something else during the job. You can ask the shop to fix your damage and the sensor replacement in one go.
Call a mechanic if your check engine light won’t clear and there are multiple sensor codes. This might mean something else is wrong too.
A professional job usually costs between 150 and 400 dollars depending on your vehicle and where the sensor is. Some shops charge more, some less. It’s worth getting a quote before you decide to DIY.
Maintenance Tips to Prevent Future Issues
Once you’ve gone through the trouble of replacing a sensor, you want to prevent it from happening again.
Keep your engine oil clean. Change your oil and filter regularly. Dirty oil damages sensors faster than anything else.
Fix oil leaks promptly. If you spot oil under your car, get it fixed soon. Oil leaks destroy electronic sensors.
Keep your engine bay clean and dry. Moisture and corrosion are bad for electrical connections. Wipe down your battery terminals and connectors occasionally.
Don’t ignore warning lights. When the check engine light comes on, get it diagnosed. Early diagnosis prevents bigger problems.
Drive smoothly. Aggressive driving and rough conditions put extra stress on every engine component. Easy does it.
Use quality fuel. Better fuel burns cleaner and keeps your fuel injectors and sensors working properly.
Keep your cooling system healthy. An engine that runs too hot damages sensors faster. Make sure your radiator and coolant are in good shape.
Wrapping Up
Changing a cam position sensor is totally doable for someone with basic mechanical skills. It’s one of those jobs that looks complicated but really breaks down into simple steps.
Take your time, follow the steps in order, and don’t skip safety precautions. You’ll have your sensor replaced before you know it.
The biggest advantage of doing it yourself is saving money. You’ll put fifty to eighty dollars into a part instead of paying a shop several hundred dollars. That’s a real win.
If you get stuck, don’t be shy about asking questions online or watching video tutorials specific to your vehicle. Thousands of people have done this job on your exact car. Their knowledge is just a search away.
Good luck with your repair. You’ve got this.

Peterson is an automotive enthusiast and auto parts reviewer with a passion for vehicle maintenance, upgrades, and performance. He enjoys researching and testing car parts, tools, and accessories to help drivers make informed buying decisions. Through AutoPartsTalk.com, Peterson shares honest reviews, practical maintenance tips, and expert guides to keep vehicles running safely and efficiently.