How to Clean Your Car Interior Roof?
Your car’s headliner gets dirty. It happens to all of us. Maybe you spilled coffee. Maybe you have kids with sticky fingers. Maybe dust just settled in there over time. Whatever the reason, a grimy car roof interior looks bad and makes your whole car feel old. The good news? You can fix it yourself without spending a fortune at the car wash.
This guide walks you through everything you need to know to clean your car’s interior roof like a pro. You’ll learn what tools to grab, what products work best, and exactly how to do the job right.
What Is Your Car’s Interior Roof, Anyway?
Your car’s interior roof is called the headliner. It’s that fabric or material that covers the ceiling inside your car. Most cars have a soft, cloth-like headliner that attracts dirt, dust, and stains like a magnet.
Why does it get so dirty? Your headliner takes a beating. Dust falls on it. Moisture from humid air settles in the fabric. Spills happen. Smoke can stain it. Pet hair floats up there. Even your hand touching it repeatedly leaves marks over time.
The problem is many people forget about this part of their car. They vacuum the floors. They wipe the dashboard. But the roof? That gets ignored. Then one day you notice it looks dingy, and you wonder how long it’s been that way.
The good news is cleaning your headliner is totally doable at home.
Why You Should Clean Your Car’s Roof Interior
Before you start, let me explain why this matters.
First, it affects how your car looks. A clean interior makes your whole car feel fresh and well-kept. Visitors notice it. You notice it every time you drive.
Second, a dirty headliner can affect your health. Dust sitting up there can fall into your breathing space. If you have allergies, a clean headliner means better air quality inside your car.
Third, regular cleaning helps your headliner last longer. Dirt and grime break down fabric fibers over time. The longer stains sit, the harder they become to remove. Cleaning now prevents bigger problems later.
Finally, a clean car interior means a higher resale value. When you sell your car, buyers notice everything. A spotless interior roof tells them you took care of your vehicle.
What You’ll Need to Clean Your Car Interior Roof
Gather these supplies before you start. You don’t need expensive stuff. Most items you probably already have at home.
Vacuum with upholstery attachment: This is your first tool. Get as much dust and loose dirt off as you can before you wet clean anything.
Soft-bristled brush or upholstery brush: You need something gentle that won’t tear the fabric. A soft brush lifts dirt without damaging the headliner.
Spray bottle: Fill this with water and your cleaning solution. You’ll spray and wipe.
Cleaning solution: You have options here. More on that below.
Clean microfiber cloths: These are your best friend. They grab dirt without leaving lint behind. Avoid paper towels because they fall apart and leave fibers.
Dry towels: Regular towels work great for the final dry stage.
Optional supplies: A leather conditioner works if you have a leather headliner. Baking soda helps with stubborn stains. A carpet cleaning machine with an upholstery attachment makes the job easier if you have one.
Choosing the Right Cleaning Solution
You don’t need fancy products. Three main options work great.
Dish soap and water: Mix a few drops of mild dish soap in a spray bottle with water. This is gentle and works on most stains. It’s cheap and you already have it at home.
Upholstery cleaner: These are made specifically for car interiors and fabrics. Brands like Folex, Turtle Wax, and Chemical Guys all make good headliner cleaners. They’re designed not to leave spots.
Baking soda: For stubborn stains, sprinkle baking soda on the spot, let it sit for a few hours, then vacuum it up. Works great for odors too.
Avoid these: Don’t use bleach. Don’t use harsh chemicals that can discolor fabric. Don’t use products with alcohol if you have a vinyl or leather headliner, as it can crack the material. Test any cleaner on a hidden spot first.
Step-by-Step: How to Clean Your Car Interior Roof
Now let’s get into the actual cleaning process. Follow these steps in order for the best results.
Step 1: Prepare Your Car
Start by parking your car in a shaded area or in a garage. You don’t want direct sunlight beating down while you work. Your windows should be down or your doors open so you get good air flow. This helps things dry faster.
Gather all your supplies and lay them out where you can reach them. Remove any loose items from your car. You need clear space to work.
If you have a sunroof, open it. This gives you more light and better access to the roof area. It also helps with ventilation.
Step 2: Vacuum the Headliner
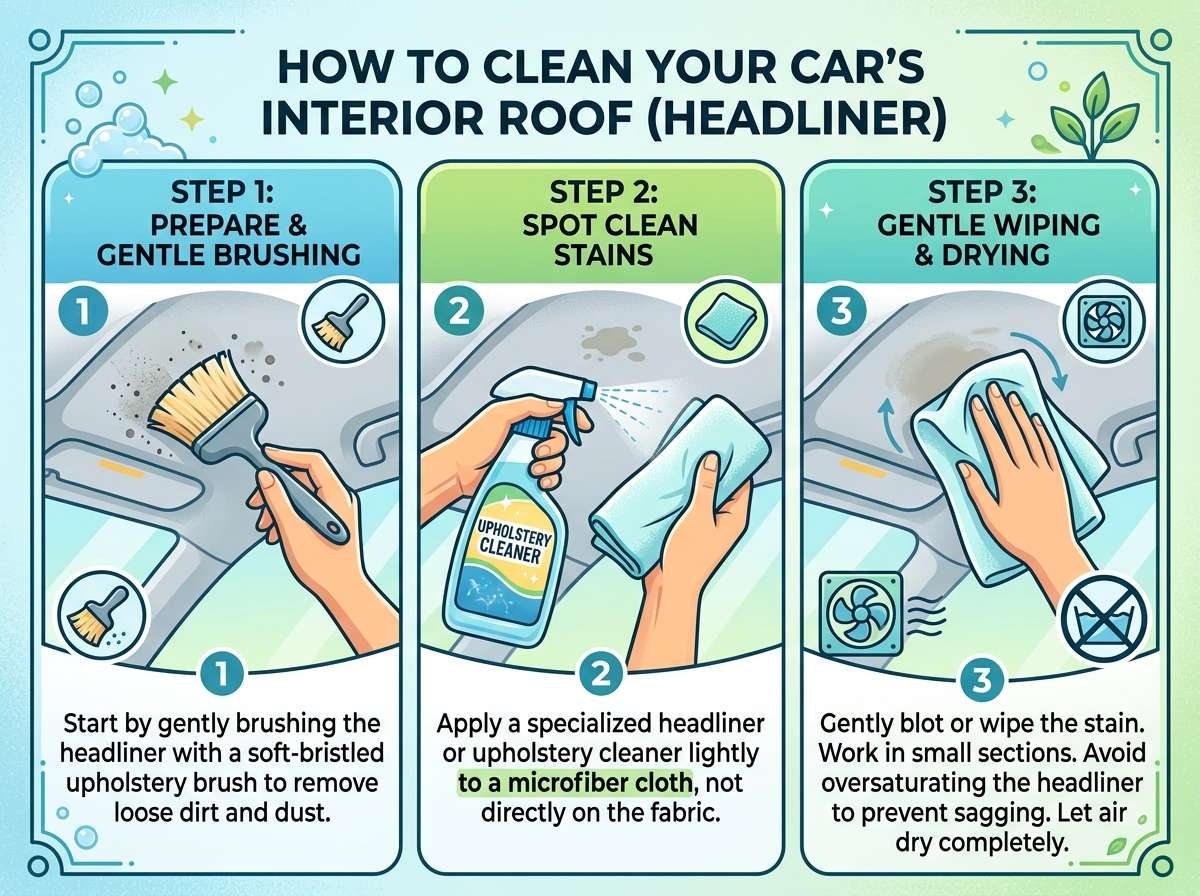
Attach your upholstery attachment to your vacuum. Use gentle, light pressure. You’re not trying to rip the fabric. Just suck up dust and loose dirt.
Work in straight lines from the front of your car to the back. Don’t use a back-and-forth motion. Straight lines are easier to control and cover the area evenly.
Pay special attention to corners and seams where dust likes to hide. Spend extra time around the edges near the windows and doors.
This step removes most of the loose particles. It makes the wet cleaning much more effective because you’re not pushing dirt around.
Step 3: Identify Your Stains
Look at your headliner in good light. What are you dealing with? Is it general grime? Specific stains? Water spots?
Different stains need different approaches. Grease or oil stains need a stronger cleaner. Water spots might just need plain water and a cloth. Food stains or sticky spots respond well to dish soap solution.
Look at the color of your headliner too. If it’s light colored, you might need to be more careful to avoid discoloration.
Understanding what you’re cleaning helps you pick the right approach and avoid making things worse.
Step 4: Test Your Cleaning Solution
Before you spray your whole roof, test on a hidden spot. Try an area in the back corner or under the seat where no one will see it.
Spray a little solution on your test area. Wait a few minutes. Wipe it with a cloth. Does the color hold? Does the fabric feel right? Any discoloration?
If everything looks good, you’re ready to move forward. If anything seems wrong, pick a different cleaner and test again.
This one step saves you from accidentally ruining your headliner.
Step 5: Spray and Wipe
Now the real work begins. Fill your spray bottle with your cleaning solution. Lightly mist a small section of the headliner. You want it damp, not soaking wet. Water dripping down onto you or pooling in the fabric is bad.
Use a light misting spray. Let it sit for about 30 seconds. This gives the cleaner time to break down the dirt.
Take your soft-bristled brush or microfiber cloth and gently scrub. Use circular motions or gentle back-and-forth strokes. Don’t scrub hard or you might damage the fabric.
Work in small sections. Clean one small area completely before moving to the next. This helps you maintain control and see your progress.
Wipe away the solution with a clean, damp cloth. You want to get all the cleaner off, not leave residue behind. Residue left behind looks like water spots and attracts more dirt.
Continue this spray, scrub, and wipe process across your entire headliner. Take your time. Rushing leads to missed spots.
Step 6: Handle Tough Stains
Some stains won’t come out with regular cleaning. That’s okay.
For really stubborn spots, spray the area and let it sit for a few minutes. Don’t just spray and immediately wipe. The cleaner needs time to work. After a few minutes, scrub gently and wipe.
If it still won’t come out, try spraying again and letting it sit even longer. Sometimes you need two or three applications. That’s fine.
For sticky residue like old gum or tape, use a little more pressure when scrubbing. You can use a soft brush with more vigor on these spots.
For greasy stains, mix your dish soap solution a bit stronger. Let it soak longer. Grease takes more time to break down.
For water stains that won’t budge, try a mixture of equal parts water and white vinegar. This works great on mineral deposits and water marks.
Don’t give up on tough stains immediately. Sometimes they just need patience.
Step 7: Dry Everything Thoroughly
After you’ve cleaned your entire headliner, drying is crucial. Moisture left in the fabric can lead to mold, mildew, or new water spots.
Open all your windows and doors fully. Turn on your car’s fan on high with the windows open to push air through. This is the fastest way to dry your headliner.
Use clean, dry towels to dab any areas that are still visibly wet. Don’t rub hard. Just press the towel against the fabric to absorb moisture.
If it’s sunny outside, the sun will help dry things faster. If it’s cloudy, just let air flow dry it. Give it at least an hour of drying time before you close your doors and windows.
You can also park with your windows down for a few hours if you have time. The air flow will dry everything completely.
Tips and Tricks for Better Results
You’ve got the basics down. Here are some pro tips to make your cleaning even better.
Work in sections: Don’t try to do your whole roof at once. Break it into three or four big sections. Do one section completely before moving on.
Use two cloths: Keep one damp cloth for wiping away cleaner and one dry cloth for drying. This speeds up the process.
Clean on a cool day: If it’s hot outside, your solution dries too fast and leaves spots. Mild temperatures are best.
Go with the fabric grain: Most car headliners have a slight texture or grain. Wiping with the grain removes dirt more effectively.
Don’t oversaturate: Water is your enemy if you use too much. Damp is good. Soaking is bad. Too much water takes forever to dry and can damage the backing of the headliner.
Spot clean as you go: Don’t wait for your headliner to get really dirty. Clean small spills immediately and do quick spot cleans every few months.
Use baking soda for odors: If your headliner smells musty, sprinkle baking soda, let it sit overnight, and vacuum it up. This removes odors naturally.
Consider professional help for leather: If you have a leather or suede headliner, professional cleaning might be worth it. These materials need special care.
Common Mistakes to Avoid
Learn from others’ mistakes so you don’t make them yourself.
Using too much water: This is the number one mistake. People think more water cleans better. It doesn’t. It just takes forever to dry and can ruin your headliner. Keep it damp, not wet.
Scrubbing too hard: Your headliner fabric is delicate. Aggressive scrubbing damages it. Use gentle pressure and let the cleaner do the work.
Using the wrong products: Bleach, harsh chemicals, and alcohol can discolor your headliner or damage it permanently. Stick with gentle options.
Not vacuuming first: Skipping the vacuum step means you’re grinding dirt into the fabric while you clean. Always vacuum first.
Not testing products: You might find out a cleaner damages your fabric after you’ve already used it on the whole roof. Test first.
Rushing the drying: If you close your car up before things are completely dry, you trap moisture inside. This leads to mold and new problems. Wait until it’s fully dry.
Ignoring small stains: One coffee spill you ignore becomes a permanent stain in a few weeks. Clean spills immediately when they happen.
How Often Should You Clean Your Car Interior Roof?
This depends on how much you use your car and what your habits are.
If you eat or drink in your car, plan to spot clean your headliner monthly. Small cleanups prevent big stains.
If you have pets or kids, monthly cleaning is a good idea.
If you drive mostly alone and keep food out of your car, cleaning your headliner every three to six months is fine.
Do a full deep clean once a year at minimum. This keeps it looking fresh and prevents buildup.
The reality is most people don’t think about this enough. Anything more than once a year is great.
Protecting Your Headliner Going Forward
Once it’s clean, let’s keep it that way.
No eating in the car: This is the biggest one. Food and drinks cause stains. Keep the car food-free.
No smoking: Smoke stains your headliner and smells terrible. Smoke bans are good for your car.
Keep sunshade: UV rays fade fabric. A sunshade protects your headliner color and keeps the whole car cooler.
Wipe spills immediately: Don’t let liquid sit. Wipe it up right away before it soaks in.
Keep windows closed in rain: Water leaks happen. They usually drip onto your headliner. Check for leaks and fix them quickly.
Regular vacuuming: Vacuum your car’s interior often. This keeps dust from building up on your headliner.
What If Your Headliner Is Beyond Help?
Sometimes a headliner is so damaged or stained that cleaning won’t fix it. If you’re in this situation, you have options.
Replacing your headliner is possible but expensive. It involves removing the entire interior roof panel and installing new fabric. This usually costs several hundred to over a thousand dollars at a professional shop.
Some people use headliner repair kits. These are temporary fixes that aren’t perfect but are much cheaper than full replacement.
You can also just leave it. A dirty headliner doesn’t hurt your car’s function. It just looks bad. Many people accept a worn headliner as part of their car’s personality.
Final Thoughts
Your car’s interior roof is part of your car. Taking care of it makes your car look better, last longer, and feel cleaner. The good news is it’s an easy job that you can do yourself with basic supplies.
Now you know exactly what to do. You know what tools you need. You know the right technique. You know what mistakes to avoid.
The next time you see a dirty headliner, you won’t feel overwhelmed. You’ll know exactly how to fix it.
Start with a small test section if you’re nervous. Build your confidence. Then clean your whole car’s roof interior. You’ll be amazed at how much better your car looks and feels.
Clean headliners make clean cars. Clean cars make happy drivers. So grab your supplies, park in the shade, and get to work. Your car will thank you.

Peterson is an automotive enthusiast and auto parts reviewer with a passion for vehicle maintenance, upgrades, and performance. He enjoys researching and testing car parts, tools, and accessories to help drivers make informed buying decisions. Through AutoPartsTalk.com, Peterson shares honest reviews, practical maintenance tips, and expert guides to keep vehicles running safely and efficiently.