How to Clean Puke from Car?
Nobody wants to deal with vomit in their car. It’s gross, it smells awful, and it can happen when you least expect it. Whether someone got carsick, a kid ate too much candy, or someone had too much to drink, cleaning up puke from your vehicle doesn’t have to be a nightmare.
The good news? You can handle this mess yourself. With the right steps, some basic supplies, and a bit of patience, your car will be clean and fresh again. Let’s walk through exactly how to do it.
Why Act Fast on Vomit Stains
Time is your best friend when dealing with puke in a car. The longer you wait, the harder the job becomes. Vomit contains acids that eat into fabric and can create permanent stains if left sitting. The smell also gets harder to remove the longer it sits.
Acting quickly means less damage to your car’s interior. You’ll also spend less time and effort on the cleaning process. So as soon as you notice the problem, grab your supplies and get started.
What You’ll Need to Get Started
Before you begin any vomit cleanup, gather these supplies:
Basic cleaning items:
- Paper towels or old rags
- Baking soda
- White vinegar
- Mild dish soap
- Spray bottle
- Vacuum cleaner
- Gloves (disposable or rubber)
- Old newspapers or plastic bags
Optional but helpful:
- Enzyme-based cleaner
- Hydrogen peroxide
- Activated charcoal
- Steam cleaner
- Odor eliminator spray
- Face mask (to protect yourself from bad smells)
Having everything ready before you start means you won’t have to stop halfway through to find supplies.
Step 1: Remove the Bulk of the Mess
This is the part nobody likes, but it’s important. You need to get rid of the solid material first.
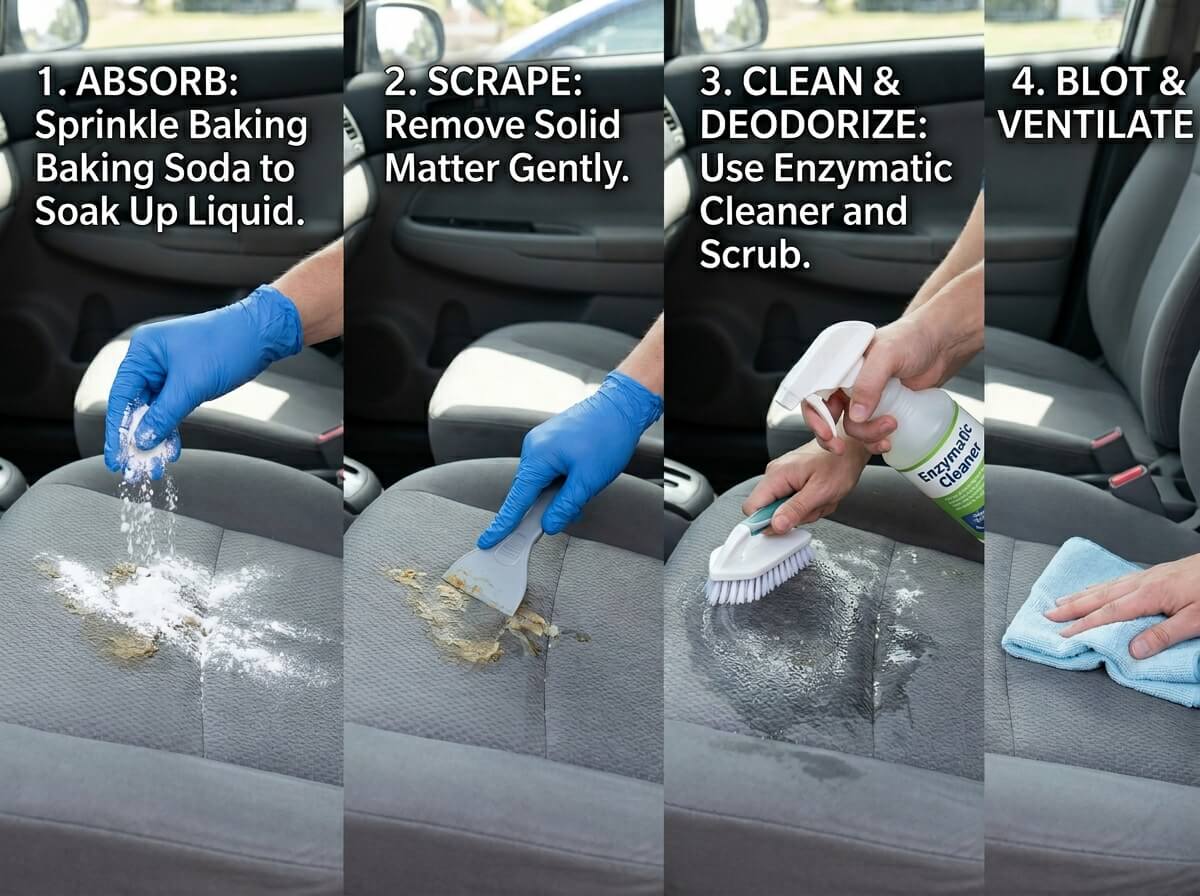
Put on your gloves right away. Grab paper towels or old rags and scoop up the main pile of vomit. Don’t press hard or smash it around. Just pick it up gently and toss it into a plastic bag. Tie the bag shut and throw it away outside.
If the puke is still wet and sticky, use multiple paper towels. Work from the edges toward the center to avoid spreading the mess. Some people find it helpful to use a plastic scraper or old credit card to help lift the material off seats or carpets.
Once you’ve removed the bulk, spray the area with some paper towels to soak up extra liquid. You want to get the spot as dry as possible before moving to the next step.
Step 2: Blot Up the Liquid
After the main mess is gone, liquid remains. This is the stuff that seeps into fabric and causes stains and smells.
Grab fresh paper towels or clean rags. Press them onto the wet area without rubbing. Blotting works better than wiping for vomit cleanup. Rubbing spreads the mess deeper into the fabric or carpet fibers.
Keep blotting with fresh paper towels until you can’t get any more liquid out. The area should feel barely damp, not wet.
If the puke got on a seat or floor mat, you might need to blot from underneath as well. Lift the mat or seat if you can and soak up liquid from the back side.
Step 3: Spray with White Vinegar
Now it’s time to use one of the best natural cleaners for puke: white vinegar. This stuff cuts through the acidic nature of vomit and helps break down the smell.
Mix equal parts white vinegar and water in a spray bottle. Spray the affected area until it’s damp but not dripping. Let it sit for five to ten minutes. This gives the vinegar time to work on breaking down the vomit and neutralizing odors.
After waiting, blot again with fresh paper towels. The vinegar smell will be strong at first, but it fades as the area dries. Don’t worry about that smell—it’s actually helping clean your car.
You can repeat this step a second time if the stain looks bad or the smell is still strong.
Step 4: Use Baking Soda for Deep Cleaning
Baking soda is amazing at soaking up odors. It works by trapping bad smells instead of just covering them up.
Sprinkle baking soda generously over the area. If it’s wet, wait a few minutes for it to dry slightly so the powder sticks. Let the baking soda sit for at least thirty minutes. Overnight is even better if you can leave your car sitting.
The longer you leave baking soda down, the more odor it absorbs. If the smell is really bad, leave it for several hours or overnight.
After the waiting period, vacuum up all the baking soda. Use a good vacuum with strong suction. Make sure you get all the powder out, especially from carpet fibers and seat crevices.
Step 5: Make a Cleaning Solution
Now let’s tackle any remaining stain. Mix a solution using these ingredients:
- One cup of warm water
- Half a teaspoon of mild dish soap
- One tablespoon of white vinegar
Pour this mix into a spray bottle and shake it up. This solution cleans the area while staying gentle on car interiors.
Spray the stained spot and let it sit for a couple of minutes. Then use a clean cloth to wipe the area. Work from the outside edges toward the center. This prevents the stain from spreading outward.
Wipe multiple times with fresh cloths. Each pass should remove more dirt and odor. Keep going until the cloth comes away clean.
Step 6: Rinse the Area
After using the soap solution, you need to rinse away the soap residue. Use a cloth dampened with plain water and wipe the area several times. This removes any leftover soap that could make the spot sticky.
You want the area to feel and look clean without any soapy film. This might take several passes with fresh cloths.
Step 7: Dry Everything Thoroughly
Moisture is the enemy when dealing with smell. Water left in the fabric will cause odors to come back, so dry the area completely.
Roll down the car windows and prop open doors if you’re not driving. Sunlight and fresh air are excellent for drying. Leave the car sitting in the sun for several hours if possible.
You can also speed up drying by using your car’s air conditioning or heating system. Run the fan on high. This helps move moisture out of the vehicle.
Some people use a handheld hair dryer on low heat to dry specific spots. Just be careful not to overheat synthetic fabrics.
Step 8: Use Enzyme Cleaner for Tough Stains
If the stain is still visible or smelly after the basic steps, bring out an enzyme cleaner. These products break down organic matter like vomit at the molecular level.
Enzyme-based cleaners are made with special bacteria that eat the proteins in vomit. They actually eliminate the problem rather than just covering it up.
Follow the directions on your specific product. Most involve spraying the area, waiting some time, and then blotting. Some products need to dry completely to work best. Others work faster if you keep the area damp.
These cleaners often cost between ten and thirty dollars but are worth it for stubborn stains or smells.
Step 9: Try Hydrogen Peroxide for Stains
Hydrogen peroxide works well on fresh stains. It’s gentle enough to use on most car interiors but strong enough to lift many stains.
Test it on a hidden spot first to make sure it won’t bleach your car’s fabric. Spray the hydrogen peroxide directly on the stain. Let it bubble for a few minutes. The bubbling action helps lift the stain out of the fabric.
Blot with clean cloth. Repeat if needed. Hydrogen peroxide is safe to use multiple times without damaging your car.
Step 10: Eliminate Lingering Odors
Even after cleaning, the smell might hang around. Here are several ways to fight odors:
Activated charcoal: Place activated charcoal bags in your car. Charcoal absorbs odors naturally without adding new smells. Leave bags out for a day or two.
Baking soda again: Sprinkle more baking soda in the cleaned area and let it sit overnight. Vacuum thoroughly in the morning.
Coffee grounds: Dried coffee grounds have a strong smell that can mask remaining odors. Put grounds in a small bowl and leave it in the car for a day.
Odor eliminator spray: Commercial products made for car odors work quickly. Just spray and let dry.
Fresh air: Drive with windows down. Air flow is one of the best odor fighters. Even a thirty-minute drive helps.
Crumpled newspaper: Place crumpled newspaper on the cleaned spot and leave overnight. Newspaper absorbs odors well.
Tips for Cleaning Different Car Surfaces
Different parts of your car need slightly different approaches.
Cloth seats and carpets: These need gentle treatment to avoid damaging the fabric. Blot rather than scrub. Use mild soap solutions.
Leather seats: Clean leather quickly with minimal water. Too much moisture damages leather. Use a leather cleaner if available.
Plastic floor mats: These are easiest to clean. You can even take them out and rinse them with a hose outside.
Headliners: If somehow puke got on the ceiling, use a light touch. The headliner material is delicate and easy to damage with rough scrubbing.
Dashboard and hard plastics: Wipe with a damp cloth. You don’t need special cleaners for plastic surfaces.
Common Mistakes to Avoid
Don’t make these mistakes when cleaning up vomit:
Rubbing instead of blotting: Rubbing pushes the vomit deeper into fabrics. Always blot by pressing down.
Using hot water: Hot water can set stains permanently. Stick with cool or lukewarm water.
Rushing the drying step: Wet spots lead to mold and smell. Take time to dry completely.
Mixing bleach with vinegar: This creates toxic fumes. Never mix cleaning products.
Ignoring hidden spots: Check under seats and between crevices. Puke can hide in places you don’t see at first.
Skipping the baking soda step: Baking soda is cheap and highly effective. Don’t skip it.
Using too much soap: Extra soap leaves residue that attracts dirt. A little goes a long way.
When to Call a Professional
Some situations call for professional help:
- Large amounts of vomit covering multiple seats
- Puke soaked into the carpeting under floor mats
- Smell that won’t go away after your cleaning efforts
- Leather seats that got damaged by vomit
- Motorhomes or fancy interiors you’re afraid to damage
Car detailing professionals have industrial cleaners and equipment. They can often remove stains and smells that seem impossible to home cleanup. The cost is usually fifty to two hundred dollars depending on the damage.
Getting professional help is sometimes smarter than risking damage by trying yourself. This is especially true for expensive or delicate interiors.
Prevention Tips for the Future
The best solution is preventing vomit in your car in the first place. Here are some ways to reduce the chances:
Keep the car cool: Heat makes carsickness worse. Run the air conditioning.
Avoid strong smells: Don’t eat smelly foods or wear heavy perfume in the car.
Drive smoothly: Jerky driving and sudden stops trigger nausea. Smooth acceleration helps.
Open windows: Fresh air prevents carsickness. Keep windows cracked if weather allows.
Take breaks: On long drives, stop every couple hours to let passengers stretch.
Keep a trash can: Have a small bag or container handy for anyone feeling sick. It gives them a place to aim.
Know your passengers: Some people get carsick easily. Seat them near windows and away from strong smells.
Regular car maintenance: Keep your car well-ventilated. Mold or stale smells can trigger nausea.
Quick Cleanup Kit for Your Car
Keep a small emergency kit in your car for accidents:
- Package of paper towels
- Small bag of baking soda
- Spray bottle filled with white vinegar and water
- Disposable gloves (a whole box)
- Small plastic bags
- Old rags
- Enzyme cleaner (optional)
Store this kit in a small container under your seat or in the trunk. You’ll be prepared if someone gets sick while traveling.
How Long Does Smell Last?
This depends on several factors:
- How much vomit there was
- How quickly you cleaned it
- The type of fabric in your car
- Temperature and humidity
- How thoroughly you dried the area
Fresh vomit cleaned right away usually smells better in a day or two. Older or more severe messes might take a week. Stubborn cases can take longer.
If smell lingers more than a week after cleaning, try the professional route. There might be residue in places you can’t reach.
The Smell You Can’t Ignore
Sometimes even after cleaning, you smell a faint odor. This might be:
- Residue under seats you missed
- Moisture trapped in air vents
- Mold growing in hidden spots
- Old smell still clinging to car fabric
Running your air conditioning on fresh air mode (not recirculate) for ten minutes helps push out trapped odors. If the smell comes from vents, you might need to replace your cabin air filter.
Final Thoughts
Cleaning vomit from a car isn’t fun, but it’s manageable. Act fast, use the right supplies, and follow these steps. Your car will be clean and fresh again.
Remember that baking soda and vinegar are your friends. These cheap, natural cleaners work surprisingly well. Most people don’t need expensive commercial products for home cleanup.
Be patient with the drying step. Rushing this part means odors come back. Give yourself time and let air do the work.
If you’re worried about causing damage, call a professional. They handle this every day and know how to work with different fabrics and materials safely.
The worst part is already over—you found the mess and decided to clean it. The rest is just follow-through. You’ve got this.
FAQ About Cleaning Car Vomit
Can I use regular household cleaners? Yes, mild dish soap mixed with water works fine. Avoid harsh chemicals that could damage car interiors.
Is it safe to use bleach? No. Bleach is too harsh for most car fabrics and can damage seats and carpets. Stick with gentler options.
How do I clean the air vents? Vomit rarely reaches air vents, but if it does, use a small brush to clean vent slats. You might also need to replace your cabin air filter.
Will the smell ever completely go away? Yes. With proper cleaning and time, odors fade completely. Be patient and don’t give up if the smell lingers for several days.
What’s the cheapest way to clean vomit? Baking soda and vinegar cost just a few dollars and work very well. They’re the cheapest and most effective home solution.
Can I use a steam cleaner on vomit stains? Yes, but wait until the area is clean and mostly dry. Hot steam works great for final cleaning after you’ve removed the bulk of the mess.
How often should I ventilate my car after cleaning? Drive with windows open for at least thirty minutes after cleaning. Open your doors and let the car air out for a few hours if possible.
What if the stain won’t come out? Professional cleaners have stronger products and equipment. If you’ve tried everything and the stain remains, it’s time to call them.
Should I clean the entire car or just the spot? Clean just the affected area unless vomit splattered widely. Cleaning the whole interior isn’t necessary and uses more time and supplies.
How can I tell if I got all the vomit? The smell should be almost gone and the stain should be invisible or very light. If either of these remains, do another cleaning pass.
Vomit in your car is never welcome, but dealing with it doesn’t have to be overwhelming. Follow these steps, stay calm, and you’ll restore your car to its normal clean state. The mess you’re facing right now is temporary. In just a few days, your car will smell fresh and look great again. You can handle this.