How to Change a Mass Air Flow Sensor?
So your check engine light is on, and your mechanic just told you that you need to replace your mass air flow sensor. You probably thought about how expensive that repair would be. Here’s the good news: you can do this job yourself, save a lot of money, and feel great about working on your own car.
This guide will walk you through everything you need to know about removing and replacing your mass air flow sensor. You don’t need to be a car expert. If you can follow steps and use basic tools, you can handle this task.
What Is a Mass Air Flow Sensor and Why Does It Matter?
Your mass air flow sensor, often called an MAF sensor, is a small but crucial part of your engine. It sits in your air intake system and does one job: it measures how much air is entering your engine at any given moment.
Your engine needs the right balance of air and fuel to run properly. Think of it like a recipe. If you add too much flour or too little flour, the cake won’t turn out right. Your engine works the same way. Too much air and not enough fuel, or too little air and too much fuel, and your car won’t run smoothly.
The mass air flow sensor tells your car’s computer, called the engine control unit or ECU, exactly how much air is coming in. The computer then adjusts the fuel mixture accordingly. When this sensor stops working correctly, your engine can’t maintain that perfect balance.
Common Signs Your Mass Air Flow Sensor Needs Replacement
Before you start the job, let’s talk about what happens when this sensor goes bad. Knowing these signs helps you catch the problem early.
Poor Fuel Economy: Your car starts drinking gas like a thirsty runner. You find yourself filling up the tank much more often than normal. The engine isn’t running efficiently because the fuel mixture is wrong.
Rough Idle: When you’re sitting at a red light or parked in a driveway, your engine shakes or vibrates. The RPM gauge bounces up and down. You might feel like the car is about to stall, but it doesn’t.
Check Engine Light: This little warning light on your dashboard comes on. It’s the car’s way of telling you something isn’t right. Sometimes you can ignore small issues, but this light means you should get your car checked soon.
Hesitation During Acceleration: You press the gas pedal, but the car doesn’t respond immediately. There’s a delay before the engine picks up speed. You might feel a slight jerk or stumble when you accelerate.
Engine Stalling: Your engine shuts off while you’re driving or while you’re stopped. This is dangerous and definitely means you need to fix the problem right away.
Trouble Starting: The engine cranks but takes a long time to start. Sometimes it starts and sometimes it doesn’t.
Black Smoke From the Exhaust: You notice dark, dirty smoke coming out of the back of your car. This means your engine is burning too much fuel.
Don’t ignore these signs. A bad mass air flow sensor causes bigger problems over time. The longer you wait, the worse your fuel economy becomes, and you risk damaging other engine parts.
Tools and Supplies You’ll Need
Let’s gather everything before you start. Having the right tools makes the job easier and faster.
Basic Hand Tools:
- A socket set with various sizes
- A wrench set
- A screwdriver set (both Phillips and flat-head)
- A spark plug socket
- Pliers
- A torque wrench
Specialized Tools:
- A mass air flow sensor removal tool (this is optional, but helpful)
- A code reader or scanner (to confirm the problem and clear the error codes)
Supplies:
- Gasket scraper or old credit card (for scraping away old seals)
- Clean cloths or shop towels
- Mass air flow sensor cleaner (very important)
- A new mass air flow sensor replacement part
- Gasket or seal material (depending on your car model)
- Safety glasses
- Work gloves
Other Supplies:
- A service manual for your specific car (you can find this online or at an auto parts store)
- A pen and paper (to write down where you disconnect things)
- A container for small screws and parts
The service manual is worth its weight in gold. It shows you exactly where everything is on your car and how to remove it. Different car models have different setups, so this book tells you the specific steps for your vehicle.
Safety First: Preparing Your Vehicle
Before you touch anything under the hood, take safety seriously. A car is heavy, and working on one can be dangerous if you don’t follow basic safety rules.
Disconnect the Battery: This is the first thing you do. Your mass air flow sensor is part of the electrical system. Disconnecting the negative battery terminal prevents electrical shocks and keeps you safe. Loosen the negative cable with a wrench and move it away from the battery terminal.
Park on Level Ground: Find a flat, solid surface like a concrete driveway or parking lot. Never work under a car parked on a hill or on soft dirt.
Engage the Parking Brake: Put your parking brake on and put the car in park if you have an automatic or in reverse if you have a manual.
Let the Engine Cool: If you just drove your car, wait at least thirty minutes for the engine to cool down. The engine gets extremely hot. Touching hot metal burns your skin.
Wear Safety Gear: Put on safety glasses to protect your eyes from dirt and debris. Wear work gloves to protect your hands. Dress in old clothes because you’ll probably get some dirt on them.
Set Up Your Work Space: Have your tools laid out and organized. Keep your phone nearby in case you need to look something up. Have good lighting. A work light or flashlight helps you see into the engine bay.
Locating Your Mass Air Flow Sensor
Now the real work begins. First, you need to find where your mass air flow sensor lives in your car.
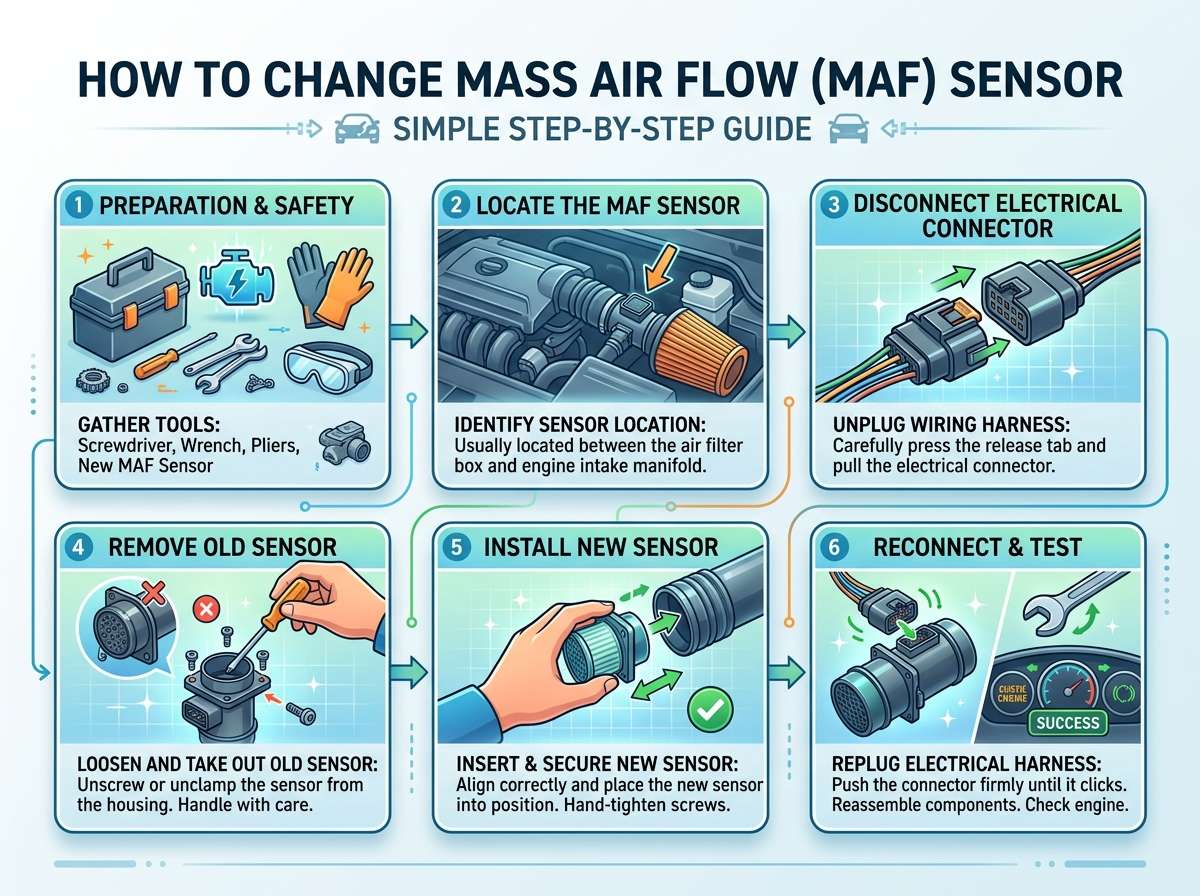
The mass air flow sensor is part of the air intake system. Air flows from outside your car, through the sensor, and into the engine. The sensor is usually located between the air filter box and the engine’s intake manifold.
Open your hood and look for a large plastic box. This is your air filter housing. Follow the tube or duct that leads from this box. The sensor sits somewhere along this path.
In most cars, the sensor is mounted on a tube between the air filter box and the engine. You’ll see a round or oval-shaped object connected to the intake duct. It’s usually about the size of a ping pong ball or slightly bigger.
Consult your service manual to be absolutely sure you’re looking at the right part. Different car makes and models have different layouts. Some sensors are easy to reach. Others hide behind other engine parts and require more work.
Take a moment to see what’s blocking access to your sensor. Do you need to move any hoses or disconnect any other parts first? Make notes on your paper so you don’t forget.
Removing the Old Mass Air Flow Sensor
Time to take out the old sensor. This is where your tool work starts.
Step 1: Locate the Sensor Connector: Your mass air flow sensor has an electrical connector. This looks like a small plastic plug. Trace the wires from the sensor back to where they plug in. Usually, there’s a small clip or tab holding the connector in place.
Step 2: Disconnect the Electrical Connector: Press the clip or tab and gently pull the connector away from the sensor. Don’t yank hard or pull on the wires. Wiggle it gently side to side while pulling. The connector should pop off easily.
Step 3: Identify Mounting Points: Look at how the sensor attaches to the intake duct. Usually, there are two or three bolts holding it in place. These bolts are small, usually around a quarter-inch size. Your socket set should have the right size.
Step 4: Remove the Bolts: Using your socket wrench, turn each bolt counterclockwise. Keep the bolts in a safe place. You might use them again with the new sensor.
Step 5: Gently Remove the Sensor: Once all bolts are out, the sensor should come free. Be gentle. The sensor is a sensitive electronic component. Don’t drop it or bang it against anything.
Step 6: Check the Seal: Look at the ring or seal where the sensor connected to the duct. This rubber or foam seal might still be stuck to the duct, or it might come off with the sensor. If it’s still there, you’ll need to remove it.
Step 7: Clean the Opening: Use your gasket scraper or old credit card to remove any old seal material or debris. Scrape gently. You don’t want to damage the mounting surface. Wipe everything clean with a cloth.
Understanding the Sensor Type: Hot Wire vs. Hot Film
Not all mass air flow sensors are the same. Before you buy a replacement, know which type your car has.
Hot Wire Sensors: These use a thin, hot platinum wire. Air flowing past the wire cools it down. The sensor measures how much electricity is needed to keep the wire at the right temperature. The more air, the more cooling, the more electricity needed. Your car’s computer reads this information.
Hot Film Sensors: These are newer and use a hot film instead of a wire. They work on the same principle but are sometimes more durable.
Check your service manual to see which type your car needs. Your old sensor can also tell you the type. When you buy your replacement, make sure you get the exact same type.
Buying the Right Replacement Part
This is crucial. Buying the wrong sensor wastes your money and time.
Know Your Car’s Details: You need the year, make, model, and engine size of your car. You might also need the trim level. All this info helps the parts store give you the correct sensor.
Check Multiple Sources: Call several auto parts stores or check their websites. Prices vary. You might save money by shopping around.
Compare Part Numbers: Different manufacturers make sensors. The part number tells you if it’s the right one for your car. Don’t assume all sensors for your car year are the same. Engine size and other factors matter.
Buy from Trusted Brands: Stick with well-known brands. Cheap knock-off sensors sometimes fail quickly. You’ll be doing this job again in a few months.
Consider an OEM Part vs. Aftermarket: OEM means Original Equipment Manufacturer. These are the parts the car company put in your car originally. Aftermarket parts are made by other companies. OEM parts cost more but are guaranteed to fit. Good aftermarket brands work well and cost less.
Installing Your New Mass Air Flow Sensor
Now comes putting everything back together. This is the reverse of removing the old sensor, but you need to be careful.
Step 1: Prepare the New Sensor: Take the new sensor out of its packaging. Don’t touch the sensitive element inside. The tip or wire part is fragile. Some sensors come with a protective cap. Leave this cap on until you’re ready to install.
Step 2: Install the Gasket or Seal: Most new sensors come with a rubber gasket or foam seal. If not, you might need to buy one. This seal creates a tight fit between the sensor and the duct. Without it, air leaks around the sensor and causes problems.
Slide the gasket onto the sensor or into the mounting location on the duct. Make sure it sits evenly.
Step 3: Slide the Sensor Into Place: Line up the sensor with the mounting holes on the duct. Gently push it in. It should slide into place smoothly. Don’t force it.
Step 4: Install the Bolts: Put the bolts back through the sensor mounting holes. Use your socket wrench to tighten them. Turn clockwise to tighten. Don’t go crazy tight. These bolts hold a small sensor, not an engine block. Firm and snug is the right tightness.
If you have a torque wrench, use it. Different sensors have different torque specifications. Check your service manual or the instruction sheet that came with your sensor. Usually, these bolts tighten to just a few pound-feet of force.
Step 5: Reconnect the Electrical Connector: Line up the connector with the sensor port. Push it on until you hear or feel a click. The connector should be firmly seated. Tug on it gently to make sure it’s not going to fall off.
Step 6: Double-Check Everything: Look at your work. Are all the bolts tight? Is the connector fully seated? Is there anything you forgot to reconnect?
Reconnecting the Battery and Clearing Error Codes
You disconnected the battery at the start. Now you need to put it back.
Step 1: Reconnect the Negative Battery Terminal: Take the negative cable and connect it back to the negative terminal on the battery. Tighten the bolt so the cable is secure. Don’t overtighten or you might strip the bolt.
Step 2: Start the Engine: Turn on the ignition and let the engine run for a few seconds. Listen for any unusual sounds. The engine should start normally.
Step 3: Check for Error Codes: Your car’s computer might still be showing the old error codes. You need to clear these codes. You can do this a couple of ways.
Option A: Drive Around: Sometimes, driving the car normally for a few days causes the computer to clear old codes on its own. The sensor works correctly now, and the computer forgets about the old problem.
Option B: Use a Code Scanner: A code scanner reads and erases error codes. You can buy an inexpensive scanner at any auto parts store for less than thirty dollars. Some stores will even lend you one for free.
Hook up the scanner to the diagnostic port under your steering wheel. Follow the scanner’s instructions to erase the codes. The check engine light should go off.
Testing Your Work: How to Know It’s Done Right
Once everything is back together, test to make sure the new sensor works properly.
The Check Engine Light: This light should go off after you’ve driven the car for a few minutes. If it stays on, something is still wrong. You might have an error code. Scan it again to see what the problem is.
Listen to Your Engine: The engine should run smoothly. No more rough idling or stumbling during acceleration.
Feel the Performance: Drive around your neighborhood. The car should accelerate smoothly and responsively. No hesitation or jerking.
Check Fuel Economy: Over the next week or two, pay attention to your fuel economy. It should improve noticeably. You should get more miles per gallon than before.
Smell the Exhaust: There should be no black smoke or foul smells coming from the exhaust.
If everything seems good, congratulations. You’ve successfully replaced your mass air flow sensor.
Common Mistakes to Avoid
Even experienced people make mistakes on this job. Here’s what to watch out for.
Touching the Sensor Element: The sensitive part inside the sensor is delicate. Fingerprints and oils can damage it. If your sensor has a protective cap, keep it on until installation. Only touch the outer plastic housing, never the tip or wire.
Forgetting to Install the Gasket: This is a common mistake. Without the gasket, air leaks around the sensor. Your computer gets the wrong air flow reading. All your symptoms come back.
Not Tightening Bolts Enough: Loose bolts cause the sensor to move or rattle. It might disconnect while you’re driving. On the other hand, over-tightening can break the mounting tabs.
Mixing Up Connectors: If you have multiple connectors in the area, don’t plug the sensor connector into the wrong port. Check the connector shape. It should only fit in the right place.
Forgetting to Reconnect the Battery: You’d be surprised how many people finish the job and can’t figure out why the car won’t start. That’s because they never plugged the battery back in.
Not Checking the Service Manual: Every car is different. The service manual for your car tells you the exact steps. Skipping this step often leads to problems.
Reusing an Old Gasket: The gasket wears out and loses its seal. Always use a fresh gasket with a new sensor.
When to Call a Professional
Sometimes, it’s okay to get help from a mechanic.
The Sensor Won’t Come Out: If the sensor is stuck and you can’t get it out after reasonable effort, stop. Forcing it can damage the mounting location. A mechanic has special tools to remove stuck sensors without damage.
You Don’t Have the Right Tools: If you’re missing essential tools and don’t want to buy them, a mechanic might be the better choice.
You’re Not Confident: If you’re nervous about doing this job, there’s no shame in letting a pro handle it. It’s better than damaging your car.
Your Car Has Complications: Some cars hide the sensor under plastic covers or behind other components. The job takes longer and is more involved. A mechanic knows how to navigate these complications quickly.
How Much Money Do You Save?
Here’s the financial side of the story.
A new mass air flow sensor costs between twenty and two hundred dollars depending on your car and the brand you buy. A professional mechanic charges between one hundred and three hundred dollars in labor. That means a total shop bill is usually between two hundred and five hundred dollars.
By doing it yourself, you pay just for the sensor. That’s real savings.
Even if you buy the expensive tools you don’t have, you still come out ahead. A code scanner costs about thirty dollars. That’s still a huge savings compared to the mechanic’s labor charges.
And you get the satisfaction of fixing your own car. That feeling is priceless.
Maintenance Tips to Prevent Future Problems
Now that your sensor is new, keep it healthy.
Change Your Air Filter Regularly: A dirty air filter forces more dirt and debris to your sensor. Replace your air filter according to your car’s maintenance schedule. Most cars need a new filter every fifteen to thirty thousand miles of driving.
Use Quality Fuel: Bad fuel can cause sensor problems. Buy fuel from reputable gas stations.
Avoid Driving Through Deep Water: Water can damage your sensor. If you must cross standing water, go slow and steady.
Don’t Ignore Warning Lights: If the check engine light comes on again, get it scanned and fixed quickly. Small problems become big ones if you wait.
Keep Your Engine Clean: Dirt buildup inside your engine causes various problems, including sensor issues. Use quality engine oil and follow your maintenance schedule.
Final Thoughts
Replacing your mass air flow sensor is a manageable job for most car owners. You don’t need expert skills or expensive equipment. What you need is patience, care, and attention to detail.
Take your time. Read your service manual. Don’t rush the work. Double-check your connections. These steps help you succeed.
The money you save by doing this job yourself is substantial. The confidence you gain is even more valuable. You’ve taken control of your car’s maintenance and learned something new.
If you run into problems, reach out to forums or tutorials specific to your car model. The car community online is helpful and friendly. Thousands of people have replaced their mass air flow sensors, and they’re willing to help you through any challenges.
You’ve got this. Your new mass air flow sensor will have your car running smoothly and efficiently again. Enjoy the improved performance and fuel economy. Most importantly, enjoy knowing you did it yourself.

Peterson is an automotive enthusiast and auto parts reviewer with a passion for vehicle maintenance, upgrades, and performance. He enjoys researching and testing car parts, tools, and accessories to help drivers make informed buying decisions. Through AutoPartsTalk.com, Peterson shares honest reviews, practical maintenance tips, and expert guides to keep vehicles running safely and efficiently.