How to Change a Tire Pressure Sensor?
If you’ve been driving lately and notice that annoying light on your dashboard that won’t go away, you’re probably dealing with a tire pressure sensor problem. That little warning light can be a real headache, but the good news is that fixing it yourself is totally doable. You don’t need to be a mechanic or have a fancy garage to get this job done. Let me walk you through the whole process in a way that actually makes sense.
What Exactly is a Tire Pressure Sensor?
Before you start taking things apart, it helps to understand what you’re working with. A tire pressure sensor is a small electronic device that sits inside your tire, mounted on the valve stem. This tiny gadget constantly measures the air pressure in your tire and sends that information to your car’s computer system. When the pressure drops too low or goes too high, the sensor alerts your vehicle, and that warning light pops up on your dashboard.
These sensors are sometimes called TPM sensors, which stands for Tire Pressure Monitoring System. They’re pretty important because driving on tires with incorrect pressure can mess with your fuel economy, make your tires wear out faster, and even make your car harder to handle on the road. So when your sensor stops working, you’ll want to fix it pretty quick.
Why Would Your Tire Pressure Sensor Go Bad?
Tire pressure sensors don’t last forever. Most of them will go bad after about five to ten years of normal use. The sensor sits in a tough spot, dealing with heat, moisture, road salt, and constant changes in temperature. All that stress adds up over time and can make the sensor stop working.
Sometimes your sensor fails because the battery inside it dies. Yes, these sensors have tiny batteries that power them, and when that battery runs out, the sensor stops sending signals to your car. Other times, water gets inside the sensor and causes it to rust or corrode. Physical damage can also kill a sensor. If you hit a pothole hard or drive over something sharp, you might damage the sensor.
There’s also a possibility that your sensor is fine but the valve stem itself is damaged. The valve stem holds the sensor in place, and if that gets damaged or leaks, you’ll see the same warning light. Sometimes fixing the valve stem alone can solve your problem without replacing the whole sensor.
Tools and Parts You’ll Need
Now let’s talk about what you need to gather before you start. The good news is that you won’t need a ton of fancy equipment for this job. Here’s what you should have on hand.
You’ll need a new tire pressure sensor, of course. Make sure you buy one that works with your specific car. Different vehicles use different types of sensors, so check your owner’s manual or ask at the parts store to get the right one for your car.
You also need a tire removal tool or breaker bar to loosen the lug nuts. A jack is essential for lifting your vehicle up so you can remove the wheel. If you don’t have a jack, your car probably came with one in the trunk. You’ll want a wrench that fits your lug nuts, which is usually a nineteen or twenty-one millimeter wrench, but check what size you need before you start.
A rubber mallet comes in handy for gently tapping the tire bead to help separate the tire from the rim. You might also need a tire removal tool or spoon to help pry the tire off the rim. Some people use a flathead screwdriver, but a proper tire tool works better.
Finally, grab some tire sealant and balancing beads if you need them. These aren’t absolutely necessary, but they can help when you reassemble everything. You’ll also want a good workspace with solid, flat ground and good lighting. A flashlight helps a ton when you’re working in tight spaces.
Safety First: Protecting Yourself During This Job
Before you touch anything, let’s talk about safety. Working on your own car comes with some risks, so it’s smart to take precautions. First, park your car on a flat, solid surface like a driveway or parking lot. Never work on your car on a slope or an uneven surface. You want to make sure your vehicle can’t roll or shift while you’re working under it.
Put on some old clothes that you don’t mind getting dirty, because this job will probably leave grease and dirt on whatever you’re wearing. Wear work gloves to protect your hands from sharp edges and dirty surfaces. Safety glasses are a good idea too, because rubber and metal pieces can fly up unexpectedly.
Make sure you have good lighting. Use a flashlight or a work light so you can see exactly what you’re doing. Don’t work in dim light because you might miss important details. Also, turn off your engine and let it cool down completely before you start. Hot brakes and metal parts can burn you badly.
When you lift your car with the jack, use jack stands as well. Never work underneath a car that’s only held up by a jack. Jack stands provide a backup safety system in case something goes wrong. Always engage your parking brake and put blocks behind the wheels to keep your car from rolling.
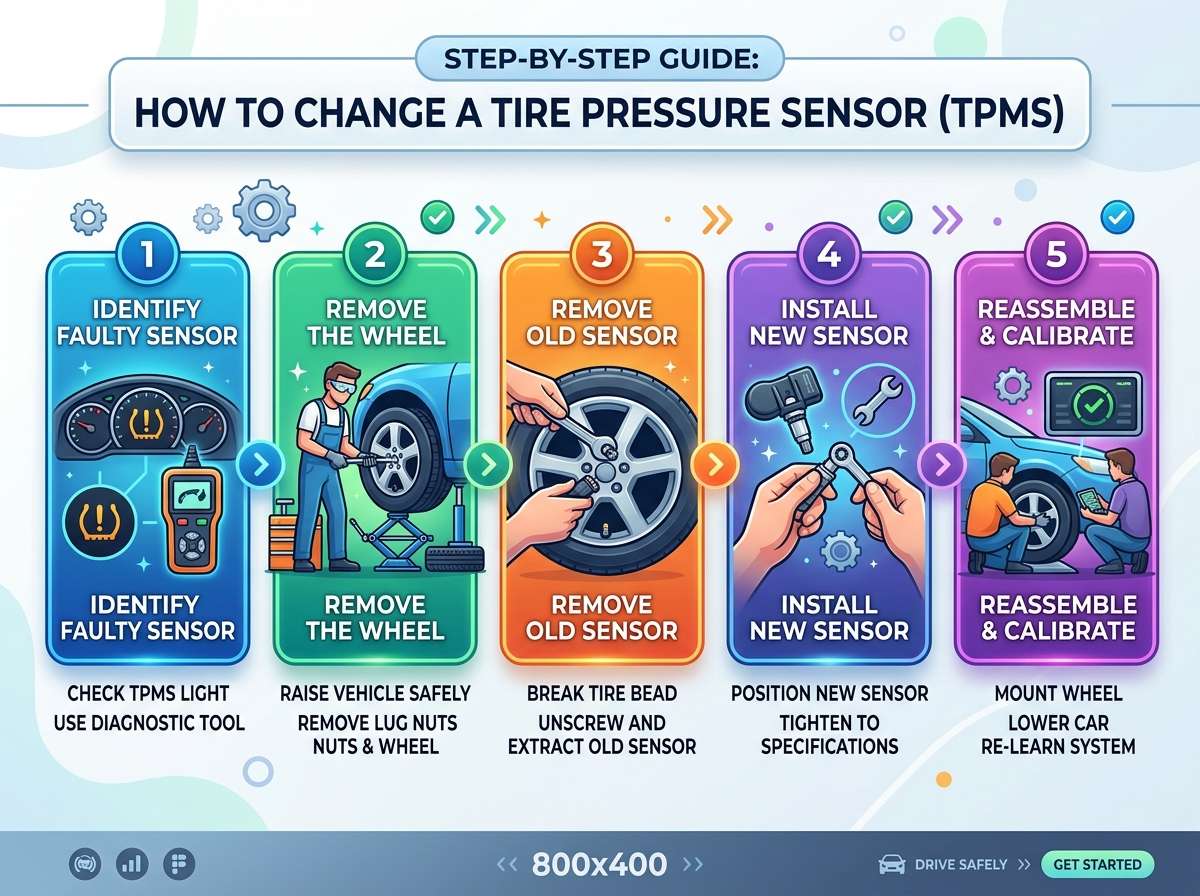
Step-by-Step Instructions for Changing Your Tire Pressure Sensor
Alright, now that you know what you need and how to stay safe, let’s get into the actual process. Follow these steps in order and take your time with each one.
Step One: Remove the Tire From Your Car
The first thing you need to do is lift your car up and remove the tire that has the bad sensor. Use your jack to raise the vehicle up high enough so you can easily work on the tire. Once it’s lifted, place jack stands under the frame to support the weight. Always use both the jack and the stands together.
Locate the lug nuts and use your wrench to loosen them. Turn them counterclockwise until they come free. Remove all the lug nuts and set them aside somewhere safe where you won’t lose them. Now grab the tire with both hands and pull it straight toward you. It might be stuck a little bit, so don’t be afraid to wiggle it back and forth gently as you pull. The tire should come off the rim.
Step Two: Break the Tire Bead
Once you have the tire off your car, you need to separate the tire from the rim. The tire bead is the edge of the tire that sits on the rim. Usually the tire is sealed pretty tight to the rim, so you need to break this seal. Use your rubber mallet and gently tap all the way around the tire where it meets the rim. Keep tapping until you feel the tire start to move away from the rim. Don’t hit it hard because you could damage the tire.
Step Three: Remove the Tire From the Rim
Now you need to take the tire completely off the rim. If your tire has sealant on the bead, you might need to use a tire removal tool or spoon to help separate them. Insert the tool between the tire and rim and gently pry the tire away from the rim. Work your way around the whole tire, a little bit at a time. Be patient because this part takes a while if you’ve never done it before.
Once the tire is mostly off, you can usually finish by hand. Grab the tire and work it off the rim completely. This part might take some muscle, so don’t be afraid to use your strength. Once the tire is free, set it aside.
Step Four: Locate and Remove the Old Sensor
Now you can see the rim and the valve stem. The tire pressure sensor is attached to the valve stem on the inside of the rim. Look for a small electronic part that sticks out from the valve stem. This is your sensor. You’ll see that it’s either screwed on or held in place by a small clip.
If it’s screwed on, use the appropriate tool to unscrew it from the valve stem. If it’s clipped on, simply squeeze the clip or push on it to release the sensor. Once it’s loose, gently pull the sensor away from the valve stem. Be careful not to damage the valve stem itself.
Step Five: Install the New Sensor
Take your new tire pressure sensor and carefully screw it or clip it onto the valve stem, depending on which type you have. Make sure it’s tight and secure so it won’t fall off while your car is driving. Don’t over-tighten it though, because you could strip the threads or break something.
If your new sensor has a battery that needs to be activated, follow the instructions that came with it. Some sensors require you to remove a small plastic tab before the battery starts working. Others might need to be registered with your car’s system using a special tool or code.
Step Six: Put the Tire Back On the Rim
Now it’s time to reassemble. If you’re using tire sealant, apply it around the bead of the tire. This helps create a good seal between the tire and the rim. Carefully lift the tire and position it onto the rim. Work the edge of the tire onto the rim, a little bit at a time, all the way around. This takes patience and a bit of muscle.
Once the tire is sitting on the rim, you need to seal the bead. If you have compressed air, you can inflate the tire slightly while working the bead onto the rim. This helps push the tire onto the rim and create a good seal. If you don’t have an air compressor, you can gently tap the tire with the rubber mallet to help it seat properly.
Step Seven: Inflate Your Tire
Using an air compressor, inflate the tire to the proper pressure. Check your owner’s manual or look at the label on your driver’s side door to see what pressure your tire should be at. Most cars use somewhere between twenty-eight and thirty-five pounds per square inch. Fill the tire slowly and watch the pressure gauge to make sure you don’t over-inflate.
Step Eight: Reinstall the Tire on Your Car
Lift your car up again if you’ve lowered it, and position the tire back on your car. Screw the lug nuts back on by hand first, then use your wrench to tighten them. Tighten them firmly but don’t use all your strength. You want them snug, not stripped. Once they’re all tight, lower your car back down using the jack.
Step Nine: Check Your Work and Reset the System
Once your car is back on the ground, you need to reset the tire pressure monitoring system. Different cars do this differently. Some cars reset automatically once they detect that the pressure is correct. Others require you to drive around for a certain amount of time before the system recognizes the new sensor. A few vehicles need you to use a special tool to register the new sensor.
Check your owner’s manual to see how your specific car resets the system. If you’re not sure, try driving around for ten to fifteen minutes at highway speeds. This usually gives the system enough time to recognize the new sensor and turn off that annoying warning light.
Tire Pressure Sensor Replacement Tips and Tricks
A few extra things can make this job go smoother. If you’re working with a tire that has a lot of miles on it, the bead might be really stuck to the rim. In this case, try soaking the rim with some penetrating oil around the bead. Let it sit for a few minutes to soften up the old sealant. This makes it easier to separate the tire from the rim.
Work in a clean area if you can. Dirt and grit can get into your tire or sensor and cause problems later. A clean workspace makes the whole job go better. If you’re doing this for the first time, don’t rush. Take breaks if you need to. This job doesn’t have to be done all at once.
If you run into any trouble during the sensor installation, don’t force anything. If something feels stuck or tight, take a step back and figure out what’s wrong before you keep going. Forcing parts together can break them, which just makes your problem bigger.
Common Problems You Might Run Into
Sometimes things don’t go exactly as planned. Let’s talk about some issues you might face and how to handle them.
If your tire pressure light stays on after you’ve installed the new sensor, the sensor might not be properly registered with your car. Try disconnecting your car’s battery for about fifteen minutes, then reconnecting it. This resets your car’s computer system and sometimes forces it to recognize the new sensor.
If you can’t get the old sensor off, it might be stuck or corroded. Try spraying some penetrating oil around the connection and waiting a few minutes. Gently work the sensor back and forth to loosen it. If it’s really stuck, you might need to take it to a mechanic.
If you see air leaking from the tire after you’ve put it back on, the bead probably isn’t sealed properly. You need to deflate the tire and try again. Reposition the tire on the rim and pay close attention to making sure it’s seated evenly all the way around.
If the pressure keeps dropping after you’ve fixed the sensor, you might have a leak somewhere else. Check the valve stem itself, the rim, and the tire for damage. Sometimes the valve stem leaks instead of the sensor failing.
When to Call a Professional
While changing a tire pressure sensor is definitely something you can do yourself, there are times when it makes sense to call a professional. If you don’t have the right tools or feel uncomfortable working on your car, a mechanic can do this job for you. They have special equipment that makes the whole process faster and easier.
If you’ve tried everything and the warning light won’t go away, a mechanic can use diagnostic equipment to figure out exactly what’s wrong. Sometimes the problem isn’t the sensor at all, and a professional can help identify the real issue.
If you damage something while you’re working on your car, it’s better to let a pro fix it than to make things worse. There’s no shame in asking for help. Sometimes it’s worth paying for a professional job to make sure everything is done right.
Maintaining Your Tire Pressure Sensors
Once you’ve successfully changed your sensor, you’ll want to keep it in good working order. Check your tire pressure regularly, at least once a month. This helps you catch any pressure problems before they cause damage to your tires or affect your fuel economy.
Keep your tires clean and protected from road salt and chemicals. These things can corrode sensors over time. Wash your tires regularly and dry them off. If you live in an area with lots of road salt, this is even more important.
When you get your tires rotated or replaced, the mechanic will handle the sensors. Just ask them to check your sensors and make sure everything is working properly. This kind of regular maintenance can prevent sensor problems from happening in the first place.
Drive carefully and avoid hitting potholes or other road hazards. Physical damage is one of the main reasons sensors fail. The more careful you are while driving, the longer your sensors will last.
Why Learning This Skill Pays Off
Now that you know how to change a tire pressure sensor, you’ve picked up a skill that saves you money. A mechanic typically charges between two hundred and five hundred dollars to replace a tire pressure sensor. That includes the cost of the sensor itself plus the labor. By doing it yourself, you only pay for the sensor, which usually costs between fifty and one hundred fifty dollars. That’s a significant savings.
Beyond just money, knowing how to do this work builds your confidence as a car owner. You start to understand how your vehicle actually works instead of just driving it and hoping nothing breaks. This knowledge helps you make better decisions about your car and notice problems earlier.
Doing your own car maintenance also gives you control over when the work gets done. You don’t have to schedule an appointment and wait for a mechanic. You can do the job whenever it’s convenient for you, right in your own driveway.
Final Thoughts on Tire Pressure Sensor Maintenance
Changing a tire pressure sensor is a manageable project for anyone willing to take their time and follow the steps carefully. You don’t need advanced mechanical skills or expensive equipment. What you do need is patience, the right parts, and a safe workspace.
Remember that the warning light on your dashboard is trying to tell you something important. Ignoring it won’t make the problem go away, and driving on bad sensors can affect your vehicle’s performance and safety. By taking action and fixing the problem yourself, you’re making a smart choice for your car and your wallet.
Start with the right attitude. Even if you’ve never worked on a car before, you can do this. Take your time, follow each step carefully, and don’t hesitate to ask for help if you need it. Whether you decide to do this job yourself or take it to a mechanic, the important thing is getting it fixed.
The next time that tire pressure sensor warning light comes on, you’ll know exactly what to do. You’ll have the knowledge and confidence to handle it like a pro. And who knows, once you get comfortable with this job, you might be ready to tackle other car maintenance tasks on your own.
So grab your tools, find that sensor, and get to work. Your car will thank you, and you’ll feel great about doing the job yourself.

Peterson is an automotive enthusiast and auto parts reviewer with a passion for vehicle maintenance, upgrades, and performance. He enjoys researching and testing car parts, tools, and accessories to help drivers make informed buying decisions. Through AutoPartsTalk.com, Peterson shares honest reviews, practical maintenance tips, and expert guides to keep vehicles running safely and efficiently.