How to Check Voltage Going to Your Headlights?
Your headlights are one of the most important safety features on your car. They help you see the road at night and make sure other drivers can see you. But what happens when your headlights start acting weird? They might flicker, get dim, or stop working altogether. One of the first things you should check is whether they’re getting the right amount of power. This guide will walk you through how to test headlight voltage yourself.
Why You Need to Know About Headlight Voltage
Before we jump into the how-to part, let’s talk about why this matters. Your car’s electrical system is designed to send a specific amount of power to your headlights. If that power is too low or too high, your lights won’t work right. A dim light can make it hard to see the road. A light that gets too much power can burn out quickly or even damage the bulb.
The good news is that checking the voltage is not as scary as it sounds. You don’t need to be a mechanic or an electrician. You just need a simple tool called a multimeter, a little bit of knowledge, and maybe ten minutes of your time.
What Is Voltage and Why Does It Matter for Headlights
Let’s start with the basics. Voltage is the amount of electrical pressure pushing power through your car’s wires. Think of it like water pressure in a hose. Just as you need the right water pressure to water your garden, your headlights need the right voltage to shine at full brightness.
Your car’s battery typically gives out about 12 volts when the engine is off. When you start the engine, the alternator takes over and keeps the voltage steady at around 13 to 14 volts. This is the normal range for most cars. Your headlights work best in this range.
If the voltage drops below 12 volts, your lights will get dim. If it stays too low for too long, your battery might not have enough power to start your car. On the other hand, if the voltage goes above 14.5 volts, you could damage your headlight bulbs and other electrical parts.
Tools You’ll Need to Check Headlight Voltage
The main tool you need is a digital multimeter. This is a small device that measures electrical current, voltage, and resistance. You can find a decent multimeter at any auto parts store or online for between ten and thirty dollars. Even cheap ones work fine for this job.
Here’s what else you might want to have on hand:
A pair of gloves to keep your hands clean A flashlight or headlamp to see better under the hood A notebook to write down your readings Your car’s manual to check the exact specs for your vehicle Access to your car’s engine bay A safe, flat place to park
You don’t need anything fancy. A basic multimeter will do the job just fine. Digital multimeters are easier to read than the old needle-style ones, so if you get to pick, go with digital.
Getting Ready to Test Your Headlights
Safety comes first. Make sure your car is parked in a flat, safe spot. You don’t want to be working near traffic or on a slope. Turn off your engine and let it cool down for a few minutes. Even though you’re not doing anything dangerous, it’s good practice.
Open your hood and locate your headlight assembly. Most headlights are easy to find. Look at the front of your car on each side. You’ll see the headlight housing, which is usually made of clear plastic or glass with the bulb inside.
Now is a good time to check your car’s manual. It will tell you where the headlight wires are and what the correct voltage should be. Most cars run at 12 to 14 volts at the headlight connection, but it’s worth double-checking your specific vehicle.
How to Use a Digital Multimeter
A multimeter might look confusing at first, but it’s pretty easy once you know what you’re doing. Let me break it down for you.
The multimeter has a dial with different settings. You’ll see labels like V, A, and Ohm symbols. The V stands for volts, which is what you’re looking for. Most multimeters have two V settings: one with a straight line and one with a wavy line. The straight line is for DC (direct current), which is what your car uses. The wavy line is for AC (alternating current), which is what your house uses. You want the DC setting.
The multimeter also has two wires coming out of it. One is black and one is red. The black one is the negative or ground probe. The red one is the positive probe. These wires plug into the bottom of the multimeter in special holes. The black wire almost always goes in the hole labeled COM (which stands for common). The red wire goes in the hole labeled V (for volts).
Once you’ve plugged the wires in and set the dial to the right setting, you’re ready to test.
Testing Headlight Voltage with the Engine Off
Let’s start with a simple test first. Before you start your engine, you’ll check the voltage at your battery and then at your headlights.
Find the battery in your engine bay. It usually has a red cap on the positive terminal and a black cap on the negative terminal. If you can’t find it, check your manual.
Turn on the digital multimeter and set the dial to DC volts. Now touch the red probe to the positive terminal of your battery. It’s the one under the red cap. Touch the black probe to the negative terminal under the black cap. Look at the reading on the multimeter screen.
With the engine off, the battery should read around 12 volts. If it reads lower, like 11 volts or less, your battery might be dead or dying. If it reads higher than 12.5 volts with the engine off, something might be wrong with your charging system.
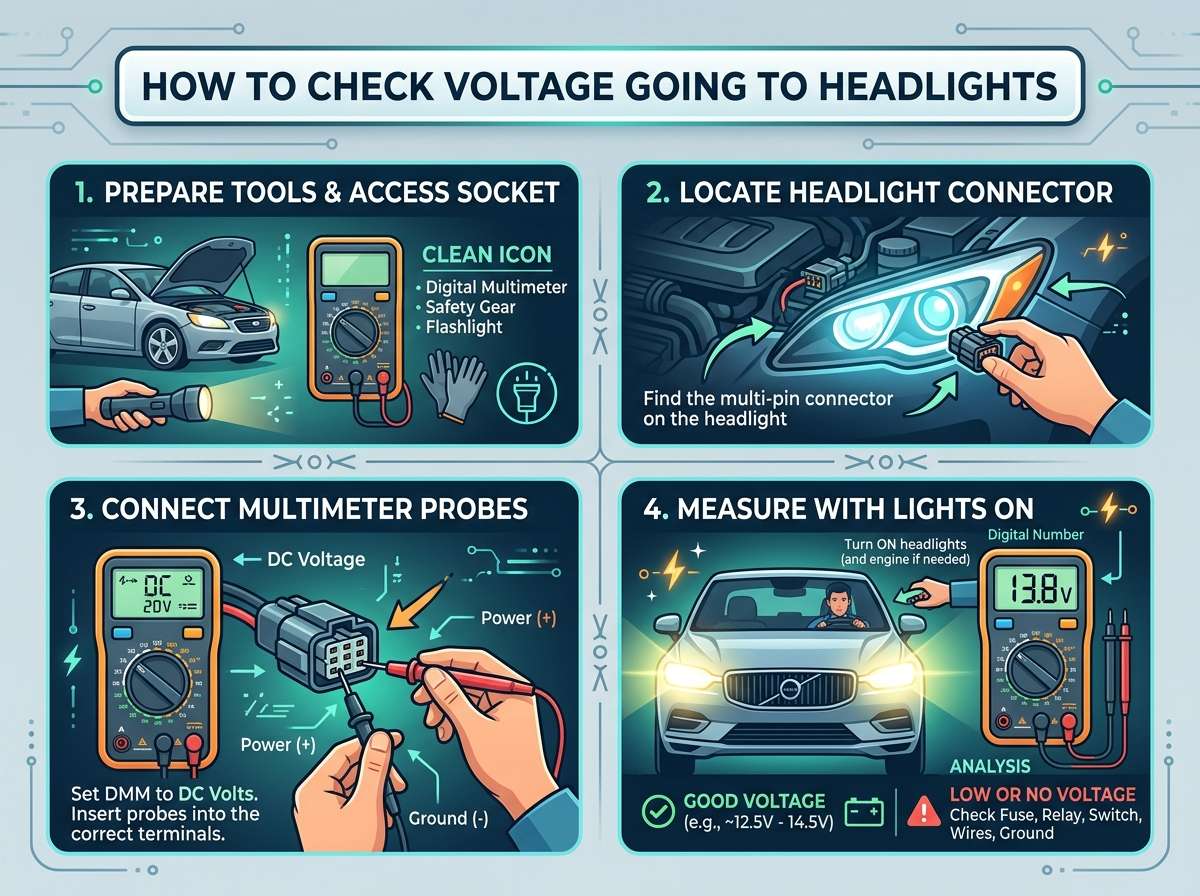
Now let’s test the headlight itself. Locate the wire that goes to your headlight bulb. You can trace it back from the headlight housing. Once you find it, carefully touch the red probe to the positive wire and the black probe to a metal part of your car’s frame or engine block. This metal part serves as the ground.
The reading should be the same as your battery reading, around 12 volts. If it’s lower, there might be a problem with the wire or the connection.
Testing Headlight Voltage with the Engine Running
This is the most important test. Start your engine and let it run at a normal speed. Don’t rev it up too hard. Just let it idle normally.
Turn your headlights on. Now set your multimeter to DC volts again. Touch the red probe to the positive headlight wire and the black probe to the ground.
The reading should be between 13 and 14 volts. This is the normal range when the engine is running. If you get a reading in this range, your electrical system is working right, and your headlights are getting the right amount of power.
If the reading is lower than 13 volts, your alternator might not be charging right. If it’s higher than 14.5 volts, your voltage regulator might be broken. Both of these problems need to be fixed.
What Different Voltage Readings Mean
Your multimeter reading tells you a lot about what’s going on with your headlights. Here’s a quick guide to what different numbers mean:
12 to 12.5 volts with the engine off: This is perfect. Your battery is healthy and holding a good charge.
Below 11 volts with the engine off: Your battery is weak or dead. You should charge it or replace it soon.
13 to 14 volts with the engine running: This is exactly what you want. Your electrical system is working great.
Below 13 volts with the engine running: Your alternator might not be charging correctly. This needs attention.
Above 14.5 volts with the engine running: Your voltage regulator might be overcharging. This can damage your headlights and battery.
Voltage changes when you press the gas pedal: This is normal to a point. A small change is fine. Big swings mean something might be wrong.
Checking Each Headlight Separately
Your car has two headlights, and they might not get the same amount of voltage. This is one reason why one light might be dimmer than the other.
Test the voltage at your driver’s side headlight first. Write down the number. Then move to the passenger’s side headlight and test that one too. Both should read the same, between 13 and 14 volts when the engine is running.
If one reads lower than the other, the problem might be with the wire or the connection on that side. Corrosion, loose connectors, or a broken wire can all cause lower voltage on one side.
Common Problems and What They Look Like
Low voltage on one or both headlights can come from several different problems. Let me walk you through the most common ones.
A bad battery will cause low voltage at everything in your car. If your headlights are dim but your voltage test shows a healthy battery, the problem is somewhere else.
A weak alternator is one of the most common causes of low voltage to headlights. The alternator charges your battery and keeps power flowing while the engine runs. If it’s not doing its job, your headlights will get less power and turn dim.
Loose or corroded battery terminals can stop power from flowing right. If you see white or blue-green crusty stuff on your battery terminals, that’s corrosion. It gets in the way of power flow. Cleaning off the corrosion and tightening the cables often fixes the problem.
A bad voltage regulator keeps the electrical system from staying at the right voltage. Your voltage regulator is usually built into your alternator, so if it’s broken, you need to replace the alternator.
Loose or broken headlight wires can cause low voltage on one side. If your voltage test shows that one headlight gets less power than the other, check the wire on that side for damage or loose connections.
A blown fuse in your headlight circuit can stop power from getting to the lights. If you can’t get any voltage reading at the headlight at all, even with the engine running, a fuse might be blown.
How to Check Your Battery Terminals
Since loose or corroded battery terminals are so common, let’s spend a moment on how to check them.
Turn off your engine and let it cool down. Look at your battery. You’ll see two cables attached to the terminals: a red one on the positive terminal and a black one on the negative terminal. Try to wiggle each cable. They should not move at all. If they twist or come loose, tighten the nut on the terminal with a wrench.
Look at the terminals themselves and the ends of the cables. Do you see white, blue-green, or pink crusty stuff? That’s corrosion. It can stop power from flowing.
If you find corrosion, you can clean it off. First, disconnect the negative cable. Then disconnect the positive cable. Mix a little baking soda with water to make a paste. Scrub the corrosion off with an old toothbrush. Wipe it clean and dry. Then reconnect the positive cable first, then the negative cable.
Safety Tips While Testing
Working with your car’s electrical system is pretty safe, but here are a few things to keep in mind.
Never touch the terminals on your multimeter together. This creates a short circuit and can damage the multimeter or give you a small shock.
Never work on your car’s electrical system if it’s raining or if you’re wet. Electricity and water don’t mix.
Don’t get your hands in moving parts. With the engine running, things like belts and fans are spinning. Keep clear of them.
Always turn off your engine before you disconnect anything. If you need to disconnect battery terminals, make sure the engine is off.
Take your time. There’s no rush. If you’re not sure about something, stop and look it up or ask for help.
What to Do If Your Voltage Readings Are Wrong
If your tests show that your headlights are not getting the right voltage, you have a few options.
First, try the simple fixes. Clean your battery terminals if they’re corroded. Tighten any loose connections. Check your fuses. Sometimes these easy steps solve the problem.
If the simple fixes don’t work, you might have a problem with your alternator, voltage regulator, or battery. These parts are more complex, and fixing them might mean replacing them.
Take your car to a mechanic if you’re not sure what the problem is. A mechanic can run more tests and figure out exactly what’s broken. It’s worth paying for professional help if you’re not confident doing this work yourself.
Testing Other Lights While You’re at It
While you have your multimeter out, you might as well test some of your other lights. Your brake lights, turn signals, and interior lights all run on the same electrical system. If your headlights are getting low voltage, your other lights might be too.
Test the voltage at your brake light connector. With the engine running, it should also read between 13 and 14 volts. Test your interior dome light the same way. All of them should get the same power.
If all your lights are getting low voltage, the problem is with your battery, alternator, or wiring. If only your headlights are getting low voltage, the problem is specific to the headlight circuit.
Keeping Your Headlights Healthy
Once you’ve checked your headlight voltage and fixed any problems, you can keep your lights healthy by doing regular maintenance.
Check your headlight bulbs every few months. If one is getting dim or looks burned out, replace it. Headlight bulbs are cheap and easy to swap out.
Keep your battery terminals clean. Every few months, take a quick look at them and make sure there’s no corrosion building up.
Have your alternator tested if you notice any electrical problems. A mechanic can check it for you pretty quickly.
Don’t ignore dim headlights. They’re not just annoying. They make it hard to see the road and make it harder for other drivers to see you. If your lights are dim, figure out why and fix it.
Wrapping It All Up
Checking the voltage going to your headlights is easier than you might think. With a simple multimeter and a few minutes of time, you can find out if your lights are getting the right amount of power. If they’re not, you’ve got some clues about what might be wrong.
Remember, your goal is to see a reading of 13 to 14 volts when your engine is running and your headlights are on. If you’re getting that, your electrical system is doing its job. If you’re not, you now know how to start troubleshooting.
The beauty of learning how to do this yourself is that you save money and you understand your car better. You don’t need to be a mechanic. You just need to be willing to learn and take your time.
If you ever feel stuck or unsure, don’t hesitate to ask for help or take your car to a professional. Your safety and your car’s safety come first. But now you have the skills to check your headlight voltage yourself, and that’s a big step toward being a more independent car owner.
Your headlights are there to keep you safe. Make sure they’re getting the power they need.

Peterson is an automotive enthusiast and auto parts reviewer with a passion for vehicle maintenance, upgrades, and performance. He enjoys researching and testing car parts, tools, and accessories to help drivers make informed buying decisions. Through AutoPartsTalk.com, Peterson shares honest reviews, practical maintenance tips, and expert guides to keep vehicles running safely and efficiently.