How to Rebuild a Brake Caliper?
Brake calipers don’t last forever. At some point, your car’s braking system will need attention, and you might find yourself staring at a seized or leaking caliper wondering what comes next. The good news? You can rebuild one without dropping hundreds of dollars at a mechanic’s shop.
Rebuilding a brake caliper is totally doable if you’re willing to take your time and follow the steps carefully. You don’t need years of experience or fancy equipment to do this job. All you need is patience, the right tools, and clear instructions. This guide walks you through the entire process so you can get your brakes working like new again.
What Is a Brake Caliper and Why Does It Need Rebuilding?
Before you start taking things apart, let’s talk about what a brake caliper actually does and why they fail.
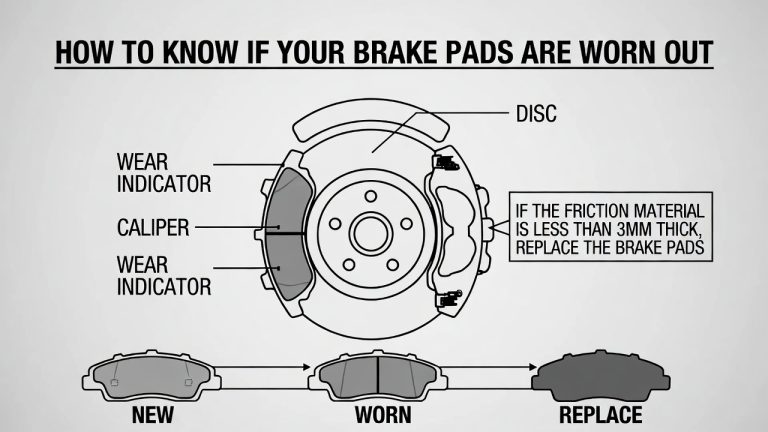
Your brake caliper is the part that squeezes your brake pads onto the rotor when you hit the brakes. Think of it like a clamping device that applies pressure to stop your wheels. Inside that caliper lives a piston or pistons that move back and forth. Rubber seals keep fluid inside and dirt outside.
Over time, brake calipers can develop problems. They might stick, meaning the piston gets stuck and won’t retract properly. They might leak, which means brake fluid escapes and your brakes get spongy. They might corrode from the inside out. Any of these issues means your braking power suffers.
You have two main options when a caliper fails. You can replace it with a new one, which costs money. Or you can rebuild it by replacing the worn seals, cleaning the parts, and reassembling everything. Rebuilding saves you cash and teaches you something valuable about how your car works.
Signs Your Brake Caliper Needs Rebuilding
How do you know if your caliper is actually the problem? Here are the common warning signs.
Sticking Calipers happen when the piston refuses to move freely. You might notice your car pulls to one side when you brake. The wheel might feel hotter than normal because the caliper is dragging and creating friction even when you’re not using the brakes.
Soft or Spongy Brakes often point to a leaking caliper. When brake fluid leaks out, your brake pedal feels mushy and travels further before your brakes grab. Your stopping distance increases too, which is dangerous.
Brake Fluid Pooling under your car near the wheels is a dead giveaway. Brake fluid looks amber or reddish. If you spot puddles, your caliper is definitely leaking.
Uneven Brake Wear happens when one caliper drags more than others. Your brake pads wear out faster on one wheel. This creates noise and reduces your braking ability.
Corrosion Inside the Caliper might not cause obvious symptoms right away, but over time, corroded pistons and bores seize up.
Any of these symptoms means your caliper needs attention soon. Driving on a bad caliper damages your rotor and pads and makes your brakes less responsive.
Tools and Materials You Need
Gathering the right tools makes this job much easier. You don’t need anything crazy or expensive.
Essential Tools
A socket set covers most fasteners on your car. You’ll need various sizes, typically from 8mm to 17mm. A torque wrench matters because brake components need specific tightness levels. Get one that reads in foot-pounds if possible. A rubber mallet helps you tap things loose without damaging them. Brake cleaner spray removes brake dust and dissolves stuck-on grime. Buy the real stuff, not carburetor cleaner.
A caliper rebuild kit contains all the seals and rubber bits you need. These kits are inexpensive and specific to your car’s make and model. Brake fluid appropriate for your vehicle completes the fluid requirements. Check your manual for the type, usually DOT 3 or DOT 4.
Helpful Tools
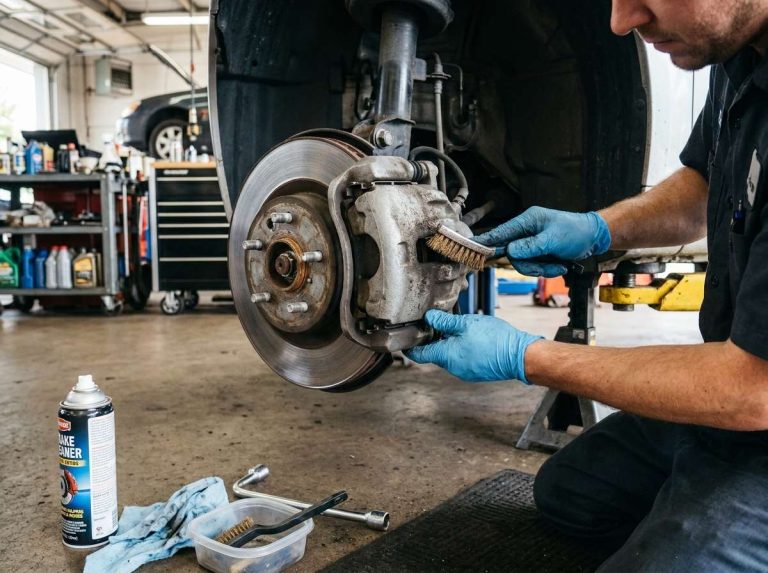
Wire brushes clean corrosion from metal parts. A small brush with soft bristles works inside the caliper bore. Steel wool handles stubborn rust spots. Clean rags absorb fluid and dry parts. Shop towels work, but real rags are better because they don’t shed lint.
A container for holding small parts keeps bolts and seals from rolling away. A plastic tray or old coffee can works fine. A jack and jack stands let you lift your car safely. Never work under a car supported only by a jack.
Safety glasses protect your eyes from spray and debris. Nitrile gloves keep brake fluid off your skin. Brake fluid dissolves paint and plastic, so cover your work area with cardboard or newspaper.
Removing the Caliper from Your Vehicle
Getting the caliper off your car is the first major step.
Prepare Your Work Area
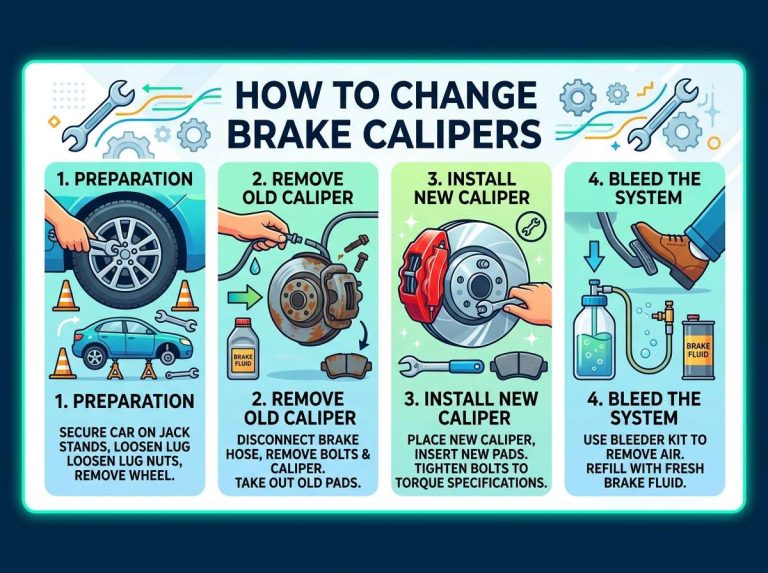
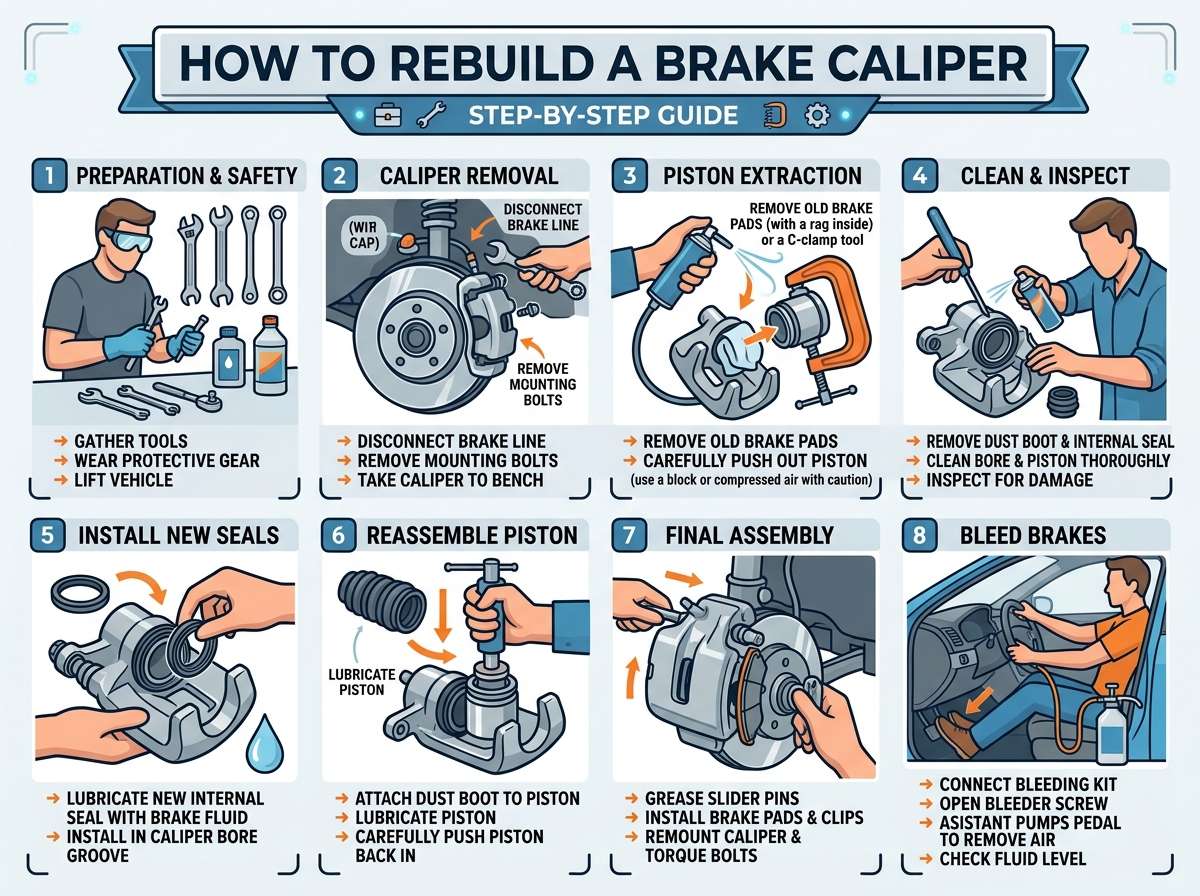
Lift your car with the jack and place jack stands under solid parts of the frame. Lower the car onto the stands. Remove the wheel and tire to expose the caliper. Position your work area so you have good light and enough room to move around.
Disconnect the Brake Line
You’ll find the brake line connected to the back of the caliper. It’s a metal tube with a fitting. Place a drain pan underneath to catch brake fluid. Use your wrench to disconnect the line by turning it counterclockwise. Have a rag ready because fluid will drip.
Immediately plug the brake line with a small bolt or cap to prevent air from entering the line. Air in your brake lines causes sponginess and requires a bleeding process later.
Remove Mounting Bolts
The caliper bolts to the bracket, which bolts to the spindle. You’ll find two bolts holding the caliper to the bracket. Remove these with your socket set. The caliper now slides off. Set it somewhere clean on a rag.
The bracket itself might stay in place, which is fine. You’re only rebuilding the caliper today, not replacing the whole assembly.
Disassembling the Caliper
Now the real work starts. You’ll take apart the caliper piece by piece.
Clean the Outside First
Use brake cleaner to spray away all the dark brake dust covering the outside. This stuff contains asbestos in older cars, so avoid breathing it. Work in a well-ventilated area. Get the caliper clean enough that you can see what you’re doing.
Remove the Dust Boot
Look at the end of the caliper where the piston sticks out. You’ll see a rubber boot covering the piston. This prevents dirt from getting inside. Use a plastic pry tool to gently lift this boot away from the piston. Don’t use a metal screwdriver because that tears the rubber.
Once you lift the boot, use compressed air or a hand pump to slowly push the piston out. Direct the air from the brake line inlet hole. If the piston sticks, soak the caliper in brake cleaner for a few minutes. The cleaner dissolves corrosion and gunk that binds the piston.
Put the piston somewhere safe. You’ll clean it later.
Access the Seals
Once the piston is out, you can see the rubber seal sitting in a groove inside the caliper bore. This seal keeps fluid in and prevents corrosion. Use a plastic pick or wooden stick to gently pry out this seal. Don’t scratch the bore with metal tools.
Many calipers have a second seal further up the bore. Remove that one too. These seals hold your job together. Don’t lose them because you need them for the rebuild kit, or they need removal to see what comes next.
Cleaning All the Parts
Clean parts work better and last longer. This step separates a good rebuild from a lazy one.
Soak in Brake Cleaner
Place all metal parts in a container of fresh brake cleaner. This includes the piston, the caliper body, and any other metal bits. Let them soak for fifteen to thirty minutes. The cleaner dissolves old brake dust, corrosion, and dried fluid.
Use a soft wire brush to scrub away loosened grime. Get inside the piston bore where the seal sat. Clean the piston itself thoroughly. Pay special attention to the sealing surfaces where the rubber seals sit. Any debris left behind damages your new seals immediately.
Dry Everything
Use compressed air to blow out the brake cleaner and dry all parts. Shake excess liquid out. Pat everything with a clean rag. Make sure no brake cleaner remains anywhere because it damages rubber seals.
Brake fluid is very sensitive to contamination. Even tiny particles of dirt or dust cause problems. Take time with this cleaning step because it directly affects how long your rebuild lasts.
Inspect for Damage
Look at the piston surface. It should be smooth and shiny. If you see deep pits or corrosion that won’t brush away, the piston might be damaged. Minor surface corrosion is fine and cleans up.
Look at the bore where the seal sat. It should be smooth and clean. Scratches in this bore damage your new seal and cause leaks. If you see significant damage, you might need a new caliper instead of a rebuild.
Installing New Seals and Reassembling
Now you install your new seals and put everything back together.
Prepare the New Seals
Your brake caliper rebuild kit includes new rubber seals and boots. The manufacturer usually includes instructions specific to your caliper. Read through these before you start.
Get your new seals out of the kit. Dip them in fresh brake fluid before installation. The fluid lubricates the seals and helps them slide into place. Don’t skip this step because dry seals tear when you install them.
Install the Main Seal
The primary seal sits in a groove inside the caliper bore. Gently press it into place using clean fingers or a plastic tool. Work it down into the groove evenly all around. The seal should sit flush with no twisted sections. Double-check that it’s fully seated before moving forward.
Install Secondary Seals
If your caliper has a secondary seal, install it the same way. Dip it in brake fluid and press it into its groove. These seals work together to keep everything sealed, so both matter.
Prepare the Piston
Dip your cleaned piston in fresh brake fluid. This lubricates it and helps you install it smoothly. Brake fluid acts as a lubricant for rubber seals, so don’t skip this.
Install the Piston
Slowly push the piston back into the bore. Go straight and even. If you feel resistance, stop and check that everything is aligned. Push too hard and you damage the seals. Take your time. The piston should slide in smoothly with gentle pressure.
Once the piston is all the way in, it should be flush with the caliper body. Some pistons stick out slightly, and that’s fine. Check your rebuild kit instructions for the correct depth.
Install the Dust Boot
The rubber boot protects the piston from dirt and weather. Press it back into place around the piston. It should sit evenly with no gaps or twisted sections. The boot keeps contaminants out, so seal it well.
Reinstalling the Caliper on Your Vehicle
You’ve rebuilt your caliper. Now it goes back on your car.
Connect the Brake Line
Position the caliper back where it came from. Connect the brake line by twisting the fitting clockwise. Hand-tighten it first so you don’t cross the threads, then use your wrench to snug it up. Don’t over-tighten because you can crack the fitting.
Remove the cap or bolt you used to plug the line while the caliper was off.
Install Mounting Bolts
Bolt the caliper back to the bracket. Use your torque wrench to tighten these bolts to the correct specification. Brake components need specific torque values. Check your vehicle manual for the exact number. Typical values run between 20 and 35 foot-pounds, but don’t guess.
Reinstall the Wheel
Put the tire and wheel back on. Hand-tighten the lug nuts first, then lower the car off the jack stands. Once the car sits on the ground, use your wrench to fully tighten the lug nuts in a star pattern. This ensures even pressure across the wheel.
Bleeding the Brake System
After rebuilding and installing your caliper, you need to bleed air out of the brake lines.
Why Bleeding Matters
Air in your brake lines makes your pedal feel spongy. You’ll have poor braking power until you remove the air. Bleeding is the process of pushing fluid through the lines and letting air bubbles escape.
Basic Bleeding Steps
Start by checking your brake fluid level in the master cylinder. Top it off with fresh brake fluid. You’ll lose some fluid during bleeding, and low fluid level lets more air in.
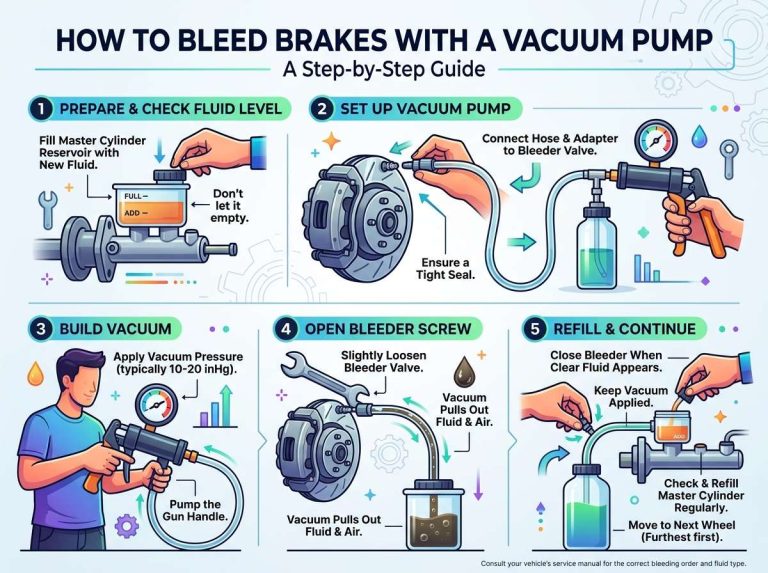
Most cars have a bleeder screw on each caliper. Locate yours. Attach a clear tube to the bleeder screw and run the other end into a container. Open the bleeder screw one half turn. Have someone sit in the car and slowly push the brake pedal down, then release it. Repeat this motion while you watch the tube for air bubbles.
Keep doing this until the fluid flowing out looks clear with no bubbles. Then close the bleeder screw and move to the next wheel. Bleed the wheels in order, usually starting with the one furthest from the master cylinder.
Professional Bleeding Equipment
If you don’t have someone to help, you can use a vacuum bleeding kit. These tools use suction to pull fluid through the lines and pull out air. They cost less than fifty dollars and work well for one-person bleeding.
Bed-In Your New Brakes
Fresh brake pads and a rebuilt caliper need a break-in period.
What Bedding In Means
Bedding creates a smooth transfer layer between your pads and rotor. This makes your brakes work better and last longer. You can’t just drive normally right away.
How to Bed Your Brakes
Find a safe place away from traffic, like an empty parking lot. Drive slowly and apply gentle brake pressure. Build your speed gradually. After accelerating to about 30 miles per hour, apply smooth pressure and coast to a stop. Rest for a minute to let the brakes cool.
Repeat this process eight to ten times. Don’t make hard stops yet. You’re teaching the pads and rotor to work together smoothly.
After gentle stops, gradually increase your speed to 45 miles per hour and repeat the process. Still no hard stops. Go through this cycle several times, increasing speed slightly each time.
Finally, do a few stops from 60 miles per hour using firm pressure. Now your brakes are ready for normal driving.
Testing Your Work
Before you trust your rebuilt caliper with your safety, test it thoroughly.
Check for Leaks
Look under your car at where the caliper connects to the brake line. Wipe the area clean with a rag. Drive around the block slowly. Park and check the same spot. Any new wet spots mean you have a leak that needs fixing. Usually this means you didn’t tighten the brake line fitting enough.
Feel Your Brake Pedal
Your pedal should feel firm and responsive. It shouldn’t travel halfway to the floor before your brakes grab. If it feels soft or spongy, you probably have air still in the lines. Go back and bleed the system again.
Listen for Noise
Strange noises from your brakes mean something isn’t right. Squeaking is usually just dust. Grinding sounds mean metal is touching metal, which damages everything. If you hear grinding, stop driving and check your work.
Test Your Stopping Power
In a safe area like a parking lot, accelerate to 20 miles per hour and apply firm brake pressure. Your car should stop smoothly without pulling to one side. If it pulls, one caliper isn’t working as hard as the other. Check that both calipers are installed correctly and both are applying pressure.
Common Mistakes to Avoid
Learning from other people’s mistakes saves you time and frustration.
Don’t Reuse Old Seals
The seals in your rebuild kit are new and better than old ones. Using old seals defeats the purpose of rebuilding. Always use the new parts from the kit.
Don’t Forget the Brake Line Cap
Leaving your brake line uncapped while the caliper is off lets air into the system. This causes problems that take time to fix. Always cap the line immediately.
Don’t Use the Wrong Brake Fluid
Different vehicles need different types of brake fluid. Using the wrong type damages seals and lines. Check your manual and buy the exact type your car needs.
Don’t Skip Cleaning
Contamination is the enemy of brake work. Dirty parts cause leaks and early failure. Spend time cleaning thoroughly. It matters more than you think.
Don’t Over-Tighten Bolts
Brake components use specific torque specifications for good reasons. Over-tightening breaks things. Under-tightening causes leaks. Use your torque wrench and follow the manual.
When to Call a Professional
Some situations call for professional help instead of a DIY rebuild.
If your caliper bore is deeply pitted or scored, a rebuild won’t fix it. You need a new caliper. Professionals have access to replacement parts at better prices than you might find.
If you don’t feel confident working on brakes, get professional help. Brake failure puts you and others at risk. Your safety matters more than saving money.
If you’ve already rebuilt your caliper once and it’s failing again quickly, something else is wrong. A professional can diagnose the actual problem.
Cost Comparison
Let’s talk money. Why rebuild when you could replace?
A new caliper costs seventy to one hundred fifty dollars depending on your car. Add labor costs at a shop, and you’re spending two hundred to three hundred dollars easily. Some shops charge more.
A brake caliper rebuild kit costs ten to thirty dollars. You provide the labor, which is free. You save money big time by doing this yourself.
Even if you mess up and need help finishing the job, you’ve still spent less than half what a complete replacement would cost.
Final Thoughts
Rebuilding a brake caliper is absolutely something you can do at home with basic tools and patience. The process seems complicated until you break it down into manageable steps. Take your time, stay organized, and follow the instructions carefully.
Your brakes are crucial to your safety and the safety of people around you. If at any point you feel unsure or encounter problems you can’t solve, get professional help. It’s better to be safe than sorry.
But if you’re willing to learn and put in the work, you’ll end up with rebuilt brakes that work great and a sense of accomplishment that comes from fixing your own car. Plus, you’ll have more money in your pocket and valuable knowledge about how your vehicle actually works.
Get yourself a rebuild kit, gather your tools, clear a clean work space, and get started. You’ve got this.

Peterson is an automotive enthusiast and auto parts reviewer with a passion for vehicle maintenance, upgrades, and performance. He enjoys researching and testing car parts, tools, and accessories to help drivers make informed buying decisions. Through AutoPartsTalk.com, Peterson shares honest reviews, practical maintenance tips, and expert guides to keep vehicles running safely and efficiently.