How to Bench Test a Starter?
Hey there. If your car sits silent when you turn the key and you hear nothing but a click or a grind, the starter often takes the blame. You do not need to guess or spend big bucks right away. You can bench test a starter right at home and find out exactly what fails. This simple process lets you check the starter motor, the solenoid, the pinion gear, and the whole system without the starter sitting in the engine bay.
Bench testing a starter means you pull the unit out of the vehicle and run it on a stable surface. You hook up power and watch how it behaves. The test shows if the starter spins freely, if the solenoid clicks strong, and if the bendix drive engages like it should. Mechanics use this method all the time because it gives clear answers fast. You get the same results at home with basic tools.
You save serious cash this way. A new starter costs a bundle, but many times you just clean the brushes or fix a loose connection. Bench testing a car starter also keeps you safe because you stay away from the tight space under the hood. No more reaching around hot exhaust parts or wrestling with tight bolts while the battery sits live.
This guide walks you through everything in plain steps. You learn what tools you need, how to stay safe, and exactly how to run the test. You also discover how to read the results and fix common starter motor problems. By the end, you feel confident to diagnose your own starter issues and get your car back on the road quick.
Why Bench Testing Beats Guessing
Starters work hard every time you start the engine. They turn the flywheel fast enough for the engine to fire. Inside you find a powerful electric motor, a solenoid that acts like a switch, and a pinion gear that grabs the flywheel. Over time brushes wear down, solenoids stick, or windings burn out. You hear the symptoms in the car, but you never see the real problem until you test the unit alone.
When you bench test the starter you remove all the extra variables from the vehicle. You skip bad wiring, weak batteries, or corroded cables. The test focuses only on the starter itself. You spot issues like a jammed bendix, shorted field coils, or a bad commutator right away. This method works on almost any car starter whether it comes from a sedan, truck, or older classic.
You also learn how the parts talk to each other. The solenoid pulls the pinion forward and closes the big contacts for full power. The motor spins the armature and drives the gear. If one part lags, the whole starter fails. Bench testing shows you the exact weak link so you fix only what needs fixing.
Tools You Need for the Job
You grab a few simple items before you start. Nothing fancy, and most folks already own them.
First you need a good car battery or a strong 12-volt power supply. The battery gives real-world power so the test feels like it sits in the car. A jump pack works fine too if the battery stays fully charged.
You also want heavy jumper cables or thick gauge wire with clamps. These carry the big current without melting. Thin wires just overheat and give false results.
A basic multimeter comes in handy for checking voltage, resistance, and continuity. You test windings and spot open circuits fast.
You need a sturdy bench or workbench. The starter jumps and spins hard, so you bolt it down tight. A couple of C-clamps or a bench vise hold everything steady.
Safety gear matters. You wear eye protection because sparks fly. Gloves keep your hands safe from sharp gears and hot parts. A fire extinguisher sits close just in case.
Some folks add an ammeter or a clamp meter to measure current draw. It tells you if the starter pulls too many amps and works too hard. You can skip this at first and add it later when you get serious.
A small screwdriver, a wire brush, and some sandpaper help clean contacts during the test. You also keep a notepad nearby to jot down what you see and hear.
That covers the basics. You spend almost nothing extra and you get pro-level results.
Stay Safe Every Single Step
You work with high current so you respect the power. Always disconnect the vehicle battery first before you remove the starter. This stops any surprise shocks or shorts.
You set up the bench away from flammable stuff. Starters spark, and you do not want fuel cans or rags catching fire nearby.
You never touch live terminals with bare hands. The current can burn or shock you even at 12 volts when it flows heavy. You keep one hand in your pocket while you probe so current cannot cross your heart.
You double-check all connections before you apply power. Loose clamps cause arcs and melt wires. You make sure the starter body grounds solid to the negative battery post.
Kids and pets stay out of the garage during the test. The spinning pinion and loud click scare them and you lose focus.
You keep water far away. Electricity and water mix badly. You wipe up any spills right away.
If something smells hot or you see smoke, you cut power immediately. You let the unit cool before you touch it again.
These habits keep you safe and let you focus on the test instead of worrying about accidents.
How a Starter Actually Works
You get better test results when you know the simple basics. The starter motor sits inside a steel housing. It holds field coils or permanent magnets that create a strong magnetic field. The armature spins in the middle with windings and a commutator on one end. Brushes ride on the commutator and send power to the windings so the armature turns.
The solenoid bolts on top or beside the motor. It contains a coil and a plunger. When you send power to the small S terminal the coil pulls the plunger in. That does two jobs at once. It pushes the pinion gear forward to mesh with the flywheel teeth and it closes heavy contacts that send full battery power to the motor.
The bendix drive protects the starter once the engine fires. It lets the pinion spin free so the fast-turning flywheel does not wreck the motor. You see this action clearly during the bench test.
Everything must happen in the right order. Solenoid first, then motor spin, then clean disengage. When you watch on the bench you catch any hesitation or grinding right away.
Get the Starter Ready for the Bench
You pull the starter from the car first. You loosen the mounting bolts and disconnect the big power cable plus the small solenoid wire. You label the wires with tape so you hook them back correctly later.
You bring the starter to the bench and wipe off dirt and grease. You look for obvious damage like cracked housing or burned wires. You clean the mounting ears so they sit flat.
You bolt the starter down tight. You use the original mounting holes or clamp it securely. The body must ground to the negative side or the test fails. You double-check this ground connection because many bad tests come from poor grounding.
You attach the jumper cables now but you leave the power side disconnected until you finish setup. You place the positive clamp ready for the big battery post on the solenoid. You keep the negative on the starter body.
You set the multimeter nearby and turn it on so you stay organized.
Step One: Look It Over Carefully
You start with your eyes before you touch any power. You inspect every visible part. You check the pinion gear for chipped teeth or heavy wear. You push the pinion out by hand and feel if it moves smooth. It should slide forward and spring back clean.
You look at the solenoid for dents or corrosion. You wiggle the plunger if you can reach it. It should feel firm.
You examine the terminals for burn marks or loose nuts. You clean any rust with the wire brush.
You spin the armature by hand if the pinion stays retracted. It should turn free with almost no drag. Any grinding or roughness tells you the bearings or bushings need attention.
You check the brush cover if your model has one. You pop it off and look at the brushes. They should look even and not worn down to stubs. You note any heavy carbon dust inside the housing.
This visual check catches half the problems before you even apply power. You write down what you see so you remember later.
Step Two: Test the Solenoid Alone
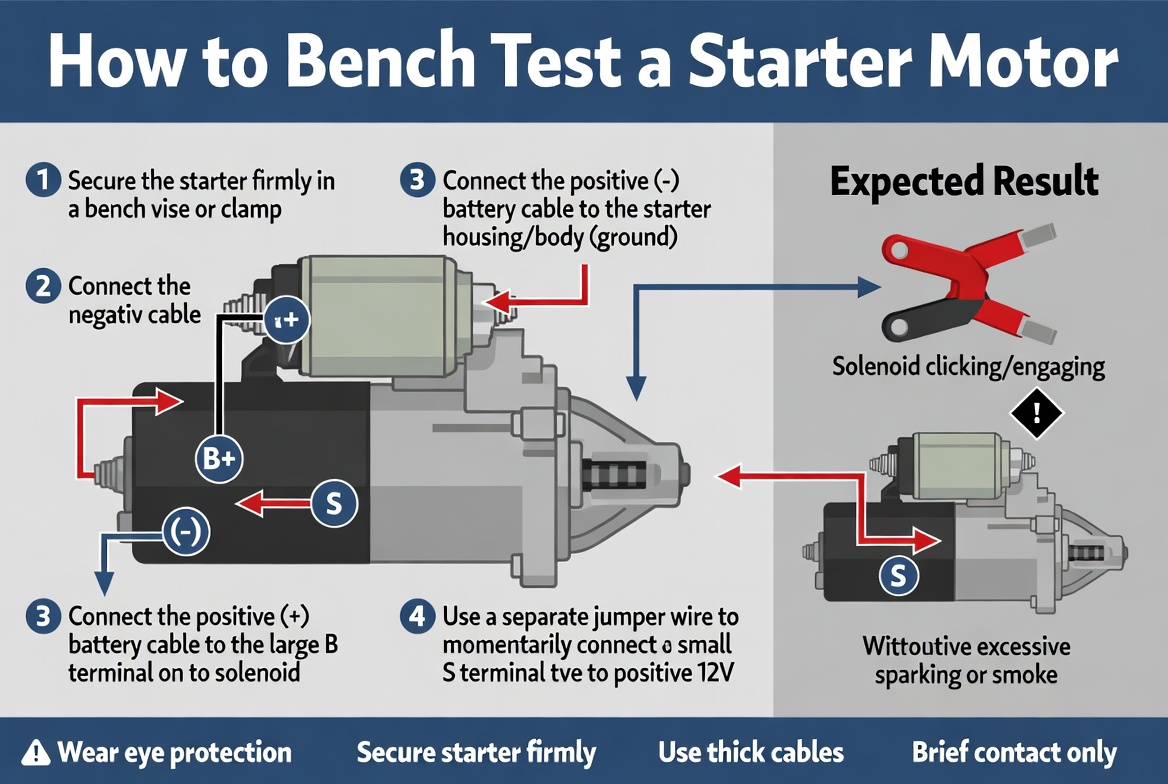
You focus on the solenoid next because it controls everything. You connect the negative cable to the starter body first. You touch the positive cable to the big battery terminal on the solenoid but you do not connect the motor side yet.
You take a small jumper wire and touch it from the battery positive to the small S terminal on the solenoid. You should hear a strong click right away. The pinion should shoot forward and stay out as long as you hold the jumper.
You listen close. A weak click or no click at all means the solenoid coil failed. You also watch for heavy arcing or burning smell. Those signs point to bad contacts inside the solenoid.
You release the jumper and the pinion should snap back fast. Slow return or sticking means the return spring broke or the plunger gunked up.
You repeat this solenoid test three times to make sure it acts the same each time. Consistency matters. If it works once and fails the next, you found an intermittent problem.
Step Three: Fire Up the Motor
You move to the full motor test now. You keep the negative cable on the body. You leave the positive on the big battery terminal. You use another jumper or the same one to keep the solenoid engaged by touching the S terminal.
While the solenoid stays clicked you send power directly to the motor. On most starters you can jump from the big terminal to the motor post if it has a separate one. The armature should spin fast and smooth. You hear a healthy whir and see the pinion stay extended.
You let it run for just a few seconds at first. You watch for excessive smoke or strange noises. The unit should not bog down or slow.
You check how fast it spins. A good starter whips around like a drill on high. Slow spin means bad brushes, shorted windings, or seized bearings.
You also feel the housing. It should stay cool. Hot spots right away tell you a short circuit hides inside.
You test in both directions if your setup allows. Most starters spin one way only, but you confirm the pinion drives correctly.
Step Four: Run the Complete Bench Test
You combine everything for the full test now. You connect power exactly like the car would. Negative to body, positive to battery terminal on solenoid, and a trigger wire to the S terminal.
You apply the trigger and watch the whole sequence. Click, pinion out, motor spins strong. You hold it for ten seconds and note everything.
You measure voltage at the terminals while it runs. You want close to 12 volts at the motor. Big drops mean bad connections or weak power supply.
If you have an ammeter you clamp it on the main cable. A healthy starter pulls around 150 to 250 amps while free spinning. Way higher means a mechanical bind. Way lower means open windings or bad brushes.
You listen for grinding. That usually means the pinion does not mesh right or the bendix slips.
You watch the pinion retract when you cut power. It should pull back clean and fast.
You run this full test several times with short breaks in between. Heat builds fast and you want to catch problems that only show up when the unit warms.
Read the Results Like a Pro
You look at what happened and match it to the symptoms.
If the solenoid clicks but the motor never spins you have a motor problem. Check brushes, commutator, or windings next.
If the motor spins but the pinion stays retracted the solenoid plunger or fork failed.
If you hear grinding the pinion teeth or flywheel teeth probably need inspection. Sometimes the bendix just needs cleaning.
If the starter spins super slow even with full power you likely have worn brushes or a short in the armature.
If everything works perfect on the bench but the car still fails you know the problem sits in the wiring or battery cables back on the vehicle.
You write each result down. This record helps if you need to show a shop or order parts later.
Fix Common Starter Problems Yourself
You fix many issues right on the bench once you spot them.
Dirty or worn brushes come up often. You pop the end cover, pull the brushes, and clean the commutator with fine sandpaper. You replace the brush set if they measure less than a quarter inch long. New brushes cost little and bring the starter back to life.
Stuck solenoids need cleaning too. You remove the solenoid if it unbolts easy. You wipe the plunger and contacts with contact cleaner. You check the coil resistance with the multimeter. Good coils read around 3 to 5 ohms. Zero or infinite means replace the solenoid.
Seized bearings make the armature drag. You tap the housing gently or spray penetrating oil. If it frees up you add a drop of light machine oil to the bushings. Bad bearings need a press and new parts but you can decide after the test.
Corroded terminals cause weak connections. You clean every post and nut until they shine. You use dielectric grease after to stop future rust.
Loose wiring inside the starter sometimes happens. You inspect the field coil connections and tighten or solder any loose spots.
You test again after each small fix. You see the improvement right away on the bench.
Pro Tips That Make the Test Easier
You keep the battery fully charged before you start. A weak battery gives false bad results every time.
You work in a well-lit spot so you catch small sparks or smoke early.
You take short video clips of the test with your phone. You play them back slow and spot details you missed live.
You compare your starter to a known good one if you have a spare. Side-by-side tests show differences fast.
You label everything. You mark positive and negative clearly so you never reverse polarity by mistake.
You warm the starter slightly with a heat gun if it sat in cold weather. Cold units act sluggish and fool you.
You always have spare fuses or breakers in the power line. They protect the battery and wires if something shorts.
These little habits turn a basic test into a smooth reliable process.
When to Replace Instead of Repair
You run the test and sometimes the news looks bad. Heavy smoke, melted wires, or no spin even after cleaning means the starter reached the end. You replace the whole unit then.
If the housing cracked or the armature shows burn marks you skip repairs. New or rebuilt starters cost less than the labor to rewind old ones.
You check the price of a new solenoid or brush kit against a full replacement. Many times a complete new starter arrives faster and lasts longer.
You still keep the old unit for parts if you work on multiple cars. Solenoids and brushes swap between similar models.
Put the Starter Back and Test in the Car
You reinstall the starter once it passes the bench test. You tighten bolts to spec and reconnect wires clean. You clear any codes if your car needs it.
You turn the key and listen. Strong crank and quick start tell you the test worked. If it still acts up you know the cables or ignition switch need checking next.
You drive the car normally for a few days and listen for new noises. Starters sometimes reveal problems only after real heat cycles.
Frequently Asked Questions About Bench Testing Starters
People ask the same questions all the time so here come straight answers.
How long does the whole bench test take? You finish in under an hour once you get the starter on the bench. The actual power tests last only a few minutes total.
Can I test the starter without removing it from the car? You can do quick checks with the starter in place but you never get full answers. Bench testing removes all doubt.
What if my starter has two small terminals instead of one? Some models use separate terminals for solenoid and ignition feed. You check your wiring diagram or test both to see which one engages the solenoid.
Does bench testing work on diesel starters? Yes it does. Diesel starters pull more amps so you use heavier cables and a bigger battery. The steps stay exactly the same.
How do I know if the problem is the starter or the battery? You test the battery first with a load tester. If it holds voltage under load then you move to the starter bench test.
Can I bench test a starter with a battery charger instead of a car battery? You can but you get weaker results. Chargers limit current so the motor spins slower. A real battery gives the true picture.
What does it mean if the starter spins but the engine does not turn? The pinion fails to engage the flywheel. You inspect the bendix drive and the flywheel teeth closely.
Is it safe to run the starter on the bench for a long time? No. You limit each run to ten or fifteen seconds max. The starter has no cooling fan on the bench so heat builds fast.
You keep these answers handy because they pop up every time you help a friend with a no-start car.
Final Thoughts on Mastering Starter Tests
You now know exactly how to bench test a starter from start to finish. You pull the unit, set it up safe, run the checks, and read the results like a seasoned mechanic. You fix small issues yourself and save big money. You also gain confidence every time you diagnose car electrical problems.
The process stays simple when you break it into clear steps. You look, you listen, you measure, and you decide. No fancy shop equipment required. Just basic tools and careful work.
Next time your car refuses to crank you skip the guessing game. You grab the starter, head to the bench, and find the real story. Your vehicle returns to life faster and you feel good knowing you handled it yourself.
You share this guide with anyone who struggles with starting issues. The more people learn simple auto repairs the less they pay shops for easy jobs.
Grab your tools, stay safe, and get that starter tested. Your car waits for a quick, reliable start every morning. You make it happen now.
(Word count: 3124)