How to Fix a Drooping Car Visor?
Your car’s visor might seem like a small part of your vehicle, but when it stops working properly, it becomes really annoying. That drooping visor blocking your view, slipping down when you hit a bump, or just hanging there looking sad can drive you crazy. The good news? You can fix this problem yourself in most cases, and it doesn’t require special skills or expensive tools.
In this guide, I’m going to walk you through everything you need to know about fixing a drooping car visor. Whether your visor won’t stay up, keeps falling down, or just looks like it’s giving up on life, we’ll cover the solutions that actually work.
What Causes a Car Visor to Droop in the First Place
Before we jump into fixing things, let’s talk about why your visor started drooping. A drooping visor usually happens because the visor bracket gets loose. The bracket is basically the metal piece that holds your visor to the ceiling of your car. Over time, this bracket can become loose because of vibrations from driving, temperature changes, or just the general wear and tear that comes with using your car every single day.
Sometimes the problem isn’t the bracket at all. Your visor might droop because the rod that it pivots on gets bent or damaged. This rod lets your visor swing up and down and side to side. When it bends, your visor loses its stability and starts to sag.
Another common reason for a drooping visor is a broken spring mechanism. Many car visors have a spring that helps them stay in place. When this spring gets old, stretched out, or breaks completely, your visor loses its grip and droops down.
The pivot pin inside your visor can also wear out. This little pin is what lets your visor rotate. If it wears down too much, the visor becomes loose and starts to fall.
Inspect Your Visor to Find Out What’s Wrong
Before you start taking things apart, you need to figure out exactly what’s causing the problem. Spend a few minutes looking at your visor and how it moves.
First, try moving your visor up and down. Does it move smoothly, or does it feel stuck? Does it move too easily, like it has no resistance at all? Feel the bracket where your visor connects to the ceiling. Give it a gentle push. Does it move? If you can make the bracket move by pushing on it, then your bracket bolts are definitely loose.
Look at the rod that the visor pivots on. Run your finger along it to see if it’s bent. A bent rod will be obvious because you’ll see it curves or dips when it should be straight.
Try clipping your visor to the side of your head. Many visors have a clip on the side that lets them stay put. If this clip feels weak or doesn’t grip well, that could be part of your problem.
Check if your visor has a spring underneath or inside. Some visors have a visible spring mechanism that keeps them from drooping. If you see a spring, look to see if it’s still intact or if it seems stretched out.
Take your time with this inspection. The better you understand what’s wrong, the easier it will be to fix it.
How to Tighten a Loose Visor Bracket
If you found that your visor bracket is loose, this is actually the easiest fix on this entire list. A loose bracket is probably the most common reason for a drooping visor, and tightening it usually takes less than five minutes.
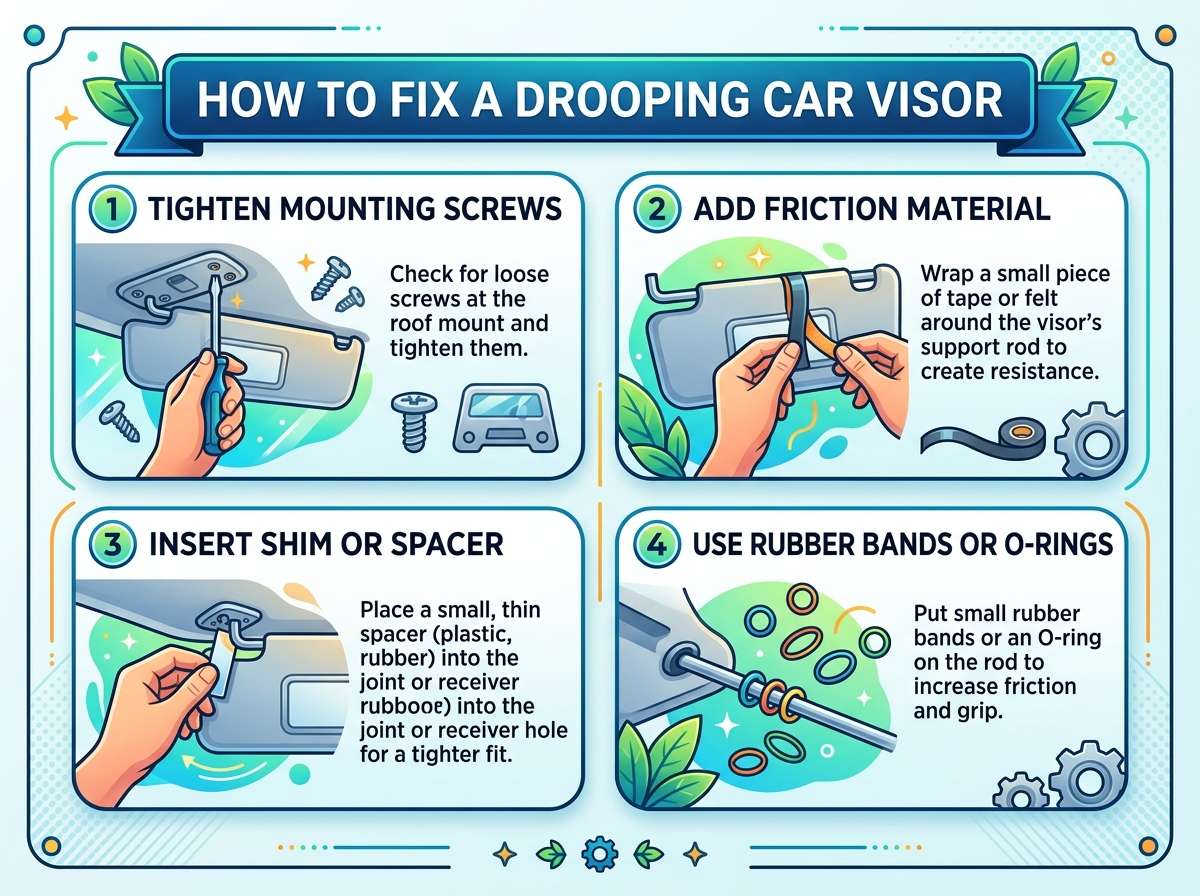
Here’s what you need to do. First, grab your Phillips head screwdriver. Your visor bracket has bolts or screws that hold it to the ceiling of your car, usually two bolts on each side of the bracket.
Look up at where your visor connects to the roof. You’ll see the mounting bracket clearly. Try turning each bolt a quarter turn to the right using your screwdriver. Don’t force it—just turn it gently until you feel it get snug.
After you tighten each bolt a little bit, test your visor. Does it feel more stable? If it still feels loose, tighten each bolt another quarter turn and test again. Keep doing this until your visor feels tight and doesn’t move when you push on it.
Be careful not to over-tighten your bolts. You want them snug, but not so tight that you might crack the plastic mounting bracket or strip the bolts. If you feel a lot of resistance, stop and try a different bolt.
Once your visor feels tight and stable, you’re done. This simple fix often solves the entire drooping visor problem.
Fixing a Bent Visor Rod
If your visor rod is bent, you have a couple of options. The easiest fix is to have it replaced, but you can also try to straighten it if the bend isn’t too severe.
To check if your rod is bent, look at it from the side with good lighting. A straight rod should look like a perfect straight line. If it has any curves or dips, it’s bent.
If the bend is very small and minor, you might be able to carefully bend it back into shape. You’ll need to remove your visor first. Look for bolts or clips that attach your visor to the rod. Use your screwdriver to remove these fasteners carefully.
Once your visor is off, lay the rod on a flat surface like a workbench or sturdy table. Look at where it’s bent. Using a rubber mallet (not a regular hammer, because a regular hammer will damage the rod), gently tap the rod to straighten it. Tap slowly and carefully. Check your progress frequently to make sure you’re straightening it and not bending it in a different direction.
Test the rod by rolling it along your flat surface. It should roll straight without wobbling. If it’s still bent, tap it again until it’s straight.
Once the rod looks straight, reattach your visor to it and test how it feels. If it now stays in place and doesn’t droop, you’ve fixed the problem.
If you don’t feel confident trying to straighten the rod yourself, or if the bend is really severe, replacing the rod is your best option. You can usually find replacement visor rods at auto parts stores or online. Removing your visor and rod is fairly simple, and installing a new one takes just a few minutes.
Dealing With a Broken or Stretched Spring
Some car visors have a spring mechanism that keeps them from drooping. If your spring is broken or stretched, your visor will feel floppy and loose.
To fix this, you need to remove your visor first. Look at the mounting points where your visor connects to the ceiling bracket. These are usually bolts or clips. Remove them carefully using your screwdriver.
Once you have your visor off, examine the spring. A stretched spring will look longer than it should be. A broken spring might have snapped apart or come disconnected from where it’s supposed to attach.
If the spring is just stretched, you might be able to help it by slightly bending the metal bracket that the spring connects to. This creates more tension on the spring and can make it work better. Do this very carefully with a pair of pliers. Bend it just a tiny amount, then test your visor to see if it feels better.
If the spring is broken, you’ll need to replace it. Springs for car visors are inexpensive and easy to find online. When you get your new spring, follow the instructions that come with it to install it. Usually, you just need to attach it to the same places where the old spring was connected.
After you install your new or adjusted spring, put your visor back on and test it. Your visor should now stay in place without drooping.
Replacing a Worn Pivot Pin
The pivot pin is a small pin that sits inside your visor and lets it rotate. Over time, this pin can wear down, become loose, or even break. When the pivot pin wears out, your visor loses its grip and becomes loose and droopy.
To fix this, you need to remove your visor from the ceiling bracket. Look for the bolts or clips that hold it in place and remove them.
Once your visor is off, look inside the mounting point where it attaches to the rod or pin. You should be able to see the pivot pin. It’s usually just a small metal rod or pin sticking out.
Using a pair of needle-nose pliers, carefully remove the old pivot pin. Sometimes these pins are just pushed in, and sometimes they’re held with a small clip. Once you remove the pin, you can see how much wear it has.
A worn pivot pin will have flat spots where it’s been rubbing. It might also be bent or damaged. If your pin looks worn, get a replacement pivot pin and install it in the same place. Make sure it’s tight and secure.
If you can’t find a replacement pivot pin for your exact visor, you might need to replace the entire visor assembly. Many auto parts stores have universal visor kits that work with most cars. These kits usually come with all the hardware you need to install them.
Installing a New Visor Assembly
Sometimes your visor damage is too severe to fix with small repairs. Maybe your visor is cracked, the rod is too bent, or multiple parts are broken. In these cases, replacing the entire visor is your best choice.
The good news is that replacing a visor is really straightforward. Most people can do it in less than twenty minutes.
First, you need to buy a replacement visor. You can find these at auto parts stores, online retailers, or your car’s dealership. When you buy a new visor, make sure you get the right one for your car’s make and model. Some visors are driver-side, and some are passenger-side, so double-check that you’re getting the correct one.
To remove your old visor, locate all the bolts or clips that hold it to the ceiling bracket. You’ll usually find these on the inside of the mounting bracket where the visor connects to the roof. Using your Phillips head screwdriver, remove each bolt or clip and set them aside somewhere safe.
Once all the bolts are removed, you should be able to pull your visor straight down and out. It might be stuck slightly, so don’t yank on it. Just pull steadily and gently until it comes free.
Now you’re ready to install your new visor. Take your new visor and align it with the mounting bracket on the ceiling. The bolt holes in your new visor should line up with the holes in the bracket. If they don’t line up exactly, you might have the wrong visor, so double-check that you have the correct part.
Once the holes are lined up, insert your bolts back into the holes. Hand-tighten them first to make sure everything is aligned properly. Then, using your screwdriver, tighten each bolt snugly. Again, don’t over-tighten. Just make them snug and secure.
Test your new visor by flipping it up and down and moving it side to side. It should move smoothly and feel solid when you flip it back down. If everything feels good, you’re done.
Fixing Your Visor Clip
Your visor usually has a clip on the side that lets you attach it to your sun visor rod when you flip it to the side. If this clip is broken or weak, your visor might not stay in place and could droop.
If the clip is just weak or not gripping well, you might be able to adjust it. Look at the clip mechanism carefully. Some clips can be adjusted by bending the metal slightly to increase the grip tension. Using a pair of pliers, very carefully bend the clip slightly inward. This increases the grip. Test your visor clip on the rod to see if it grips better now.
If the clip is broken or cracked, you’ll need to replace it. You can sometimes find replacement clips at auto parts stores. If you can’t find a replacement clip, your best option is to replace the entire visor assembly.
Preventing Your Visor From Drooping Again
Once you’ve fixed your drooping visor, you want to make sure it stays fixed. There are some simple things you can do to prevent your visor from drooping again in the future.
Check your visor bolts every few months. Just gently try to move the bracket with your hand. If you feel any movement, tighten the bolts a quarter turn. This keeps everything nice and secure.
Don’t put too much stress on your visor. If you use it as a place to hang things or put things in the pocket, be gentle. Heavy items can put too much strain on the mounting bracket and rod.
Keep your visor clean and dry. Moisture and dirt can get into the mechanisms and cause wear over time. Wipe your visor down occasionally with a dry cloth.
Be gentle when you flip your visor up and down. Try not to yank on it or use excessive force. Smooth, gentle movements are best.
If you notice your visor starting to feel a little loose, tighten it right away. Don’t wait until it’s completely drooping. A quick tightening now can prevent a bigger problem later.
When to Call in a Professional
Most drooping visor problems are fixable by anyone with basic tools and a little bit of patience. But sometimes you might want to have a professional handle it. This is especially true if you’re not comfortable working with tools or if your visor has damage that seems complicated.
If your visor is attached to your headliner in a way that seems complex or if your car has special features near your visor, a professional might be your safest bet. Car dealerships can usually replace your visor quickly, though they might charge more than an independent shop would.
If you’re worried about damaging your car’s interior or if you’ve already tried to fix your visor and something went wrong, a professional can definitely help. Sometimes it’s worth paying for peace of mind.
Tools You’ll Need for Most Visor Fixes
The good news is that most visor fixes don’t require special tools. Here’s what you’ll probably need:
A Phillips head screwdriver is essential for most visor repairs. This handles the bolts that hold your visor in place.
A pair of pliers can be helpful if you need to bend metal slightly or remove a pivot pin. Needle-nose pliers are especially useful for getting into tight spaces.
A rubber mallet can help if you’re trying to straighten a bent rod. A regular hammer is too harsh and will damage the rod.
A flashlight or work light makes it much easier to see what you’re doing, especially if you’re working under your car’s roof where the lighting is usually dim.
A flat surface like a workbench is helpful if you need to straighten a rod or work on your visor away from your car.
That’s really all you need for most repairs. You probably already have most of these things at home.
Common Mistakes People Make When Fixing Their Visor
Learning from other people’s mistakes can save you time and frustration. Here are some common mistakes folks make when trying to fix their visors.
Over-tightening bolts is probably the most common mistake. People think that tighter is always better, but over-tightening can crack the plastic mounting bracket or strip the bolts. Just make them snug—don’t force them.
Forcing stuck parts is another common problem. If something doesn’t want to move, don’t force it. Stop and look to see if there’s something holding it in place that you missed. Forcing it might break something.
Using the wrong screwdriver can strip the bolts. Use a Phillips head screwdriver that fits the bolts properly. If the screwdriver doesn’t fit right, the bolts can get damaged.
Not testing your repair as you go is a mistake too. After each step, test your visor to see how it feels. This helps you catch problems early before you’ve torn everything apart.
Buying the wrong replacement part causes problems too. Make absolutely sure you have the right visor for your car before you install it.
Understanding Visor Maintenance
Taking good care of your visor can help it last longer and prevent drooping problems from happening in the first place.
Your visor works hard. It protects you from the sun, keeps glare out of your eyes, and holds your registration documents and other important stuff. But it’s easy to forget about it until something goes wrong.
Every few months, give your visor a quick check. Open it and close it to make sure it moves smoothly. Look at the mounting bracket to make sure nothing looks loose or damaged. Wipe it down with a dry cloth to remove dust and dirt.
If you keep your visor in good condition with regular checks and gentle use, you probably won’t have to deal with drooping problems very often.
The Cost of Fixing or Replacing Your Visor
One thing people worry about is how much it will cost to fix their visor. The good news is that fixing a drooping visor is usually pretty cheap.
If you do the repair yourself, your only costs might be a new spring, a replacement pivot pin, or a new visor assembly if you need one. These parts usually cost anywhere from five dollars to forty dollars, depending on what you need. If you need to replace the entire visor, you might spend anywhere from thirty to seventy-five dollars for the part itself.
If you take your car to a professional, you’ll pay for their labor in addition to the parts. A dealership might charge you a hundred dollars or more for the repair, while an independent shop might charge less. The repair usually takes less than an hour, so the labor shouldn’t be too expensive.
When you think about it, fixing your visor yourself is almost always cheaper than taking it to a shop, and it’s actually pretty simple. Most people can do it without any special knowledge.
Final Thoughts on Fixing Your Drooping Visor
A drooping car visor is annoying, but it’s also one of the easiest car repairs you can do yourself. In most cases, the problem is just a loose bracket that needs tightening, and that takes less than five minutes.
Even if your visor has a more serious problem, you can usually fix it with basic tools and a little patience. Replacing a spring, straightening a rod, or swapping out your entire visor are all jobs that regular people can handle without any special training.
The key is to take your time, inspect your visor carefully to figure out what’s wrong, and then tackle the problem one step at a time. Don’t rush, don’t force anything, and test your work as you go.
Your visor might be small, but it’s an important part of your driving comfort and safety. A drooping visor that blocks your view is definitely something worth fixing. Now that you know how, there’s no reason not to tackle this project yourself and get your visor working like new again.
Remember, the most common fix is just tightening some bolts. Try that first before you assume you need to replace anything. Nine times out of ten, that’s all you’ll need to do. Good luck with your repair, and enjoy your properly working visor once again.

Peterson is an automotive enthusiast and auto parts reviewer with a passion for vehicle maintenance, upgrades, and performance. He enjoys researching and testing car parts, tools, and accessories to help drivers make informed buying decisions. Through AutoPartsTalk.com, Peterson shares honest reviews, practical maintenance tips, and expert guides to keep vehicles running safely and efficiently.