How to Buff a Scratch Out?
Scratches happen. You back out of a tight parking spot and scrape, there goes a shiny line down your car door. Or maybe your coffee table got a nasty mark from moving a box. Or your phone screen picked up a scratch from sitting in your pocket next to your keys.
The good news is that most scratches can be fixed at home. You do not need to be a professional or own fancy tools. You just need the right steps, a little patience, and some basic supplies.
This guide walks you through how to buff a scratch out on different surfaces, including car paint, wood furniture, glass, plastic, and even phone screens. We will keep things simple and use plain language so anyone can follow along, even if you have never buffed anything before in your life.
Let’s get started.
What Does “Buffing” Actually Mean?
Buffing means rubbing a surface with a mild abrasive to smooth it out. Think of it like sanding, but much gentler. When you buff a scratch, you are not removing the scratch by filling it in. Instead, you are gently wearing down the edges around the scratch so the surface becomes level again. This makes the scratch blend into the rest of the material until it is barely visible or gone.
Buffing works well on light to medium scratches. Deep gouges usually need a different fix, like filler or professional repair. But for most everyday scratches, buffing does the trick.
Types of Scratches You Might Deal With
Before you start, it helps to know what kind of scratch you are dealing with. Not all scratches are the same, and the fix depends on how deep the damage goes.
Surface scratches sit on the very top layer. These are shallow marks that catch light but do not go deep into the material. They are the easiest to buff out.
Clear coat scratches (common on cars) go through the top protective layer but do not reach the paint underneath. These take a bit more effort but are still fixable at home.
Paint scratches go through the clear coat and into the paint layer. These need more careful work and sometimes touch-up paint.
Deep scratches or gouges go all the way down to the metal, wood grain, or base material. These are tough to fix with buffing alone and might need filler, sanding, or a professional’s help.
A simple trick to check scratch depth is to run your fingernail across it. If your nail catches on the scratch, it is probably deeper and might need more than just buffing. If your nail glides over it smoothly, you are likely dealing with a surface-level scratch that buffing can easily handle.
Tools and Supplies You Will Need
You do not need to buy expensive gear to start buffing out scratches. Here is a basic list of supplies, and we will note which ones apply to which surface.
- Microfiber cloths (a few of these, always handy)
- Mild soap and water
- Rubbing compound or scratch removal polish
- Fine grit sandpaper (2000 grit or higher, for deeper scratches)
- Car wax or polish (for car paint)
- Toothpaste (yes, really, it works for light scratches)
- Baking soda (for wood and plastic)
- Olive oil or furniture oil (for wood)
- A soft buffing pad or foam applicator
- Painter’s tape (to protect nearby areas)
- A clean, dry cloth for wiping
You likely already have most of these lying around your home. Now let’s break down the process for each type of surface.
How to Buff a Scratch Out of Car Paint
Car scratches are probably the most common reason people search for this topic. Nobody likes seeing a fresh scratch on their vehicle. Here is how to tackle it step by step.
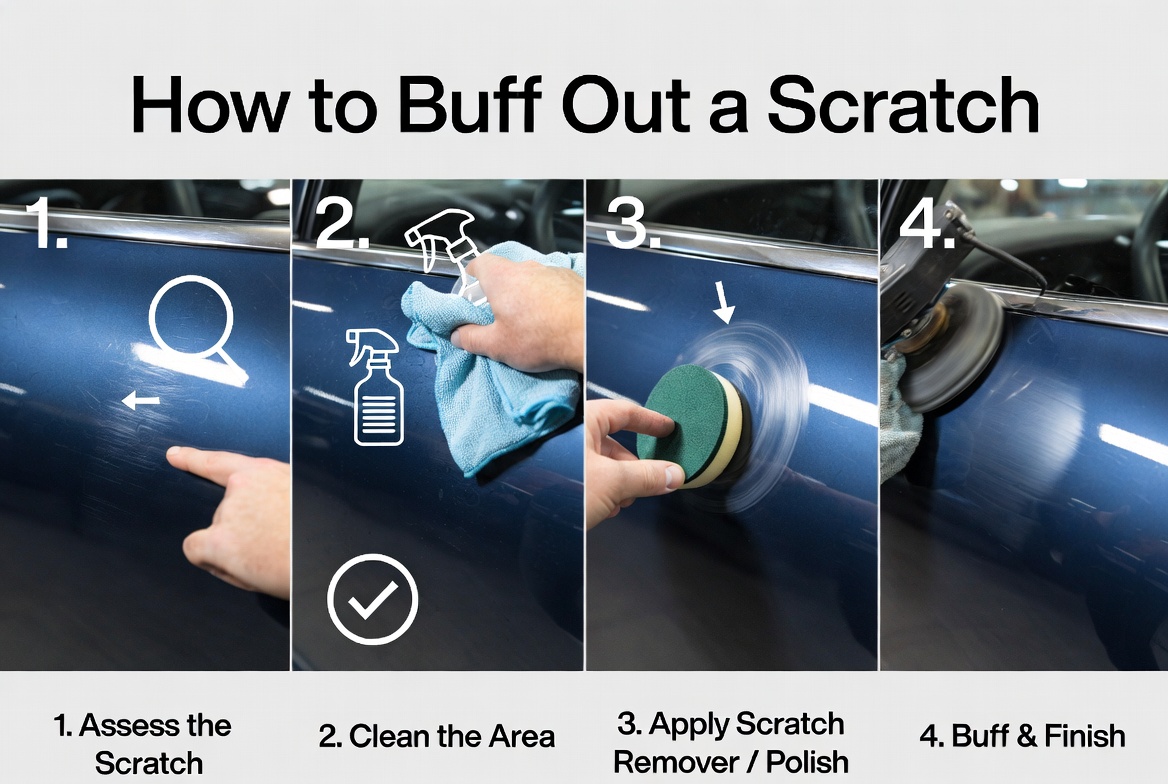
Step 1: Clean the Area First
Grab some soap and water and wash the scratched area thoroughly. Dirt and grime can make the scratch look worse than it is, and you do not want to rub dirt into the paint while buffing. Dry the spot completely with a clean cloth before moving on.
Step 2: Check the Scratch Depth
Run your fingernail over the scratch like we mentioned earlier. If it catches, the scratch has gone past the clear coat. If it glides smoothly, you are dealing with a clear coat scratch, which is much easier to fix.
Step 3: Apply Rubbing Compound
Take a small amount of rubbing compound and put it on a soft cloth or foam applicator. Rub it into the scratch using small circular motions. Keep your pressure light and steady. Do not press too hard, since that can damage the surrounding paint.
Work in one small section at a time, about the size of your palm. Buff for around thirty seconds, then wipe away the compound with a clean microfiber cloth to check your progress.
Step 4: Repeat as Needed
If the scratch is still visible, apply more compound and repeat the process. Most light scratches disappear after two or three rounds of buffing. Deeper ones might take a bit longer, so stay patient and keep at it.
Step 5: Wax and Seal
Once the scratch is gone or greatly faded, apply a coat of car wax over the area. This adds a protective layer and helps blend the buffed spot with the rest of the paint job. It also gives your car that fresh, glossy shine.
A Quick Note on Deep Scratches
If your fingernail catches on the scratch and you can see bare metal or a different color layer underneath, buffing alone will not fix it. In that case, you will need touch-up paint that matches your car’s color, followed by clear coat and then buffing to blend it all together. Auto parts stores can match paint to your vehicle using the paint code, usually found on a sticker inside the driver door.
How to Buff a Scratch Out of Wood Furniture
Wood furniture picks up scratches easily, especially if you have pets, kids, or just move things around a lot. Luckily, wood scratches are often simple to fix with items you already have at home.
Step 1: Clean the Surface
Wipe down the scratched area with a soft, dry cloth to remove dust and debris. A clean surface helps you see the scratch clearly and makes the buffing process more effective.
Step 2: Try a Natural Remedy First
For light scratches, mix equal parts olive oil and vinegar, then rub it gently into the scratch with a soft cloth. This mixture helps hide the scratch by conditioning the wood and blending the color. Let it sit for a few minutes, then wipe away the extra oil.
Another trick is using a walnut. Simply rub a raw walnut over the scratch, and the natural oils inside can fill in and darken the scratch line, making it blend with the wood around it.
Step 3: Use Baking Soda for Deeper Marks
For scratches that need a bit more work, make a paste using baking soda and a small amount of water. Rub the paste into the scratch using a soft cloth, moving in the direction of the wood grain. Let it sit briefly, then wipe clean.
Step 4: Finish with Furniture Polish
Once the scratch has faded, apply a matching furniture polish or wood oil to seal the area and restore shine. This step helps the repaired spot blend smoothly with the rest of the furniture piece.
Tips for Wood Repair
Always work in the direction of the wood grain, never against it. Going against the grain can create new marks or make the existing scratch more noticeable. Also, test any remedy on a hidden spot first, like the underside of a table, to make sure it does not change the wood’s color in an unwanted way.
How to Buff a Scratch Out of Glass
Glass scratches show up on windows, mirrors, glass tables, and even oven doors. While deep glass scratches are hard to remove completely, light surface scratches can often be smoothed out.
Step 1: Clean the Glass
Use glass cleaner and a soft cloth to remove dust, fingerprints, and grime from the scratched area. A clean surface makes it much easier to see the actual scratch.
Step 2: Apply Toothpaste
Non-gel white toothpaste works surprisingly well on light glass scratches. Put a small dab on a soft cloth and rub it into the scratch using gentle, circular motions for about a minute.
Step 3: Wipe and Check
Wipe the area clean with a damp cloth and check your progress. Repeat the toothpaste application two or three times if the scratch is still visible.
Step 4: Try Baking Soda for Stubborn Scratches
If toothpaste alone does not do the job, mix baking soda with a few drops of water to form a thick paste. Apply it the same way, rubbing gently in circles, then wipe clean with a damp cloth.
A Word of Caution
Deep scratches in glass, especially on windshields, are safety concerns and often need professional repair or full replacement. Do not attempt heavy buffing on cracked or deeply gouged glass, since this can weaken the structure further.
How to Buff a Scratch Out of Plastic
Plastic surfaces, like car dashboards, phone cases, and storage bins, scratch easily but are also fairly simple to fix.
Step 1: Clean the Surface
Wipe the plastic down with soap and water, then dry it completely. Any leftover dirt can interfere with the buffing process.
Step 2: Apply a Small Amount of Toothpaste or Baking Soda Paste
Both work well on plastic. Rub a small amount into the scratch using a soft cloth in circular motions for about a minute.
Step 3: Wipe Clean and Inspect
Wipe away the residue and check the scratch. Light scratches usually fade after one or two rounds. For deeper ones, you might need a plastic polish designed specifically for that purpose, which you can find at most hardware or auto stores.
Step 4: Add a Plastic Protectant
Once you are happy with the results, apply a plastic protectant or conditioner to restore shine and protect against future scratches.
How to Buff a Scratch Out of a Phone Screen
Phone screens, especially glass ones, get scratched from keys, coins, or rough pocket lint. Here is a gentle way to reduce their appearance.
Step 1: Turn Off and Clean the Phone
Power down your phone and wipe the screen clean with a microfiber cloth. This removes oils and dust that could interfere with the process.
Step 2: Apply Baking Soda Paste
Mix baking soda with a couple of drops of water to create a thick paste. Using a cotton swab or soft cloth, gently rub the paste into the scratch in small circles.
Step 3: Wipe and Check Progress
Wipe the paste away with a clean, damp cloth and check the screen. Repeat if needed, but avoid pressing too hard since phone screens are delicate.
Step 4: Consider a Screen Protector
For scratches that will not budge, the easiest long-term fix is adding a screen protector. It will not remove the scratch, but it hides it well and prevents new ones from forming.
General Tips for Better Buffing Results
No matter what surface you are working on, a few golden rules apply across the board.
Always test in a hidden spot first. This helps you avoid surprises like discoloration or extra shine spots that do not match the rest of the surface.
Use light pressure. Buffing works through repetition, not force. Pressing too hard can damage the surface further or create new scratches.
Work in small sections. Trying to buff a large area all at once makes it hard to track your progress and increases the chance of uneven results.
Move in circular motions. Circular rubbing spreads the compound evenly and helps blend the repaired area with the surrounding surface.
Clean between each round. Wiping away residue lets you see your actual progress instead of guessing through a layer of compound or paste.
Be patient. Some scratches disappear in minutes, while others take several rounds of buffing over a longer session. Rushing the process often leads to a worse outcome than waiting it out.
When to Call a Professional
While home buffing works for many light to medium scratches, some situations call for expert help.
If a scratch goes all the way down to bare metal on a car, professional paint matching and clear coat work will give you a much better result than a DIY fix. If a mirror or window has a deep gouge, a glass specialist can advise whether repair or replacement makes more sense. And if wood furniture has structural damage beyond a surface scratch, a furniture repair expert can restore it properly without ruining the finish.
There is no shame in calling in help. Sometimes it saves you time, money, and frustration in the long run, especially for expensive items like cars or antique furniture.
Common Mistakes to Avoid
Even with good intentions, it is easy to make small mistakes that slow down your progress or make the scratch worse. Here are a few to watch out for.
Skipping the cleaning step. Buffing over a dirty surface can grind dirt particles into the scratch, causing more damage instead of fixing it.
Using the wrong product for the surface. Rubbing compound made for cars is too harsh for wood or glass, and toothpaste made for teeth is not a full replacement for actual polish on deep scratches.
Applying too much pressure. More force does not mean faster results. It usually just means more damage.
Ignoring the wood grain direction. Rubbing against the grain on wood furniture can create new scratches or uneven color patches.
Not testing first. Skipping the test-spot step can lead to unexpected color changes or shiny patches that stand out instead of blending in.
Frequently Asked Questions
Can toothpaste really remove scratches? Yes, for light surface scratches on glass, plastic, and even some car paint, toothpaste acts as a mild abrasive that smooths the surface. It will not work on deep scratches though.
How long does buffing take? It depends on the scratch depth and the surface type. Light scratches often take just a few minutes, while deeper ones might need repeated sessions over an hour or more.
Will buffing remove the scratch completely? Sometimes yes, sometimes it just makes the scratch much less noticeable. Surface-level scratches usually disappear fully, while deeper ones might fade but remain slightly visible.
Do I need special tools to buff scratches at home? Not really. Most of the items needed, like toothpaste, baking soda, and soft cloths, are things you likely already have around the house. A few extra items, like rubbing compound for cars, are cheap and easy to find at any hardware or auto store.
Is buffing safe for all surfaces? Buffing is generally safe when done gently and correctly, but always test on a hidden area first. Some materials, like certain plastics or coated glass, might react differently than expected.
Final Thoughts
Scratches are annoying, but they are rarely permanent problems. With a bit of patience, the right supplies, and gentle circular motions, you can buff out most scratches on cars, wood, glass, plastic, and even phone screens right from home. Start light, test first, and build up your effort as needed. Before long, that annoying mark will fade into the background, and your surface will look good as new again.
Keep this guide handy for the next time a scratch catches your eye. With these simple steps, you will know exactly what to do without any stress or guesswork.