How to Bench Test an Alternator?
When your car’s battery light comes on or your headlights start dimming while you drive, your alternator might be the culprit. But before you spend hundreds of dollars replacing it, you can test it yourself right in your garage. Bench testing your alternator lets you figure out if it actually needs fixing or if something else is wrong with your vehicle’s electrical system.
This guide walks you through the entire process of bench testing an alternator. We’ll cover everything from safety tips to the actual testing methods. By the end, you’ll know exactly how to check your alternator and decide whether it needs repair or replacement.
What Is an Alternator and Why Does It Matter?
Your alternator is one of the most important parts of your car’s electrical system. It’s a generator that creates electricity to charge your battery while your engine runs. Think of it as your battery’s personal charger. When you drive, the alternator keeps your battery topped up so you can start your car next time and power all your electrical systems.
Without a working alternator, your battery will drain dead pretty quickly. Once that happens, you’ll be stuck on the side of the road with a car that won’t start. That’s why testing your alternator when you suspect problems is smart. It helps you catch issues before they leave you stranded.
The alternator sits in your engine bay and connects to your engine with a serpentine belt. As your engine runs, this belt spins the alternator, which generates electricity. The alternator then sends this power to your battery and electrical system.
Signs Your Alternator Might Have Problems
Before you even think about testing, you should know what warning signs point to alternator trouble. These clues help you decide if testing is really necessary.
Your battery warning light turning on is often the first sign. This light looks like a battery symbol on your dashboard. When it glows, it means your battery isn’t getting charged properly. Many people assume the battery itself is bad, but the alternator could be the real problem.
Dimming headlights or interior lights are another big clue. If your lights get noticeably dimmer when you accelerate or rev the engine, your alternator isn’t keeping up with electrical demand. Headlights should stay bright at any engine speed.
Weak or dead batteries that won’t hold a charge over time point to alternator issues too. If you charge your battery fully and it dies again in a few days, the alternator probably isn’t recharging it while you drive.
Strange noises from your engine area might mean your alternator is failing. A grinding or whining sound that gets louder as you rev the engine could be a bad alternator bearing. Bearings help the alternator spin freely, and worn bearings make noise.
Electrical problems like slow power windows, weak wipers, or dashboard malfunctions can happen when your alternator isn’t keeping enough power flowing through your car’s systems.
Tools and Supplies You’ll Need for Bench Testing
Bench testing means testing your alternator outside of your car, not installed in the engine bay. You’ll need some basic tools and test equipment to do this properly.
A digital multimeter is your main tool. This device measures voltage, current, and resistance. Get one rated for at least 50 amps DC output measurement if possible. You can find decent multimeters at any auto parts store for under fifty dollars.
You need jumper cables or wiring with proper connectors. These let you hook up your alternator to a power source for testing. Make sure they’re rated to handle the amps your alternator produces.
A 12-volt power source is essential. Some people use a battery charger, a fully charged car battery, or a bench power supply. This powers your alternator during testing.
An engine or hand drill helps spin your alternator. Some bench testing methods require you to manually turn the alternator shaft. A drill with a socket adapter works great for this.
Safety glasses and work gloves protect your eyes and hands from spinning parts. Never skip safety gear when working with rotating machinery.
A clean work space matters too. Set up your testing area on a bench or sturdy table. Keep things organized so you don’t lose small parts or create a fire hazard.
Safety First: Critical Precautions Before Testing
Testing an alternator involves electricity and moving parts. Both can hurt you if you’re careless. Always put safety first.
Never test a wet alternator. Water and electricity don’t mix. If your alternator got wet, let it dry completely for at least 24 hours before testing.
Disconnect any batteries before you start taking apart your alternator or connecting test equipment. This prevents accidental shorts that could damage your tools or hurt you.
Wear proper safety glasses whenever you spin the alternator with a drill or by hand. Small brushes, springs, or parts can fly out and hit your face.
Keep loose clothing and long hair tied back. Spinning alternators can grab fabric or hair and pull you in. This is especially true when using a power drill to spin the alternator.
Never touch the alternator’s shaft while it spins. Keep your hands away from all moving parts. Always stop the drill before reaching near the spinning parts.
Let hot alternators cool down before testing. If you just pulled the alternator from your car, it might be extremely hot. Wait at least 30 minutes for it to cool to a safe temperature.
Work in a well-ventilated space. Some testing methods create small amounts of heat or electrical arcing. Good airflow helps prevent problems.
Double-check all your connections before turning on any power. Loose connections can spark or cause damage. Verify each wire connects securely to the right place.
How to Remove Your Alternator Safely
Before you can bench test your alternator, you need to get it out of your car. This is straightforward but requires care.
Start by disconnecting your negative battery terminal. This cuts power to the entire electrical system and makes it safe to work with electrical parts. Use a wrench to loosen the negative terminal nut and pull the terminal away from the battery post.
Locate your alternator in the engine bay. It usually sits on the side of the engine and has a large wire coming out of it. Your owner’s manual shows exactly where it is if you get lost.
Disconnect the alternator’s main power wire. This is typically a large wire connected with a nut. Use a socket wrench to remove it. This wire carries electrical current from the alternator to your battery, so removing it safely is important.
Unplug the alternator connector. Most alternators have a two or three-pin electrical connector. Press or pull the connector clip to disconnect it, then wiggle it free.
Remove the serpentine belt if needed. Some cars let you remove the alternator while the belt stays on. Others require belt removal. Check your owner’s manual for your specific car. If you must remove the belt, take a photo first so you remember how it routes.
Unbolt the alternator from its mounts. Usually two or three bolts hold it in place. Use the right socket size so you don’t strip the bolt heads. Remove all bolts completely and set them somewhere safe.
Carefully pull the alternator away from the engine. Watch out for tight spaces that might catch the alternator or nearby hoses. Sometimes twisting the alternator slightly helps it slide out easier.
Set the alternator down gently on your work bench. Don’t drop it or bash it around. Rough handling can damage internal parts.
Method One: The Multimeter Voltage Test
This is the simplest bench test method. It tells you if your alternator produces the right voltage when it spins. This test gives you quick information without much setup.
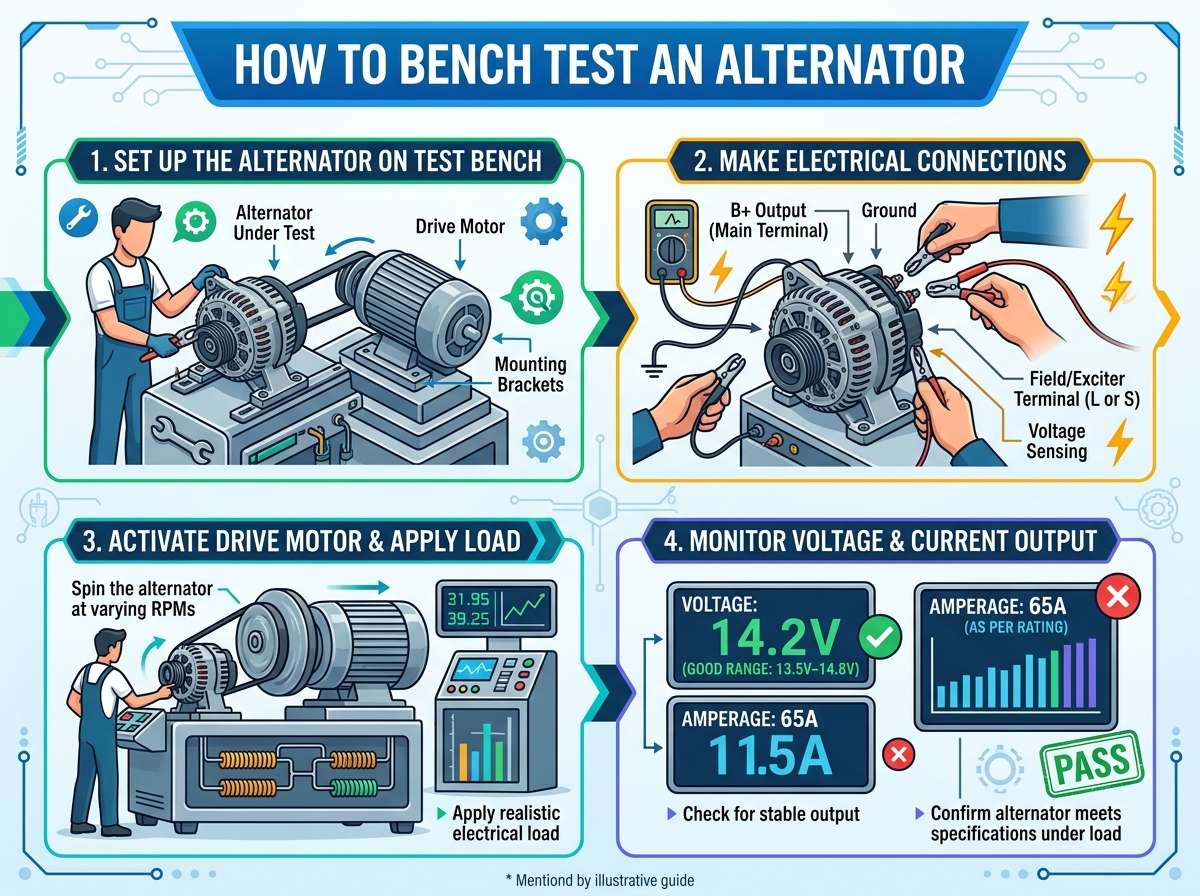
Set your multimeter to the DC voltage setting. You want the 20-volt range or higher. Make sure your multimeter is working by testing it on a known battery first. Touch the red probe to the positive terminal and the black probe to the negative. It should read about 12 volts.
Connect your 12-volt power source to your alternator’s battery positive and ground terminals. Check your alternator’s manual or wiring diagram to find these terminals. Usually they’re labeled on the alternator body or connector.
Connect your multimeter probes to the alternator output terminals. Again, red probe to positive and black probe to ground. Don’t turn on the power yet.
Safely spin the alternator using your drill or by hand. Start slowly and watch your multimeter reading. A good alternator should show 13 to 15 volts when spinning at moderate speed. Some should hit 16 volts at higher speeds, but most stay around 13.5 to 14.5 volts.
If the voltage stays near 12 volts or doesn’t increase when you spin faster, your alternator has problems. It’s not generating electricity like it should.
If the voltage climbs above 16 volts or keeps climbing without stopping, your voltage regulator might be bad. This part controls how much voltage the alternator produces. A stuck or broken regulator can overcharge your battery.
Check the voltage at different spin speeds. Spin slow, then spin fast. The voltage should increase a little bit with speed but then level off. If it jumps wildly or spikes, something’s wrong internally.
Take note of your readings and compare them to your alternator’s specifications. Your owner’s manual or the alternator’s data sheet tells you the normal range for your specific model.
Method Two: The Load Test for Real-World Performance
Load testing is more thorough than just measuring voltage. It tells you how well your alternator handles electrical demand, which is how it works in your actual car.
Connect your alternator to your 12-volt power source as before. This time, you’ll also need a load resistor or a way to draw current from the alternator.
Some people use a 12-volt light bulb as a load. A typical car headlight bulb draws about 5 to 10 amps. You can create a simple load by wiring a headlight socket with a bulb into your alternator’s output circuit.
Connect your multimeter in series with the load to measure current flow. This shows how many amps your alternator produces. Set your multimeter to the DC amps setting and choose the 50 amp range or higher if available.
Spin your alternator at moderate speed using your drill. Watch both the voltage and current readings. Your alternator should maintain 13 to 14 volts while producing its rated current. If your alternator is rated for 100 amps, it should produce close to that number.
Gradually increase the load while spinning the alternator faster. Add more resistance or more light bulbs to draw more power. Watch the voltage and current change as you do this.
A healthy alternator maintains relatively constant voltage even as the load increases. The voltage might drop slightly, but it shouldn’t fall below 13 volts unless the load is extremely high.
If the voltage collapses or drops dramatically when you add load, your alternator can’t handle the demand. This means it would fail in a real car situation where everything is running at once.
If the current doesn’t increase when you increase the load, something is wrong internally. The alternator should produce more current when asked to.
Run this test for several minutes to make sure everything stays stable. Temperature changes can affect performance, so a quick test might miss problems that show up after the alternator warms up.
Method Three: The Bearing and Mechanical Test
Beyond electrical testing, you should check if your alternator’s mechanical parts are in good shape. Alternators have bearings that let the rotor spin freely, and bad bearings cause problems even if the electrical output seems okay.
Spin the alternator shaft by hand with your alternator unpowered. It should spin freely with minimal resistance. You should be able to grab the shaft and spin it easily with just your fingers.
Listen closely as it spins. You should hear nothing except smooth, quiet spinning. Any grinding, squealing, or rough sound means the bearings are worn out.
Feel the alternator as it spins. It should feel smooth and consistent. Roughness or catching sensations point to bearing trouble.
Check for play in the alternator shaft. Grab the shaft and try to move it up and down, side to side, and front to back. The shaft should have almost no movement. Significant play means the bearings are shot and need replacement.
Look at the alternator housing and pulleys for damage, cracks, or warping. Even small cracks can cause problems. Look closely around all mounting points and where the pulley sits.
Make sure the pulley spins true without wobbling. A bent or damaged pulley throws off the belt alignment and can damage everything around it.
Check that all exterior bolts and mounting points are tight. Loose bolts let the alternator vibrate too much, which damages bearings faster.
Inspect the brushes if you can access them. These are small carbon blocks that conduct electricity to the rotating parts. They should be dark but not crumbly or short. Worn brushes usually need replacement.
Understanding Your Test Results
After running your bench tests, you need to understand what your numbers mean.
Voltage between 13 and 15 volts while spinning at moderate speed is good. Your alternator is charging properly.
Voltage between 15 and 16 volts is still acceptable but on the high side. Check your voltage regulator settings if possible.
Voltage above 16 volts suggests a faulty voltage regulator. Your alternator is producing too much electricity and could overcharge your battery.
Voltage below 13 volts while spinning at medium speed is bad. Your alternator isn’t charging enough. It needs repair or replacement.
Voltage that drops dramatically when you add an electrical load points to internal resistance or winding problems. The alternator can’t deliver power efficiently.
Current output that’s much lower than your alternator’s rating means internal failure. Burned windings, shorted diodes, or other internal damage causes this.
A grinding noise that gets worse as you spin faster indicates worn bearings. Bearing replacement is needed.
Shaft play that’s noticeable suggests the bearing is completely worn out and dangerous to use.
A smooth, quiet alternator with stable voltage and good current output at all speeds is healthy. You can put it back in your car with confidence.
When to Replace Versus When to Repair
Finding out what’s wrong with your alternator is just the first step. Next, you decide whether repair or replacement makes sense.
Simple problems like a loose pulley or external connector can be fixed easily. If that’s all you find, repair is smart and affordable.
Worn bearings can be replaced if you have access to bearing puller tools and are comfortable taking the alternator completely apart. However, bearing replacement requires significant skill and takes several hours.
Voltage regulator problems sometimes mean you can replace just the regulator. Some alternators have external regulators that unplug. Others have internal regulators that require complete alternator disassembly.
Burned windings, shorted diodes, or internal electrical damage almost always mean alternator replacement. Internal damage is too complex to repair for most people, and parts are often more expensive than a replacement alternator.
If your alternator is old with many miles on it, replacement might be wiser even if only one part failed. Once one thing goes bad, other parts usually aren’t far behind.
For newer cars with expensive original equipment alternators, rebuilding or repair shops can sometimes fix them affordably. For older cars, finding a used alternator from a salvage yard often costs less than repair.
Consider warranty options too. A rebuilt alternator from an auto parts store usually comes with a good warranty. This gives you peace of mind if something goes wrong quickly.
Installing Your Alternator Back in Your Car
Once you’ve tested your alternator and decided whether to use it, reinstall it in your car if it’s good.
Start with a clean alternator. Wipe away any dust or oil buildup before installation.
Slide the alternator back into position in your engine bay. Line up the mounting holes with the bracket holes.
Install the mounting bolts by hand first. Get all bolts started so the alternator sits in the right place. Then tighten them snug with your socket wrench.
Connect the main power wire to the alternator. Use a wrench to tighten the terminal nut securely. This connection must be tight to prevent voltage drops.
Plug in the electrical connector. Push it in firmly until you hear or feel it click. The connector should require a little force to remove, not come off easily.
Reinstall the serpentine belt if you removed it. Route it exactly as it was before, following the diagram under your hood or in your manual. The belt must sit properly in all pulley grooves.
Reconnect your negative battery terminal. Tighten the terminal nut securely. Your electrical system is now active again.
Start your engine and check that everything works. The battery light should turn off once your engine starts. Test your lights, wipers, and other electrical systems.
Verify that your headlights stay bright when you rev the engine. Dimming lights mean the alternator isn’t charging properly, and you need to investigate further.
Let your car run for at least ten minutes. The alternator should warm up and continue working smoothly.
Troubleshooting Common Test Problems
Sometimes your tests don’t work out smoothly. Here’s how to handle common issues.
If your multimeter reads zero volts no matter how fast you spin the alternator, check your connections first. Loose connections often cause false readings. Reseat every connection and try again.
If the alternator still produces zero volts after rechecking connections, the alternator is completely dead internally. It needs replacement.
If you get inconsistent readings that jump around, you might have a bad connection that’s making and breaking contact. Wiggle every connection while watching your multimeter. If the reading jumps, you found the problem.
Alternators with corroded terminals might give false low readings. Clean the terminals and contacts with a wire brush before testing.
If your drill won’t spin the alternator, the rotor might be seized. This happens when an alternator sits unused for a long time or has internal corrosion. Free it up with some penetrating oil and tapping gently with a hammer.
If you get normal voltage readings but strange sounds, your bearings might be making noise. Listen closely during the mechanical test to pinpoint where the sound comes from.
If the voltage climbs very high when you just start spinning and then drops back to normal, the regulator might be cycling. This is normal behavior for some alternators.
Tips for Accurate Testing
Getting accurate test results requires careful technique and attention to detail.
Make sure your multimeter is in good working order before starting. Test it on a known battery to verify it’s accurate.
Keep all connections clean and tight. Corrosion or loose connections throw off your readings completely.
Spin the alternator at consistent speeds during testing. Erratic spinning speed gives inconsistent voltage and current readings.
Let the alternator warm up a bit before taking final readings. Electrical components behave differently at different temperatures.
Repeat your tests a few times and average the results. This accounts for minor variations and gives you more confidence in your findings.
Write down your results as you go. Don’t trust your memory. Numbers that seemed clear at the moment get confused later when you’re deciding about repair or replacement.
Compare your results to your alternator’s actual specifications, not generic ranges. Different alternators have different output ratings, and this matters.
Test in a well-lit area where you can see your multimeter clearly. Bad lighting causes reading errors.
Keep your test area organized. Losing a connection or forgetting where something plugged in wastes time and risks mistakes.
Conclusion: You Can Handle This
Bench testing an alternator isn’t magic or rocket science. It’s just a straightforward process that any car owner can handle with basic tools and a little patience. By testing your alternator before spending money on replacement, you save time and money.
The information you get from bench testing guides your next decision. Sometimes a simple fix gets your alternator working again. Other times the test confirms that replacement is your only good option.
Remember that alternators fail for reasons. If you replace your old one with a new one, figure out why it failed. Bad grounds, wiring problems, or a faulty voltage regulator might have caused the failure. Fixing the underlying problem keeps your new alternator from dying early too.
Take your time with the testing process. Rushing leads to mistakes and bad decisions. Follow the steps in order, take good notes, and don’t skip the safety precautions.
Your alternator is too important to ignore when problems start. Test it, find out what’s wrong, and fix it right. Your car’s electrical system will thank you, and you’ll be able to drive without worrying about getting stranded with a dead battery.

Peterson is an automotive enthusiast and auto parts reviewer with a passion for vehicle maintenance, upgrades, and performance. He enjoys researching and testing car parts, tools, and accessories to help drivers make informed buying decisions. Through AutoPartsTalk.com, Peterson shares honest reviews, practical maintenance tips, and expert guides to keep vehicles running safely and efficiently.