How to Install a Bike Hitch Rack?
So you want to take your bikes on a road trip, but you don’t have the space inside your vehicle. A bike hitch rack might be the perfect solution for you. The good news? Installing one is easier than you think, and you don’t need special skills or experience to get it done.
In this guide, I’ll walk you through everything you need to know about getting a bike carrier hitch mounted on your car. We’ll cover the tools you’ll need, the step-by-step process, and some helpful tips to make sure your bikes are secure and ready for adventure.
What Exactly Is a Bike Hitch Rack?
A bike hitch rack is a carrier that attaches to your vehicle’s hitch receiver. Think of it as a platform that extends from the back of your car or truck where your bikes sit during transport. Most people use hitch racks because they’re affordable, easy to use, and work with almost any vehicle that has a hitch.
These racks come in different styles. Some hold just one or two bikes, while others can carry up to five bikes. The most common types are platform-style racks and hanging racks, both of which bolt directly to your vehicle’s hitch receiver.
Why Choose a Hitch-Mounted Bike Carrier?
Before we get into the installation, let’s talk about why so many people love hitch racks. First, they’re really simple to install. Second, they keep your bikes off your roof and away from your trunk, so you have easy access to both. Third, they’re generally cheaper than roof racks. Finally, they work great for long road trips because you can carry multiple bikes without worrying about space.
What Tools Do You Need?
The beautiful thing about installing a bike hitch rack is that you probably already have most of the tools at home. Here’s what you’ll need:
Basic tools:
- Socket wrench set or adjustable wrench
- Torque wrench (if your rack comes with specific bolt tightness requirements)
- Phillips head screwdriver
- Flathead screwdriver
- Rubber mallet (optional but helpful)
- Work gloves
Additional items:
- Measuring tape
- Flashlight (to see under your vehicle better)
- Grease or anti-seize lubricant
- Rags or towels
Most modern bike hitch carriers come with everything you need in the box, so you won’t have to buy special equipment just to install it. The manufacturer usually provides all the bolts, washers, and brackets required for setup.
Understand Your Vehicle’s Hitch Receiver
Before you start the installation, you need to know about your vehicle’s hitch receiver. This is the square or rectangular opening at the back of your car where the rack will slide in.
Hitch receivers come in different sizes. The most common sizes are one-inch and one-and-a-quarter-inch receivers. You can find your receiver size by looking at the numbers stamped inside the opening. You can also check your vehicle’s manual or ask at an auto parts store.
Make sure you know your receiver size before you buy a hitch rack. A rack designed for a 1.25-inch receiver won’t fit properly in a 1-inch receiver, and vice versa. Getting the right size is crucial for safe installation.
Prepare Your Vehicle and Workspace
Start by finding a safe, flat location to work. An empty parking lot or a flat driveway works great. Make sure you have plenty of space around your vehicle so you can move around easily.
Park your vehicle and turn off the engine. If you have a garage, that’s even better because it protects you from the elements while you work. Let your vehicle cool down if you’ve been driving it recently.
Next, inspect the hitch receiver area. Look for any dirt, rust, or debris. Use a rag to clean out the receiver opening. If you see rust, don’t worry. You can still install the rack, and the bolts will help prevent future rust from spreading.
Apply a small amount of grease or anti-seize lubricant to the hitch pin holes. This will make installation smoother and prevent the bolts from getting stuck in the future.
Get Familiar with Your Bike Hitch Rack
Take time to unpack your new bike carrier and lay out all the parts on a clean surface. Read through the instruction manual that comes with the rack. Yes, really read it. Different manufacturers have different installation methods, and you want to make sure you follow the specific steps for your model.
Identify all the components:
- The main rack frame or platform
- Mounting bolts and washers
- Straps or clamps for securing bikes
- Any brackets or adapters
- The hitch pin
- Safety cable or strap
- Instruction manual
Count the bolts and make sure you have all the pieces listed in the manual. Missing parts now means stopping your work later. If something is missing, contact the manufacturer before you start.
Mount the Hitch Rack to Your Vehicle
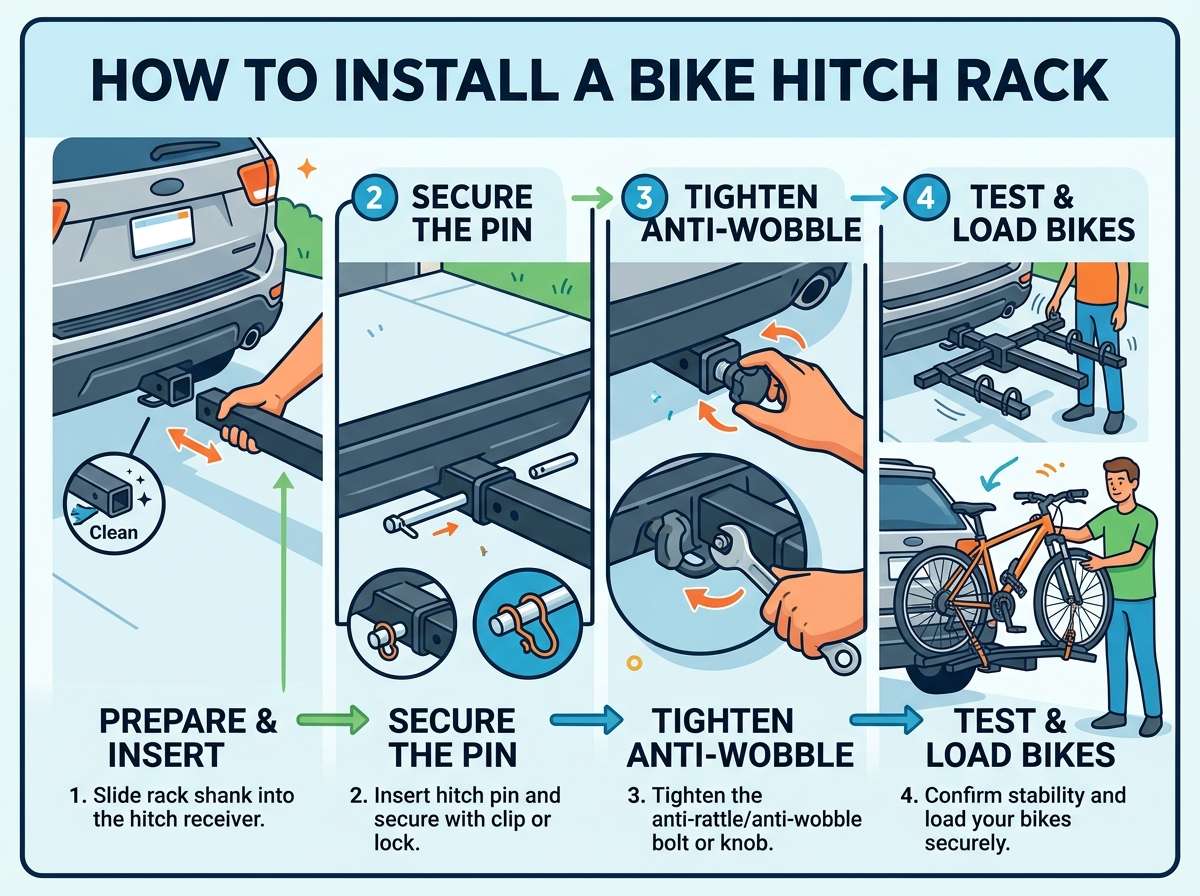
This is the main event. Here’s how to do it step by step:
Step One: Align the Rack Slide the rack’s mounting shaft into the hitch receiver. You want it to go in straight, so have someone help you guide it if possible. The shaft should slide in smoothly. If it feels tight or like it’s hitting something, pull it back out and check for debris in the receiver.
Step Two: Insert the Hitch Pin Once the mounting shaft is fully inserted into the receiver, you’ll insert the hitch pin through the receiver opening. This pin keeps the rack from sliding out while you drive. Push the pin all the way through until you hear or feel it click into place.
Step Three: Add the Security Clip Most racks come with a security clip that goes around the hitch pin. This clip prevents the pin from vibrating loose during travel. Slide the clip over the pin until it’s snug against the receiver.
Step Four: Tighten All Bolts Now it’s time to secure everything with bolts. Most bike hitch racks have four to six bolts that thread into the hitch receiver or the rack mounting plate. Use your socket wrench or adjustable wrench to tighten each bolt.
Start with finger-tight. This means you tighten the bolts by hand until they’re snug but not with full force. Then go back and tighten them properly with your wrench. Use a torque wrench if your manual specifies bolt tightness. If no specification is given, make them tight enough that the rack doesn’t move when you push it, but not so tight that you strip the threads.
Step Five: Double-Check Everything Grab the rack and try to wiggle it side to side and front to back. It should be completely solid with no movement. If you feel any give, go back and tighten the bolts more.
Check the hitch pin. Make sure it goes all the way through the receiver and that the security clip holds it in place. Try to pull the rack forward. It shouldn’t move.
Install the Bike Straps and Clamps
Now that your rack is mounted, it’s time to set up the components that hold your bikes in place.
Most hitch racks have either arm-style clamps or platform straps. Arm-style clamps have individual arms that hold each wheel in place. Platform straps are webbing that goes across your bike frame.
For arm clamps: Place each bike on the rack. Position the arms so they grab the bike wheels securely. Tighten the clamp bolts enough that the arms hold the wheel firmly but not so tight that they damage the wheel or tire.
For platform straps: Place your bike frame on the platform. Thread the straps through the attachment points. Tighten the straps so your bike frame is snug against the platform. You want it held tight but not so tight that it dents your frame.
Test each bike by lifting the rack slightly and shaking it gently. Your bikes should not move or make noise. If they do, tighten the clamps or straps more.
Secure Your Bikes with Safety Cables
Even with the straps and clamps, adding a security cable gives you extra peace of mind. Most hitch racks come with a cable that threads through your bike wheels or frames and attaches to the rack.
Thread the cable through the wheel or frame of each bike. Connect the cable to the lock points on the rack. Make it tight so that someone can’t quickly pull a bike free. This security cable won’t stop a determined bike thief, but it will prevent someone from easily grabbing your bike at a rest stop.
Adjust Lights and License Plate
Before you hit the road, check if your hitch rack blocks your vehicle’s lights or license plate. Many jurisdictions require that your lights and license plate remain visible and functional.
If your rack blocks the plate, you have a few options. You can get an extension bracket that moves your license plate higher. You can also install bike lights on the rack itself to ensure your vehicle is visible to other drivers.
Make sure all your vehicle’s brake lights and turn signals work after the rack installation. Have a friend stand behind your car while you test the lights.
Load Your Bikes Correctly
Now for the fun part: loading your bikes. Here’s how to do it safely:
Step One: Start with the Heaviest Bike Load your heaviest bike first. It should go in the position closest to your vehicle. This distributes weight evenly and keeps the rack balanced.
Step Two: Lower the Bikes onto the Rack Gently lower each bike onto the rack. Don’t just drop them. Guide them into position slowly so they rest securely in the clamps or on the platform.
Step Three: Secure the First Bike Tighten all clamps or straps for the first bike before adding the next one. Make sure it’s completely secure and won’t move.
Step Four: Add the Second Bike If you’re loading two bikes, the second one should also be positioned securely. Most two-bike racks allow both bikes to rest side by side or with one slightly behind the other.
Step Five: Secure with Safety Features Thread your security cable through both bikes. Tighten any straps or clamps one final time. Give the rack a gentle shake to confirm nothing moves.
Make Final Safety Checks
Before you drive away, complete this checklist:
- The hitch pin is fully inserted and the security clip is in place
- All bolts are tight and the rack doesn’t wiggle on the vehicle
- Bike clamps or straps are tight and bikes don’t move
- The security cable is threaded and locked
- Your license plate is visible
- Your brake lights work
- Your turn signals work
- Side mirrors are clear and not blocked by bikes
Don’t skip these checks. They take five minutes and could prevent an accident or bike theft.
Important Tips for Bike Rack Safety
Keep these points in mind as you use your new bike hitch carrier:
Weight Limits Matter Every hitch rack has a maximum weight capacity. Check your manual and never exceed it. Overloading your rack puts stress on your vehicle’s hitch and can damage it. It also makes your vehicle harder to handle on the road.
Regular Inspections Before each trip, inspect your rack and bikes. Look for loose bolts, bent arms, or damaged straps. Tighten anything that’s loose. A quick five-minute check prevents problems down the road.
Protect Your Bike Paint The clamps on your rack might scratch your bike frame over time. You can prevent this by wrapping the clamp contact points with foam padding or old towels. This cushioning protects your bike’s paint.
Watch Your Clearance Remember that your hitch rack extends beyond your vehicle’s normal width and length. When backing up or making tight turns, give yourself extra space. Your bikes now make your vehicle longer and wider.
Secure Your Bikes When Parked Even though your bikes are on the rack, lock them up when you stop. Use a cable or chain lock that goes through your bike wheels and frames. Don’t rely only on the rack straps to prevent theft.
Troubleshooting Common Issues
Bikes Make Noise While Driving This usually means the straps or clamps aren’t tight enough. Pull over safely, tighten everything, and test again. Noise often comes from the security cable rattling as well, so check that it’s not loose.
The Rack Moves or Wiggles Stop driving immediately and check your bolts. A loose bolt is the most common cause. Tighten all bolts and make sure the hitch pin is fully inserted.
One Bike Sits Lower Than Others This happens when the clamp or strap isn’t positioned correctly. Loosen the clamp, reposition the bike, and tighten again. All bikes should sit at roughly the same height.
The Hitch Pin Won’t Go In If the pin is hard to insert, the receiver might be misaligned with the mounting shaft. Pull the rack slightly backward and try again. You might also need to apply gentle pressure with a rubber mallet.
Paint Damage on Mounting Area If your vehicle’s hitch paint is chipped, coat the area with touch-up paint or clear nail polish. This prevents rust from starting.
Different Types of Hitch Racks Explained
While most hitch racks work similarly, they come in a few different styles. Let’s break them down:
Platform-Style Racks These have a flat platform where bikes rest. They’re great for heavier bikes and e-bikes because the platform provides solid support. They’re also easy to load and unload.
Hanging or Swing-Down Racks These have arms that hang your bikes by the frame or wheels. They’re compact and often lighter weight. They work well for road bikes and lighter mountain bikes.
Tilting Racks Some racks tilt or swing away from the vehicle. This is helpful if you need access to your trunk or tailgate. Tilting racks are convenient but slightly more complicated to install and use.
Gravity or Gravity-Fed Racks These use gravity to keep bikes in place. They’re simple and reliable, though not all bike types fit them well.
Pick the style that matches your bikes and your needs. All styles install similarly to what we’ve covered in this guide.
Maintenance Tips for Your Hitch Rack
Your bike hitch carrier will last longer with proper care:
Clean Regularly After drives, especially in rain or salt spray, rinse your rack with water. Dry it with a rag. This prevents rust and keeps everything looking good.
Check Bolts Monthly Vibration from driving can loosen bolts over time. Check them once a month, even if you’re not using the rack. Tighten any that have come loose.
Apply Lubricant Once or twice a year, apply a thin coat of lubricant to the hitch pin and bolts. This prevents rust and makes future removal easier.
Store Properly If you won’t use your rack for a while, store it in a dry place. You can leave it mounted on your vehicle, but covering it with a tarp protects it from weather.
Inspect After Impacts If you hit a pothole or bump your vehicle, check the rack afterward. Look for bent metal or loose components. Address any damage right away.
Final Thoughts
Installing a bike hitch rack is a straightforward project that takes an hour or less once you have all the parts. You don’t need special skills, expensive tools, or a professional mechanic. Just follow these steps, take your time, and double-check everything before you drive away.
Once your rack is installed and your bikes are secure, you’ll be ready for adventures. Whether you’re heading to a trailhead, exploring a new town, or just enjoying a weekend getaway, your bikes will be safe and secure on the back of your vehicle.
The key to success is reading your specific manual, taking time with each step, and doing a final safety check before hitting the road. When you do this right, you can transport your bikes confidently to any destination. Now get out there and enjoy those bike rides!

Peterson is an automotive enthusiast and auto parts reviewer with a passion for vehicle maintenance, upgrades, and performance. He enjoys researching and testing car parts, tools, and accessories to help drivers make informed buying decisions. Through AutoPartsTalk.com, Peterson shares honest reviews, practical maintenance tips, and expert guides to keep vehicles running safely and efficiently.